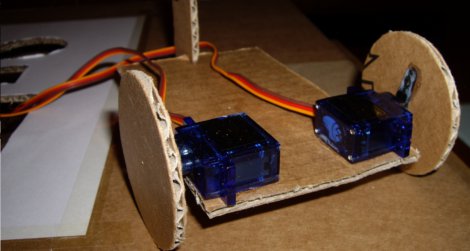
We love cheap stuff here. Who doesn’t? [Oscar Rodriguez Parra] does too, and wrote in to show us his super cheapey robot L.I.O.S. The build was for the AFRON design challenge, which involves building a 10 dollar robot to teach students robotics. The winners of the challenge were neat and all, but they all look too fancy flaunting their molded plastics and electronics breadboards.
[Oscar’s] design is super simple, LDRs as eyes, a PIC12F683 to do the brainin, LEDs for indicators and a couple modded servos to drive the wheels. An extraordinarily complex cardboard flap roller helps the cart turn, but probably isn’t going to see much aside from smooth flooring. The electronics are mounted using one of our favorite techniques, the paper perf board (very similar to the substrate free technique).
Check out the video after the jump to see LIOS in action. This is an excellent introduction to robotics for any classroom. Thanks [Oscar]!
[youtube=http://www.youtube.com/watch?v=jwrVHF3-TMw&w=470]


Glad to see someone else using the old “paper perfboard” too! I used to draw my somewhat blown up schematic on a pizza box and just punch thru components and tap solder. Less confusing than dead bug if it is your first build and less confusing for newbies as ya don’t have to count holes etc. I do recommend rectifying the pinouts on ICs from the usual spider legs on schematics lol. “Yeah so what if pin 8 is on the other side, we are going to put it over here in the schematic to be closer to his pal the resistor…” Cheers to all and I love the simple builds :)
It is a nice contribution but the Pikit 2 is around $60 whereas an ARM chip is around $1.50 and an FTDI cable is $20 or a USB dongle is $29.
An ATMega16u4 pre flashed at the factory with USB DFU bootloader is not much more. Neither of these come in DIP packages though.
I suggest PIC12F1840 ($1.18 in onesies) as a good 8 pin DIP replacement for the PIC12F683 and a PicKit2 clone from Ebay to program it (about $12). The 12F1840 is cheaper, has many more peripherals built in such as UART and better timers and has a sort of crossbar/CPLD so the pin layout can be reprogrammed.
Get a PICKIT 3.
$60? Microchip’s website sells these direct for $35.
I grabbed my PICkit 2 for $20. Microchip publishes the schematics for their PICkits, so even the newest PICkit 3 is available on eBay for under $30.
Very Arvind Gupta! That’s one of my preferred Quickest and Dirtiest Technique to make robots. My Number one involves:
– styrofoam from unused plates, and cups, very rigid and easy to cut with scissors! (Wheels,pulleys and chassis)
Toothpicks, bamboo skewers, and straws to make axes and bearings!
Rubber Bands! to make return mechanism and belt transmissions!
The only tools you will need: scissors, hot glue gun, wire cutter (to do clean cuts in the skewers), pencil, and compass!
In the electronics side:
Cardboard (as breadboard), soldering iron, solder, wire.
Great build. Its nice to see people actually stick to the design constraints of these competitions. A couple of things I would add (off the top of my head). Rubber bands around the wheels for better traction. I believe we saw that somewhere on HAD recently. And I would have used a simple wheel block from a standard LEGO set on a free spinning rod on the back for stabilization instead of the piece of cardboard dragging on the floor, which adds friction and slows down the robot. Nice build either way.
I’m impressed!
I’d make one ‘cept my apartment is carpeted. A problem to solve!
To overcome more difficult terrain, I wonder if you can just tie a couple of zipties to the axle instead of using a rigid wheel. Something more like what RHex uses, but without having to go to a hexapod design:
http://en.wikipedia.org/wiki/File:Rhex.jpg
It never ceases to amaze me how cheap micro servos have become. But if you want to shave another $5 off this build, you could scavenge some nice DC motors from old CD drives for free. Might even be able to reuse some of the gears to reduce the rpm.