What’s Inside A Super-Cheap Projector? Not A Lot!

[Raymond Ma] has a penchant for browsing Aliexpress and purchasing curious pieces of hardware that are as high on promises as they are low on cost. This is a process he aptly sums up with his opening line of “I should have known better, but…” Luckily, these devices all get torn down and analyzed so we can each enjoy and share a little slice of disappointment.

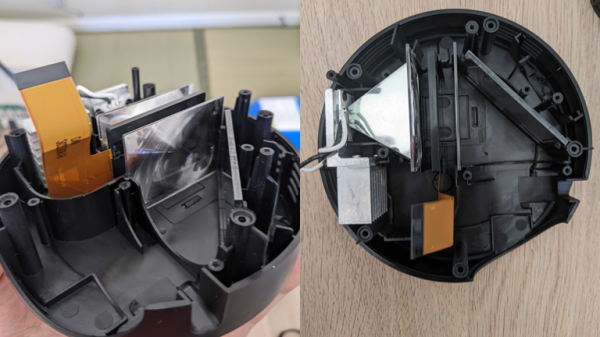
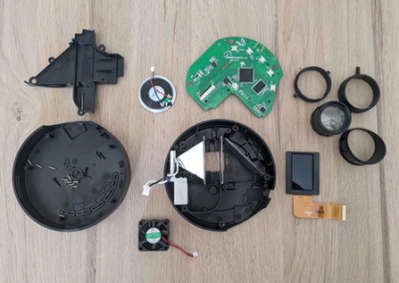
One such item is the $30 USD YT200 mini projector, which at 320×180 is almost as low on pixels as it is on cost. Still, [Raymond] looks inside to find out if there is perhaps more hacking potential than there is image resolution.

The YT200 lacks any kind of normal video input, and the anemic 15 lumen output is brazenly branded as a feature to protect children’s eyes from excessive brightness.

Light from the single LED is collimated with some Fresnel lenses. That light passes through an LCD panel, and from there the image bounces off a mirror and through a focusing lens housed in a spiral guide. Focal adjustments are made with a small lever, and the whole assembly provides just enough friction to prevent the lens from moving out of focus on its own.

The device actually does work fairly well for what it is: a way to play a range of different media types off a connected USB storage device. As long as one is in a dark room, anyway.

[Raymond] hopes to find some alternate use for the device. Might we suggest projecting into a frosted glass globe to create a sort of spherical display? A spooky eye animation on a USB stick might pair well with that.

When Combat Robot Wheels Need To Be Nice And Cheap (But Mostly Cheap)

It started with [CHORL] making a promise to himself regarding constructing a new combat robot: no spending of money on the new robot.

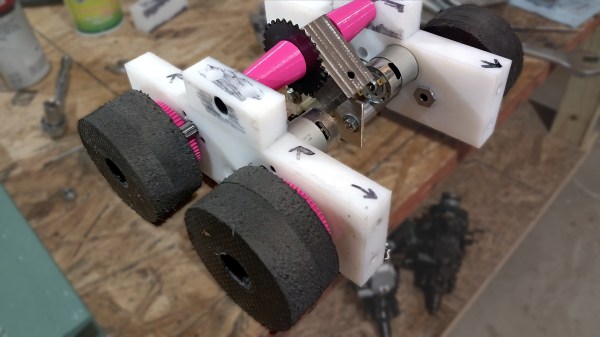
That rule was violated (but only a little) by making his robot’s wheels out of EVA kneeling pads. EVA (Ethylene-Vinyl Acetate) is a closed-cell foam that makes for durable yoga mats, kneeling pads, and products of a similar nature. [CHORL] found a way to turn them into light but serviceable wheels for his robot: the Susquehanna Boxcar.

Nested hole saws create concentric holes. Perfect for wheels.

Here’s how the wheels were made: [CHORL] began with two hole saws. Nesting a smaller hole saw into a larger one by putting both on the same arbor created a saw with two holes, both of which were centered with respect to one another. The only problem was that this hole saw was not actually deep enough to cut completely through the thick foam. Luckily, cutting roughly halfway through on one side, then flipping the sheet over and cutting through from the other side was a good workaround. That took care of turning the thick foam sheet into round wheels.

A 3D-printed part served as a wheel hub as well as gear for the drivetrain. We want to call attention to the clever method of reinforcing the connection between the parts. [CHORL] didn’t want to just glue the geared hub directly to the surface of the foam wheel, because he suspected it might separate under stress. To address this, he designed six slots into the hub, cut matching slots into the foam wheel, and inserted six spline-like reinforcements in the form of some ABS strips he had on hand. Gluing it all together with E-6000 and leaving it to cure overnight under a weight resulted in a geared wheel assembly that [CHORL] judged to be about as round and rigid as a wheel should be, so the robot had a solution for nice light wheels that were, above all, cheap!

Lots of robots need wheels, and unsurprisingly, DIY solutions are common projects. [CHORL]’s approach here looks pretty scalable, as long as one can cut some accurate holes.

Interested in knowing more about the robot these wheels are destined for? [CHORL]’s still working on the Susquehanna Boxcar, but it’s almost done, and you can read a bit more about it (and see a few more pictures) here.

Camping For $25: Thrift Store Hacks To Keep Cozy

A hacker is somebody who’s always thinking creatively to solve problems, usually using what they have on hand. Sometimes that means using a 555 to build a CPU, and other times it means using a dead flashlight to start a fire. In the video below the break, [Kelly] shows us a series of hacks you can use while camping in the woods for a night to keep you warm, dry, and well fed!

[Kelly] started his camping trip not in the woods, but rather at a local thrift store. Instead of packing along hundreds of dollars in gear, his aim was to keep costs low. Very low. With some searching he was able to find a blanket, cooking utensils, rope, knife, tarp, and several other camp necessities for just $25.

A good campfire is a necessity of course, and [Kelly]’s full of great ways to start a fire even if all you have is a lighter with no butane or an old flashlight with dead batteries. The purpose of the video is to show how anyone can get their bush craft on even when all they have is a few dollars and a little know-how, which he generously shares. And after watching, we’re sure you’ll agree that he met his mark.

Will you raid the local second hand store before your next camping trip? After seeing this video, you just might! And while you’re there, make sure to grab the things you’ll need to make your own camping-friendly French press so you have some good coffee while you’re out camping in your… uh… Corolla?

Continue reading “Camping For $25: Thrift Store Hacks To Keep Cozy”

Dream Bigger, Predict The Future

I’d love to tell you that I’m never wrong, but I’ve been wrong a lot. Remember the Arduino? When it was brand new, I thought it was some silly collection of libraries and a drop-down menu for people who are too lazy to just type out their own #include statements. Needless to say, it launched about a million hacks and brought microcontroller programming into the mainstream. Oops.

Similarly, about fifteen years ago, I saw an educational project out of MIT’s Media Lab. It consisted of a bunch of blocks that had LCD screens on them and would interact with each other when put together. The real hook, though, was that each block had an accelerometer inside, so you could “pour water” out of one block into another, for instance.

At that time, accelerometers were expensive, even in quantities. Even one of these cubes must have cost $100 at the time, much less a whole set. Accelerometers were so expensive that I wouldn’t have thought about incorporating one into a project, much less a dozen, so I ignored them for hacker purposes. Then came the cellphone and economies of scale. Today, even in chip shortage times, they’re readily available for around $2 each, making them useful for exactly this kind of “frivolous” use.

From the Arduino experience, I learned to never underestimate the impact of what seem to me to be “small” conveniences. (And maybe more so, the value of the tremendous common effort from the community.) From the MIT accelerometer story, the moral is that some parts will get drastically cheaper in the future, so you shouldn’t necessarily exclude the cool new sensor from your design repertoire. After all, ten years ago, nobody would have thought that we’d have laser time-of-flight rangefinders for less than a hamburger.

What new components are fantastically useful, or full of potential, that might be cheap enough in the future to make them also worth looking into? Swing by Hackaday tomorrow morning and join in the conversation!

The True Cost Of Multimeters

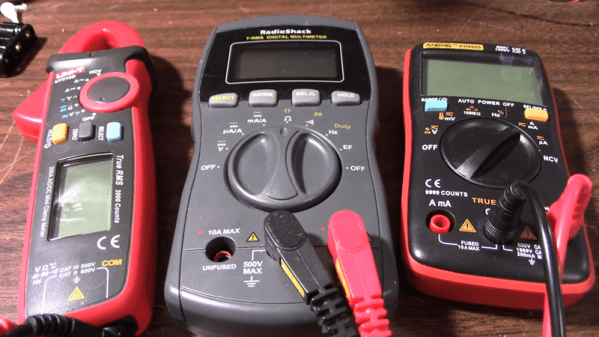
If you are building a home shop, it is common to try to get the cheapest gear you can possibly get. However, professionals often look at TCO or total cost of ownership. Buying a cheap car, for example, can cost more in the long run compared to buying an expensive car that requires less maintenance. Most consumers will nod sagely and think of ink jet printers. That $20 printer with the $80 cartridges might not be such a deal after all. [JohnAudioTech] bought a few cheap multimeters and now has problems with each of them. Maybe that $120 meter isn’t such a bad deal, after all.

The problems he’s seen are the same ones we’ve all seen: noisy selector switches, suspect display readings, and worn off lettering. You can see the whole story in the video below.

Continue reading “The True Cost Of Multimeters”

Simulate Climate With An Arduino

Greenhouses create an artificial climate specifically suited to the plants you want to grow. It’s done by monitoring conditions like temperature and humidity, and making changes using things like vents, fans, irrigation, and lighting fixtures to boost temperature. But how do you know when it’s time to up the humidity, or vent some of the heat building up inside? The easy way is to use the Arduino-powered Norman climate simulator from [934Virginia] which leverages data from different locations or times of year based on NOAA weather data to mimic a particular growing environment.

Norman relies on a simple input of data about the target location, working from coordinates and specified date ranges to return minimum/maximum values for temperature and humidity weather conditions. It makes extensive use of the Dusk2Dawn library, and models other atmospheric conditions using mathematical modeling methods in order to make relatively accurate estimates of the target climate. There are some simulations on the project’s Plotly page which show what this data looks like.

This data is used by [934Virginia’s] Arduino library to compare the difference between your target climate and actual sensor readings in your greenhouse. From there you can make manual changes to the environment, or if you’re luck and already have an Arduino-based greenhouse automation system the climate adjustments can be done automatically. The project is named after Norman Borlaug, a famous soil scientist and someone worth reading about.

Editor’s Note: This article has been rewritten from the original to correct factual errors. The original article incorrectly focused on replicating a climate without the use of sensors. This project does require sensors to compare actual greenhouse conditions to historic climate conditions calculated by the library. We apologize to [934Virginia] for this and thank them for writing in to point out the errors.

Images courtesy of Wikimedia Commons.

Smooth Moves From Cheap Motors

Building an electric motor isn’t hard or technically challenging, but these motors have very little in the way of control. A stepper motor is usually employed in applications that need precision, but adding this feature to a motor adds complexity and therefore cost. There is a small $3 stepper motor available, but the downside to this motor is that it’s not exactly the Cadillac of motors, nor was it intended to be. With some coaxing, though, [T-Kuhn] was able to get a lot out of this small, cheap motor.

To test out the motors, [T-Kuhn] built a small robotic arm. He began by programming his own pulse generating algorithm that mimics a sine wave in order to smooth out the movement of the motor. An Arduino isn’t fast enough to do these computations, though, so he upgraded to using the ESP32. He also was able to implement the inverse kinematics on his own. The result of all this work for a specific platform and motor type is a robotic arm that has a very low cost but delivers performance of much more expensive hardware.

The robot arm was built by [T-Kuhn] too, and all of the details on that build, as well as all the schematics and code, are available on the project site if you need a low-cost robot arm or a good stepper motor controller for a low cost. There are many other ways of getting the most out of other types of low-cost motors as well.

Continue reading “Smooth Moves From Cheap Motors”