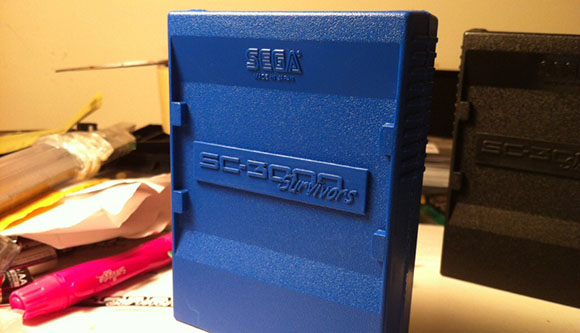
The folks at SC-3000 survivors have been working on a cartridge capable of storing dozens of games for the ancient Sega SC-3000 computer. The PCB works beautifully, but making a case for their cartridge left them with few options. They could use a 3D printer or simply collect a whole bunch of used cartridge cases, but making their own mold for a cartridge case was the best solution.
To create the mold for their multicart enclosure, the SC-3000 survivors first took an old, used case and made a silicone mold. While the first attempt at mold making was encouraging, several problems began to crop up due to the lack of vent holes and wiggling the mold before the resin had set. Before long, a proper technique to make resin casts was developed: use lots of resin, and don’t apply pressure or rubber bands to a curing mold.
We’re always impressed by what can be done with a few sheets of plastic, some Bondo, and the inordinate amounts of patience and sandpaper we see with other case mods and enclosure builds. the SC-3000 survivors put together an enclosure that rivals any Bondo build, and we’re happy they put out this tutorial.


How do you actually make a mold with such “sand” pattern on some parts?
This type of mold is cast (using silicone rubber) around a master, so to get this sort of surface texture you start with a master that has that texture. Silicone molds are very good at including even very fine surface detail.
In this case, they used an original Sega case to make the master, and it already had this texture. I don’t know of a good way to create it by hand.
I would suggest making a slightly undersize positive out of whatever, then paining it with texturizing paint, then making a mold of that.
http://www.mold-tech.com/services/mold-texturing.php
“via exclusive Mold-Tech Digital Transfer Technology (D.T.T.).” Ahh, that sums it up rather nicely, thanks :)
You can also use textured paper, then seal it and paint.
Sandpaper?
Not exactly by hand, but how do they create molds for plastic extrusion with such texture? It would be probably rather complicated process using cnc.
They are etched similar to the way PCB’s are etched. It’s a very specialist job.
Oh, you mean how they made the original version! I’m not sure — but they’ve been doing it since well before any of this was computerized.
My guess is that it involves a fair bit of handwork, and the resources I can find online bear that out to some extent, though most of it seems to be done with chemical etching on the steel mold with various forms of masking (and then possibly some handwork to clean up edges), and some of it is done with EDM milling. It’s clearly an art done by skilled practitioners, and there are many companies that just do mold texturing. Here are some articles:
http://www.moldmakingtechnology.com/articles/texturing-molds-for-thermoplastics-considerations-for-success
http://www.mold-tech.com/texturing/Texturing-In-Depth.pdf
its a edm texture,you get it no matter what,i spend lots of time polishing out that texture on some of my molds.(injection molding)
At our mold shop we have a sampler set from a specialty shop that does this.
Step 1: Make the mold and polish it.
Step 2: Ship the mold to this shop and tell them which pattern you want (leatherette, leopard spots, stipple, checker plate etc), how deep and which surfaces get the treatment.
Step 3: Pay them a bunch.
I try to use the sandblasted finish when I can, with a variety of media:
– glass beads are a fine, satiny finish on a steel mold, and medium coarse on an aluminum one.
– sand is mid-range.
– shiny coarse black crushed slag gives the roughest treatment on steel (takes patience to get an even coating), but is too rough for most aluminum projects. While blasting it on, you can watch it pushing the surface of the aluminum around as if it was a bunch of tiny towers of plasticine.
I would guess they’d use KISS. Something like a steel roller with the desired texture at some point after the extrusion die to impress the texture.
They could have saved themselves a lot of trouble with a little STFW. Searching The (choose an F word) Web. There are tons of how to sites and videos on making RTV molds and casting resin in them.
Once you have your mold set up, how much time and money does it take to make a copy?
Masking by tape if you need mold texturing, please browse http://www.moldtexture.net
Laser texture let your molds not need masking, please browse http://www.lasertexture.com