DIY Hydrophone Listens In On The Deep For Cheap

The microphone is a pretty ubiquitous piece of technology that we’re all familiar with, but what if you’re not looking to record audio in the air, and instead want to listen in on what’s happening underwater? That’s a job for a hydrophone! Unfortunately, hydrophones aren’t exactly the kind of thing you’re likely to find at the big-box electronics store. Luckily for us, [Jules Ryckebusch] picked up a few tricks in his 20-year career as a Navy submariner, and has documented his process for building a sensitive hydrophone without needing a military budget.

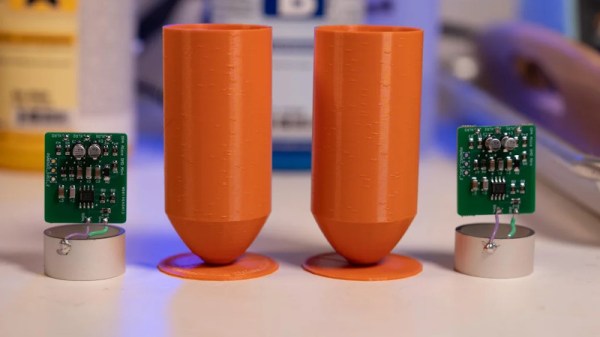
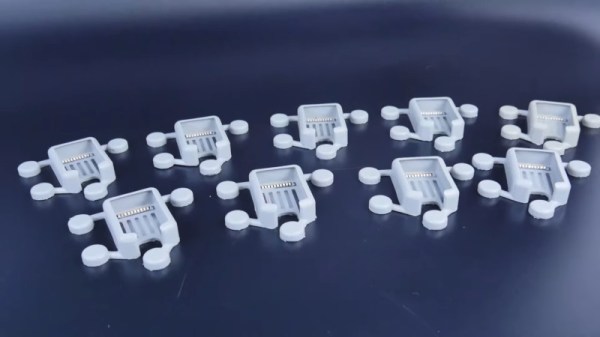
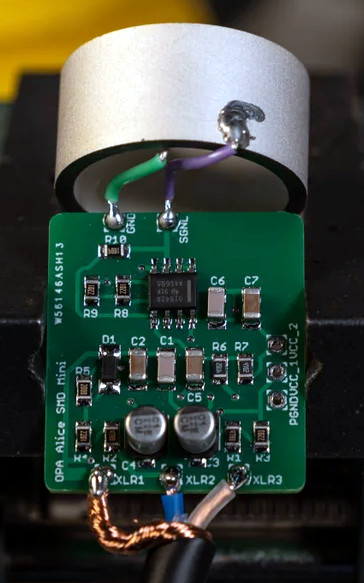
Fascinated by all the incredible sounds he used to hear hanging around the Sonar Shack, [Jules] pored over documents related to hydrophone design from the Navy and the National Oceanic and Atmospheric Administration (NOAA) until he distilled it all down to a surprisingly straightforward build. The key to the whole build is a commercially available cylindrical piezoelectric transducer designed for underwater communication that, incredibly, costs less than $20 USD a pop.

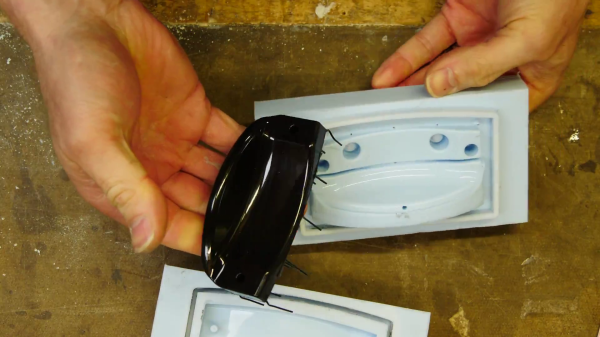
The transducer is connected to an op-amp board of his own design, which has been adapted from his previous work with condenser microphones. [Jules] designed the 29 x 26 mm board to fit neatly within the diameter of the transducer itself. The entire mic and preamp assembly can be cast inside a cylinder of resin. Specifically, he’s found an affordable two-part resin from Smooth-On that has nearly the same specific gravity as seawater. This allows him to encapsulate all the electronics in a way that’s both impervious to water and almost acoustically transparent. A couple of 3D-printed molds later, the hydrophone was ready to cast.

Interestingly, this isn’t the first homebrew hydrophone we’ve seen. But compared to that earlier entry, which basically just waterproofed a standard microphone pickup, we think this more thoughtful approach is likely to have far better performance.

Continue reading “DIY Hydrophone Listens In On The Deep For Cheap”

Making High Quality Copies Of Existing Parts Using A Silicone Mold

3D printing has made it incredibly easy to produce small runs of plastic parts, but getting rid of the 3D printed look can be tricky and time-consuming. When you need a smooth and polished finish, or you want to make exact copies of an existing injection molded part, casting resin parts in silicone molds is an excellent option. [Eric Strebel] has plenty of experience with the process, and demonstrates it in detail while creating copies of violin chin rests that are no longer in production. It’s an interesting application, where 3D-printed layer lines are not just an aesthetic issue, but something that would irritate the user’s skin if present.

Creating silicone molds requires a bit of forethought about the mold design. You want to select the split line to make it as easy as possible to remove the finished parts, while also placing the resin pouring sprue and vents to prevent air bubbles from getting trapped in the mold. In [Erics] case, it’s impossible to use a simple planar split line, so he mounts the master part on a block of wood and uses cardboard and modeling clay to create a volume where the second side of the mold will protrude in the first side. It’s important to note that sulfur-free clay must be used, otherwise the silicone might not cure.

One side of the silicon mold is cast first, and after curing it is placed back in the mold box with the master part to allow casting the other side of the mold. At this point [Eric] super glues the sprue-former and vent rods to the master parts before molding the second side. A release agent consisting of petroleum jelly and naphtha is added wherever the two sides of the mold will touch, to prevent them from sticking together.

Bubbles are your enemy while resin casting, so ideally you need a vacuum chamber to degas the silicone and resin before casting, and a pressure chamber to allow the resin part to cure. While pouring the silicone for the molds, the mold box is placed on a vibration table to allow any bubbles to rise to the surface. While the entire mold-making and molding process is time-consuming, the copied parts are almost indistinguishable from the original.

[Eric] has also shown us how to make much larger silicone molds in the past. If you find yourself making lots of different-sized mold boxes, it might be worth building an adjustable mold box.

Continue reading “Making High Quality Copies Of Existing Parts Using A Silicone Mold”

Making Flexible Overmolded Parts With Urethane Resin

Resin casting videos have taken social media by storm of late. Everything from inlaid driftwood tables to fancy pens are getting the treatment. Pouring some nicely colored epoxy is straightforward enough, but it’s just the tip of the iceberg. [Eric Strebel] has some serious skills in resin casting, and has lately been working on some overmolded electroniics with urethane resin (Youtube link, embedded below).

The build starts with the creation of a silicone mold, using a 3D printed SLA master. The part in question is for a prototype medical device, and requires overmolding, in which a flexible PCB is covered in flexible urethane. Wooden pins are used to allow the flexible PCB to clip into the mold for accurate location, and a small shield is placed over the metal contacts of the PCB to avoid them being covered in silicone.

Initial tests are done with an empty mold to determine the correct material to use, before the actual parts are ready to produce. [Eric] takes great care with the final production, as any mistakes would waste the expensive prototype PCBs provided to him by the client. With the electronics placed in the mold, the resin is degassed and carefully injected, using a syringe to minimise the chance of any air bubbles. With some delicate cleanup by hand, the completed parts are ready for delivery.

It’s a process that covers the basics of overmolding for a prototype part, as well as showing off [Eric]’s skill at producing quality prototype parts. We’ve seen [Eric]’s work before, too – like his discussion of the value of cardboard in product design. Video after the break.

Continue reading “Making Flexible Overmolded Parts With Urethane Resin”

How To Make Bisected Pine Cones Look Great, Step-by-Step

[Black Beard Projects] sealed some pine cones in colored resin, then cut them in half and polished them up. The results look great, but what’s really good about this project is that it clearly demonstrates the necessary steps and techniques from beginning to end. He even employs some homemade equipment, to boot.

Briefly, the process is to first bake the pine cones to remove any moisture. Then they get coated in a heat-activated resin for stabilizing, which is a process that infuses and pre-seals the pine cones for better casting results. The prepped pine cones go into molds, clear resin is mixed with coloring and poured in. The resin cures inside a pressure chamber, which helps ensure that it gets into every nook and cranny while also causing any small air bubbles introduced during mixing and pouring to shrink so small that they can’t really be seen. After that is cutting, then sanding and polishing. It’s an excellent overview of the entire process.

The video (which is embedded below) also has an outstanding depth of information in the details section. Not only is there an overview of the process and links to related information, but there’s a complete time-coded index to every action taken in the entire video. Now that’s some attention to detail.

Continue reading “How To Make Bisected Pine Cones Look Great, Step-by-Step”

An Old Way To Make A New Crank Handle

When the crank handle on [Eric Strebel]’s cheapo drill press broke in two, did he design and print a replacement? Nah. He kicked it old school and cast a new one in urethane resin.

In his newest video, [Eric] shows us his approach to molding and casting a handle that’s likely stronger than the original. The old crank handle attached to the shaft with a brass collar and a grub screw, so he planned around their reuse. After gluing the two pieces together and smoothing the joint with body filler, he packs the back of the handle with clay. This is a great idea. The original handle just has hollow ribbing, which is probably why it broke in the first place. It also simplifies the cast a great deal.

Here’s where things get really interesting. [Eric] planned to make a one-piece mold instead of two halves. At this point it becomes injection molding, so before he gets out the reusable molding box, he adds an injection sprue as an entry point for the resin, and a plug to support the sprue and the handle. Finally, [Eric] mixes up some nice bright Chevy orange resin and casts the new handle. A few hours later, he was back to drilling.

Crank past the break to watch [Eric]’s process, because it’s pretty fun to watch the resin rise in the clear silicone mold. If you want to take a deeper dive into injection molding, we can fill that need.

Continue reading “An Old Way To Make A New Crank Handle”

Adventures In Mold Making And Making Your Own Enclosures

case

The folks at SC-3000 survivors have been working on a cartridge capable of storing dozens of games for the ancient Sega SC-3000 computer. The PCB works beautifully, but making a case for their cartridge left them with few options. They could use a 3D printer or simply collect a whole bunch of used cartridge cases, but making their own mold for a cartridge case was the best solution.

To create the mold for their multicart enclosure, the SC-3000 survivors first took an old, used case and made a silicone mold. While the first attempt at mold making was encouraging, several problems began to crop up due to the lack of vent holes and wiggling the mold before the resin had set. Before long, a proper technique to make resin casts was developed: use lots of resin, and don’t apply pressure or rubber bands to a curing mold.

We’re always impressed by what can be done with a few sheets of plastic, some Bondo, and the inordinate amounts of patience and sandpaper we see with other case mods and enclosure builds. the SC-3000 survivors put together an enclosure that rivals any Bondo build, and we’re happy they put out this tutorial.