3D Printed Cookies, Sort Of

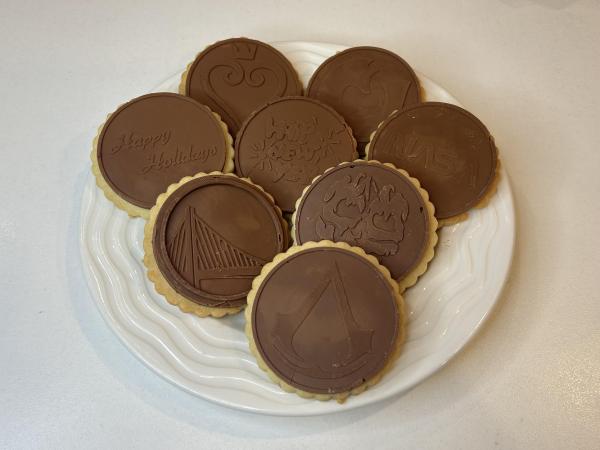
Are there any cookies that taste better than the ones you make yourself? Well, maybe, but there’s a certain exquisite flavoring to effort. Just ask [jformulate], who created these custom chocolate-topped butter cookies using a mixture of 3D printing, silicone, and of course, baking and tempering.

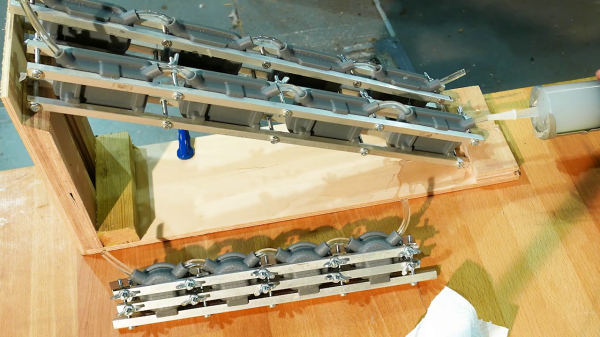
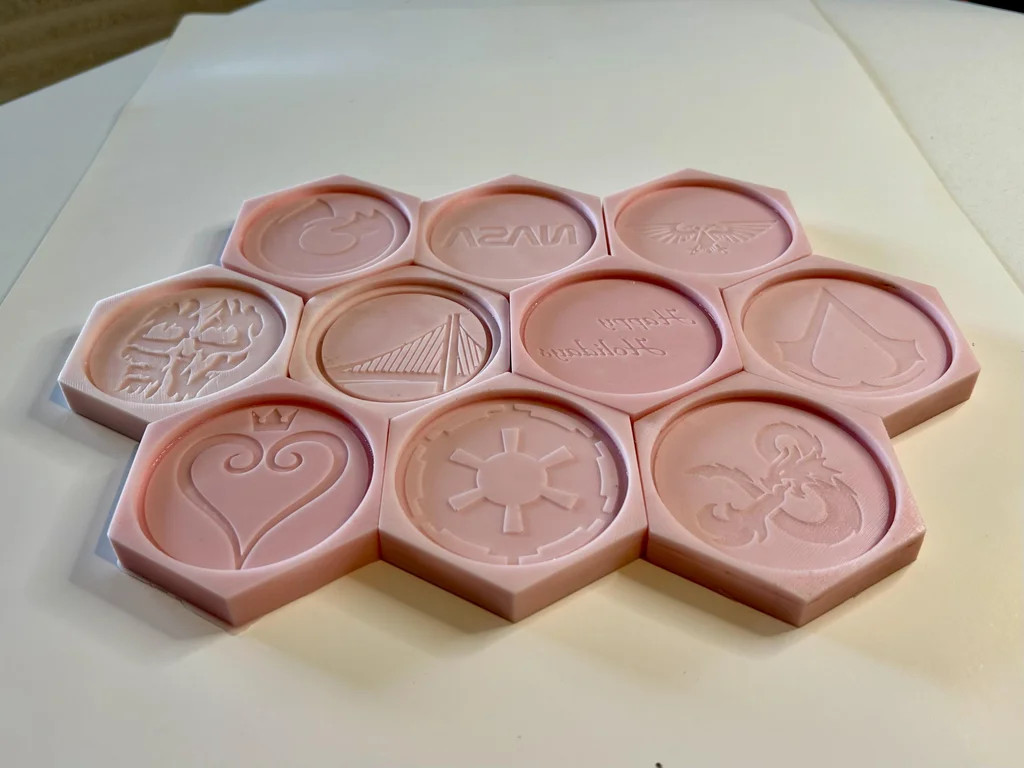
[jformulate] did this project along with a makerspace group, and the first thing they did was decide on some images for the cookies. Once a hexagon-shaped mold was created in Fusion360, the images were added in. Some had to be height-adjusted in order for the detail to come out.

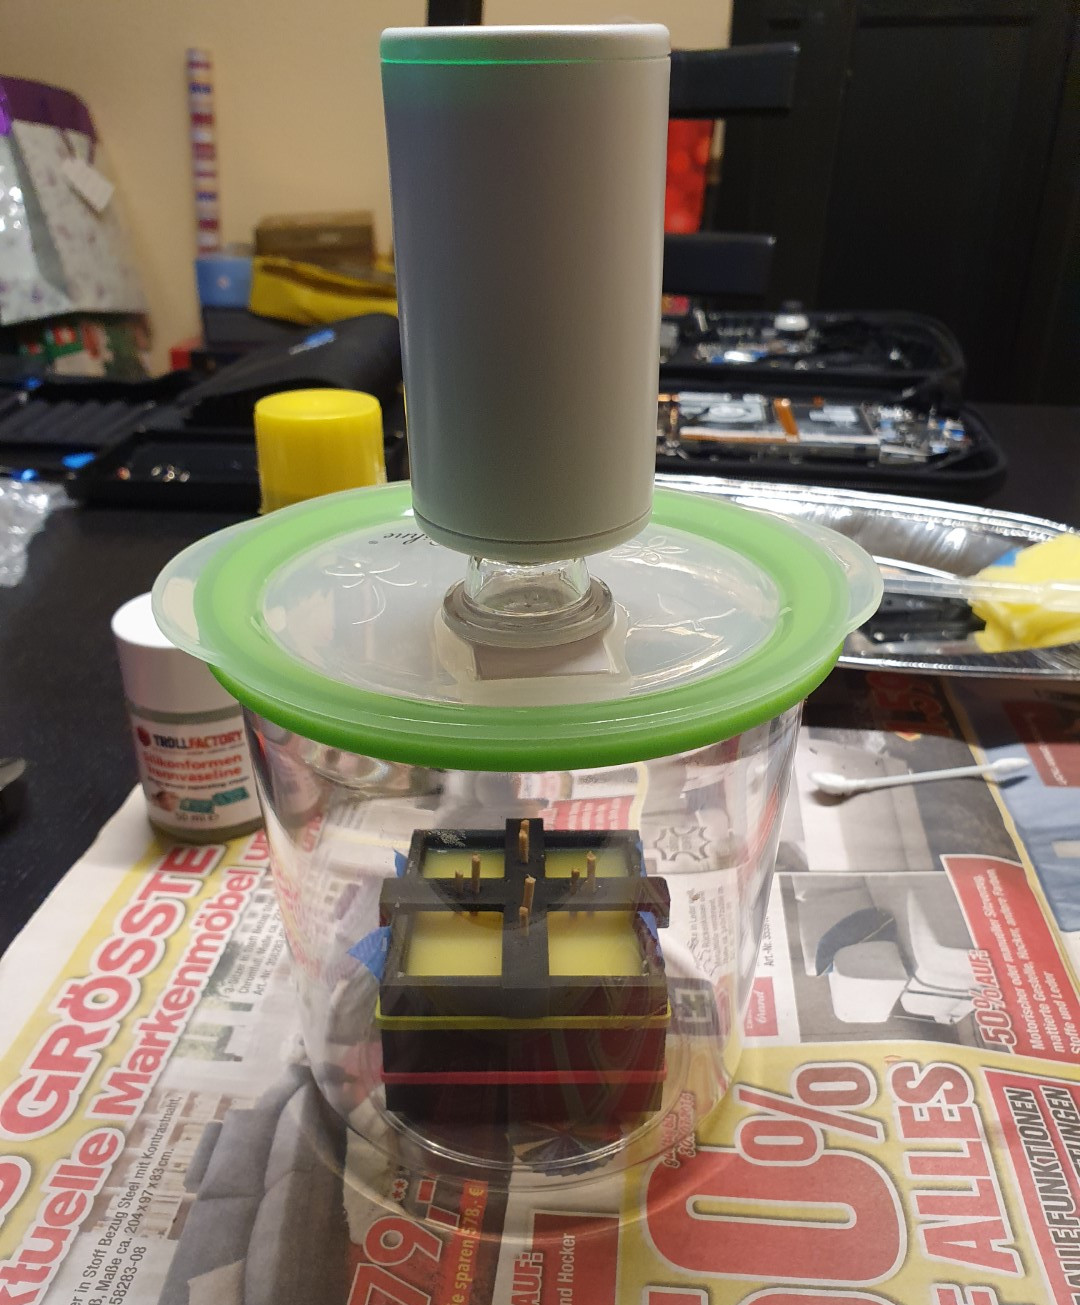
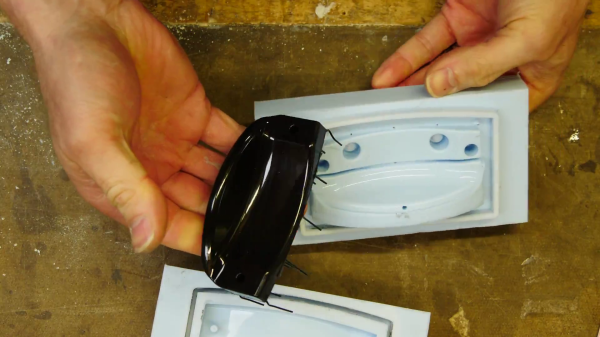
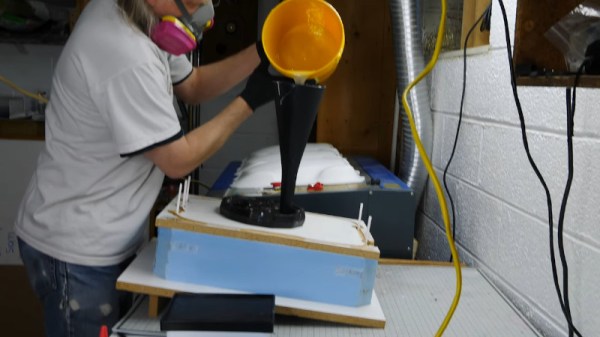
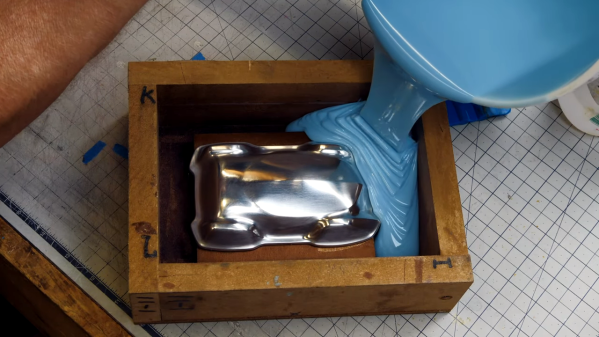
Once these positives were printed, it was time to make the food-safe silicone molds that would form the custom chocolate toppers. If you don’t have a vacuum de-gasser, [jformulate] recommends pouring a thin stream from a high place to avoid air bubbles. You can always tap the mold several times on a flat surface as well to bring trapped air to the top.

Finally, it’s time to make cookies. [jformulate] has good instructions for tempering chocolate, as well as a recipe for the butter cookies that support the designs. As a bonus, [jformulate] shows how to make a fish-shaped hot chocolate bomb, and made Jolly Rancher (sadly not Wrencher) medallions using the silicone molds and a microwave.

For the semi-disappointed, directly 3D printing cookies is definitely a thing.

Casting Custom Resin Buttons For The Steam Deck

If you play games on multiple consoles, you’re probably familiar with the occasional bout of uncertainty that comes with each system’s unique button arrangement. They’re all more or less in the same physical location, but each system calls them something different. Depending on who’s controller you’re holding, the same button could be X, A, or B. We won’t even get started on colors.

Overhearing her partner wish the buttons on his Steam Deck matched the color scheme of the Xbox, [Gina Häußge] (of OctoPrint fame) decided to secretly create a set of bespoke buttons for the portable system. There was only one problem…she had no experience with the silicone molding process or epoxy resins which would be required for such an operation.

Toothpicks were used to make channels in the mold.

Luckily we have the Internet, and after researching similar projects that focused on other consoles, [Gina] felt confident enough to take apart Steam’s handheld and extract the original plastic buttons. These went into a clever 3D printed mold box, which was small enough to put into a food vacuum container for degassing purposes. The shape of the buttons necessitated a two-piece mold, into which [Gina] embedded two channels: one to inject the resin, and another that would let air escape.

The red, green, blue, and yellow resins were then loaded into four separate syringes and forced into the mold. It’s critically important to get the orientation right here, as each button has a slightly different shape. It sounds like [Gina] might have mixed up which color each button was supposed to be during an earlier attempt, so for the final run she made a little diagram to keep track. After 24 hours she was able to peel the mold apart and get a look at the perfectly-formed buttons, but it took 72 hours before they were really cured enough to move on to the next step.

[Gina] applied the legends with a sheet of rub-on lettering, which we imagine must have been quite tricky to get lined up perfectly. Since the letters would get worn off after a few intense gaming sessions without protection, she finally sealed the surface of each button by brushing on a thin layer of UV resin and curing it with a flashlight of the appropriate wavelength.

There are a fair number of steps involved, and a fair bit of up-front cost to get all the materials together, but there’s no denying the final result looks phenomenal. Especially for a first attempt. We wouldn’t be surprised if the next time somebody wants to head down this particular path, it’s [Gina]’s post that guides them on their way.

Making High Quality Copies Of Existing Parts Using A Silicone Mold

3D printing has made it incredibly easy to produce small runs of plastic parts, but getting rid of the 3D printed look can be tricky and time-consuming. When you need a smooth and polished finish, or you want to make exact copies of an existing injection molded part, casting resin parts in silicone molds is an excellent option. [Eric Strebel] has plenty of experience with the process, and demonstrates it in detail while creating copies of violin chin rests that are no longer in production. It’s an interesting application, where 3D-printed layer lines are not just an aesthetic issue, but something that would irritate the user’s skin if present.

Creating silicone molds requires a bit of forethought about the mold design. You want to select the split line to make it as easy as possible to remove the finished parts, while also placing the resin pouring sprue and vents to prevent air bubbles from getting trapped in the mold. In [Erics] case, it’s impossible to use a simple planar split line, so he mounts the master part on a block of wood and uses cardboard and modeling clay to create a volume where the second side of the mold will protrude in the first side. It’s important to note that sulfur-free clay must be used, otherwise the silicone might not cure.

One side of the silicon mold is cast first, and after curing it is placed back in the mold box with the master part to allow casting the other side of the mold. At this point [Eric] super glues the sprue-former and vent rods to the master parts before molding the second side. A release agent consisting of petroleum jelly and naphtha is added wherever the two sides of the mold will touch, to prevent them from sticking together.

Bubbles are your enemy while resin casting, so ideally you need a vacuum chamber to degas the silicone and resin before casting, and a pressure chamber to allow the resin part to cure. While pouring the silicone for the molds, the mold box is placed on a vibration table to allow any bubbles to rise to the surface. While the entire mold-making and molding process is time-consuming, the copied parts are almost indistinguishable from the original.

[Eric] has also shown us how to make much larger silicone molds in the past. If you find yourself making lots of different-sized mold boxes, it might be worth building an adjustable mold box.

Continue reading “Making High Quality Copies Of Existing Parts Using A Silicone Mold”

Serial Silicone Molding

The techniques for making single-digit quantities of custom molded parts don’t scale well when you need to make dozens, as [Kevin Holmes] discovered. He needed to make 80-some sets of a silicone motor mount, and the one-up mold process was not going to work. He explores several solutions, which he rejects as being too complicated. Finally [Kevin] comes up with the idea of daisy-chaining banks of molds clamped together with rails of stock metal bars. It’s a pretty nifty process to watch and you can check the video out below, which is not unlike a very slow 7495 four-bit shift register.

Even though the silicone he uses is clear, pay attention and you can still see the carry-out as it propagates from mold to mold. He manually performs the nibble carry operation from one bank to the next — we wonder if he could cascade these banks, and inject all 80 in one really big squeeze?

Why would someone need 80 sets of silicone rubber motor mounts, you may ask? Well, you may remember the 4-mation 3D zoetrope that we wrote about back in 2018. [Kevin] is one of the founders of this mesmerizing project, and it would seem that their Kickstarter project has been successful. As he demonstrates in the video below, without some type of noise dampening mounts, a rumble from the motor is amplified through the stage of the zoetrope. If you have any favorite mold-making tips for small batch manufacturing, let us know in the comments below. Thanks to [George Graves] for sending this tip our way.

Continue reading “Serial Silicone Molding”

Apple Watch Gets Custom Transparent Case

The Apple Watch was the tech company’s attempt to bring wrist computers into the mainstream. It’s naturally available in a variety of fits and finishes, but if you want something properly original, you’ve got to go custom. [Useless Mod] does just that with a clear case for the popular smartwatch.

The mod starts with a patient, careful disassembly of the watch – necessary given the delicate components inside. It’s achieved in the end with only having to drill out 1 screw and an unfortunately snapping of the crown wheel axle. However, [Useless Mod] presses on, and silicone casts the original Apple enclosure. The video goes over all the finer points, from degassing to using strips of acrylic plastic to act as runners. Once done, the silicone mold is used to produce a replica case in transparent epoxy, and the watch is reassembled.

The final result is impressive, with the case optically clear and showing off the watch’s internals. The look is improved by removing some of the original insulation tape to better reveal the PCBs inside. Unfortunately, the design of the watch, which is largely covered by a screen and heartbeat sensor, means it’s not the greatest choice for a clear case mod, but it works nonetheless. We’ve seen similar work before from [Useless Mod] too – like this transparent drone case for the Mavic Mini. Video after the break.

Continue reading “Apple Watch Gets Custom Transparent Case”

Making Silicone Molds – Big Ones!

If you’ve got one of something and you want more, duplicating it with a silicone mold can be a great way to go. This is applicable to 3D printing something you need many copies of, and a whole variety of other usecases. [Eric Strebel] prides himself on his abilities in this area, and has put out a guide to producing very large silicone molds in a simple and reliable manner.

The overarching process is simple, but followed properly, it produces great results. [Eric] starts by building a mold box out of wood, coated in shellac to ensure it doesn’t stick to the silicone. The master part is then stuck to the base, surrounded by a lasercut cardboard strip which acts as a seal and key. Once properly degassed silicone is poured in and cured, the second half can be made. The mold is flipped in the mold box, the seal key removed,  and release agent applied to the silicone surfaces. With another pour and cure, the mold is ready for casting new parts.

While simple, if the correct equipment isn’t used or steps skipped, you’ll end up with a useless mold full of air bubbles or surface irregularities. It’s useful to see just what it takes to get a mold of such scale (13″ x 19″!) completed without flaws. We’ve featured [Eric]’s work before, such as his fine detail improvements on the Apple Pencil. Video after the break.

Continue reading “Making Silicone Molds – Big Ones!”

Mold-Making Masterclass In Minutes

Making silicone molds seems easy, but there are a lot of missteps to be made along the way that can mean the difference between a great, reusable mold, and one that’s a sad waste of silicone. If you’re helpless to know the difference, then check out [Eric Strebel]’s 9-minute masterclass teaser video on making a two-part mold for resin casting, which is also embedded below.

Even if you already know how to do this, there’s probably a good tip in here somewhere. One of them being that you should always pour your silicone from one place and let it coat the piece being copied. Otherwise, there might be lines on the mold. Another tip is for DIY mold release made from petroleum jelly thinned with naphtha.

Our favorite tip has to do with the way [Eric] makes this a reusable two-part mold, which is more akin to injection molding. To pour silicone for the second part and get it to separately nicely, [Eric] uses sprues made out of resin rods that were cast inside of drinking straw molds. These he chamfers against a belt sander to minimize the contact with the cast part, which makes them a snap to break off. [Eric] says this is just the beginning, and there are more videos to come that will break down the steps.

There’s more than one way to make a mold, especially for casting in metal. We’ve seen everything from 3D-printed molds to kinetic sand.

Continue reading “Mold-Making Masterclass In Minutes”