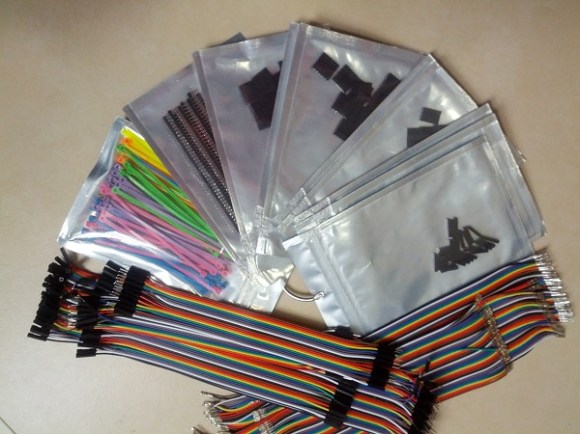
Etching and populating a board is childs play compared to finding connectors which link several components. But Hackaday alum [Ian Lesnet] and his crew over at Dangerous Prototypes have come up with a solution that makes us wonder why we haven’t seen this long ago? They’re prepping an any-size ribbon cable kit.
So lets say you do find the type of connector you want. You need to cut the ribbon cable to length, crimp on the connectors, then seat those connectors in the housing. We’ve done this many times, and being cheapskates we use needle-nose pliers instead of buying a proper crimper. This solution does away with that grunt work. The kit will ship several different lengths of ribbon wire with the connectors already placed by machine. This way you peel off the number of connectors you need, select the proper house size and plunk it in place. Also in the kit are several lengths of male, female, and male/female jumper cables you can peel off in the same way.
Now what are we going to do with the rest of the spool of ribbon cable sitting in the workshop?


Use the remaining ribbon cable with DIL IDC connectors?
I’m sure this is a dumb question, but how do you handle DIL Double In-Line connectors when you’re working in a simple 0.1″ breadboard environment? Many of them seem to be narrower than 0.1, and I haven’t found any connectors that make it easy to break them out (other than getting F-F ribbon cable, shredding the end connected to the DIL, and trying to connect all the right pins, which is ok for a 2×3 Arduino programming interface but really annoying for anything bigger.)
Is this connector what you are looking for? I use this connector all the time to plug in a ribbon cable to a breadboard. I’ve even trimmed them to length using a razor knife for larger/smaller pin configurations.
http://www.vetco.net/catalog/product_info.php?products_id=13672
The ways that I’ve got around it is by either putting it through a bit of stripboard and soldering some headers on, or what I had to do this morning, which was folding 1 row of the pins flat, angling them slightly and soldering some headers to the angled pins.
here’s a pic
http://imgur.com/a/MzfGF
Brilliant!
I use these same pre-crimped rainbow ribbons to make all the cables for my projects: http://mightymicrocontroller.com/kickstarter/update29/protonkit3.jpg
What’s that LED light on the bottom left, that looks like it would be very handy.
It is an automotive replacement light. There are a variety of sizes:
http://www.amazon.com/5-SMD-White-High-Power-Lights/dp/B0047RV8WG
or
http://www.amazon.com/Amico-Auto-Blue-13-SMD-Light/dp/B00AKXCEFG
Ah, never seen one on wires before.
wait, I already buy “dupont” cables from china, provided with 8 pin headers (or sometimes single) , and change them out for whatever size header I want, and tear off…
The crimp tool I dont use after finding cables on ebay cost me $35
“dupont ribbon” prices starting at $4…
Adding a copy of what I posted in the DP comments:
It would be nice to have the option of getting the entire ribbon cable in one neutral color, like gray.
Assume you’re trying to color code your connections. For single-conductor jumpers, the existing rainbow jumpers you can get any number of places now are fine. Just select and tear off the appropriate single color.
But you’re developing this kit with a different intent, making multi-conductor jumpers. If you want to make a four-conductor jumper, and want those conductors to still be attached to each other in a neat ribbon cable instead of four individual wires, the four you tear off together will be essentially random colors; which won’t match the color coding scheme. In which case I’d prefer the wires simply be uncolored, rather than falsely colored.
I agree. Ribbon cable is also commonly available in grey with a red stripe on one end to indicate pin one. Could include a cheap red permanent marker with the kit to make the red stripe on the additional cables.