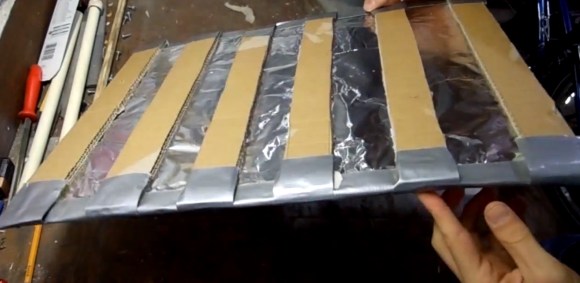
Yes, its Halloween time again and the hacks are going to be crawling out of the woodwork for the rest of the month. [Rich Osgood] is off to a good start promising one hack every week until Halloween. Judging from this first project, a DIY pressure plate switch, we think there’s going to be a common theme to follow. [Rich] constructs his pressure plate for almost no cost using cardboard, tinfoil and duct tape. It couldn’t be easier, so make lots of these if your haunting project requires pressure plate triggers to activate any spooks. Judging by the cardboard construction it’s likely they will fail after multiple uses, but you can switch one out quickly requiring only two hookup wires and a bit of tape.
Hopefully we aren’t stealing [Rich’s] thunder by recommending using Xbee wireless remote sensors to covertly monitor guests or trigger spooktacular scares.
We will be keeping an eye out for [Rich’s] follow-up Halloween hacks. Join us after the break to watch the tutorial video on making homemade pressure plates.


IEDiy.
+1
Man, I never even thought of that. I don’t know if I should feel happy or sad about that.
You should feel no more sad than the creator of any other switch/relay/contact method (and tinfoil&cardboard has been used as a contact method since the earliest days of radio)… Objects are amoral, the humans using them are the issue.
I think using low density foam (household sponge?) as a separator would be a simple way to extend the lifespan of one of these, as once the card strips lose their integrity you would not be able to rely on the contacts separating after use. But if all you have is card…
I wouldn’t give the cardboard much chance of surviving a couple of steppings-on, unfortunately. You can buy pressure pad switches for not too much money.
Or, I saw plans in a magazine ages ago, to use the anti-static foam you get ICs in. It’s slightly conductive, since that’s how it works. Place a sheet of foil on either side, then measure it’s resistance as it’s stepped on. Small squeezes won’t do much, but squashing down big, foot-sized areas should produce a resistance change.
From there just put a pot in series and stick a transistor’s base in the middle, like the first LDR / thermistor circuits you learn in school.
You can buy the foam pretty cheap from anywhere that sells components. Still another 4 weeks to test it out.
Voltage divider! That’s the phrase I was looking for.
I’ve built a couple of these in the past but only ever for Halloween so they didn’t get used very much. The last one I built was probably stepped on somewhere around 50 times that day and it still worked after that. I think there are a lot of factors that go into the lifespan of the thing but I do know from experience it can work beyond just a couple steps. I like the anti static foam idea though too. That might last longer in the long run.
Good call with the foam. I’ve built these before with what I happened to have laying around (cardboard) and knew that it worked for my purposes. I think the foam might actually last longer though. Another thing to think about is weather. Something more waterproof would probably be a better idea if you were going to put this outside, especially if you live in a rainy climate.
makes me wana play minecraft
lol, if you painted the “pressure plate”, and made it so when someone steps on it, it will play the pressure plate sound effect. Then, as an addition, play the piston going out side effect. :)
Using cardboard inside is a fail. Find some thin foam so it will work for more than 10 uses or one fat guy.
The Taliban have been using a similar system for years with devestating results!
Carpet foam and coat hangers work really well too. A coat hanger on each side of the foam, lay a piece of carpet over it and no one is the wiser until they step on it and complete the circuit. If your worried about electric shock then pick up a sheet of rubber gasket material from your local auto parts story and lay it between the carpet and foam.
When I was like 11 or 12 years old, I made one out of foil covered cardboard plates separated by cotton balls. By removing cotton in small amounts, I got it to the point where when the cat walked in my room, a buzzer would sound. I know my age, because I didn’t have my TRS-80 yet. Got that when I was 13.
Don’t forget to debounce your mechanical switch.
An easier way to do this is with a pizza box – the cardboard naturally self supports. Staple a metal wire coat hanger to the inside of the top and bottom (check for connectivity first – some hangers are coated with some kind of shellac crap). Overlay the inside of the top and bottom with aluminum foil. Voila.
I’ve used this for years when conducting counter IED training. This is usally good for about two hits with a humvee – beyond that it won’t self-support.