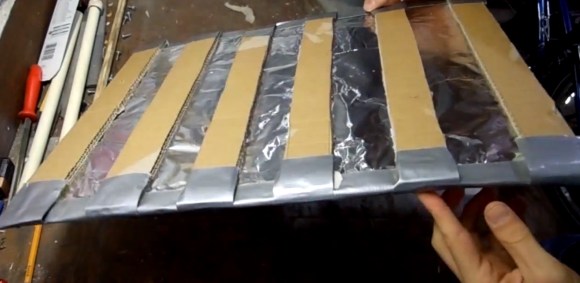
DIY Pressure Plate Switch For Your Haunted House

Pressure Plate

Yes, its Halloween time again and the hacks are going to be crawling out of the woodwork for the rest of the month. [Rich Osgood] is off to a good start promising one hack every week until Halloween. Judging from this first project, a DIY pressure plate switch, we think there’s going to be a common theme to follow. [Rich] constructs his pressure plate for almost no cost using cardboard, tinfoil and duct tape. It couldn’t be easier, so make lots of these if your haunting project requires pressure plate triggers to activate any spooks. Judging by the cardboard construction it’s likely they will fail after multiple uses, but you can switch one out quickly requiring only two hookup wires and a bit of tape.

Hopefully we aren’t stealing [Rich’s] thunder by recommending using Xbee wireless remote sensors to covertly monitor guests or trigger spooktacular scares.

We will be keeping an eye out for [Rich’s] follow-up Halloween hacks. Join us after the break to watch the tutorial video on making homemade pressure plates.

Continue reading “DIY Pressure Plate Switch For Your Haunted House”

PocketQubes: Even Smaller Than A CubeSat

Qube

Over one hundred CubeSats have been launched by hundreds of organizations and universities from around the globe. These have proven very useful in technology demonstration, Earth imaging, and other applications. There is, however, one large downside to the CubeSat platform. Even though it is designed to hitch a ride on launches of larger satellites, they’re still very expensive to develop and launch – somewhere between $60,000 and $125,000.

PocketQubes are a new design of satellite that bring the cost of personal satellites down to what Universities and amateur radio enthusiasts can actually afford. Instead of spending $125k on a 10cm cube CubeSat, the PocketQube, a 5cm cube, can be launched to a 700 km orbit for about $20,000.

Already, four PocketQubes are scheduled for launch in November to a 700km solar synchronous orbit, including $50SAT, a small radio transceiver put together by some ham guys, and The WREN a very impressive PocketQube with 3-axis reaction wheels and plasma thrusters.

Right now, the PocketQube kickstarter is only for aluminum structures that will become the skeleton of a small, 5cm cube satellite. There’s also the PocketQube Shop that provides a little more background on the project.

JTAGulator Finds Debug Interfaces

jtagulator

[Joe Grand] has come up with a tool which we think will be useful to anyone trying to hack a physical device: The JTAGulator. We touched on the JTAGulator briefly during our DEF CON coverage, but it really deserves a more in-depth feature. The JTAGulator is a way to discover On Chip Debug (OCD) interfaces on unfamiliar hardware.

Open any cell phone, router, or just about any moderately complex device today, and you’ll find test points. Quite often at least a few of these test points are the common JTAG / IEEE 1149.1 interface.

JTAG interfaces have 5 basic pins: TDI (Test Data In), TDO (Test Data Out), TCK (Test Clock), and TMS (Test Mode Select), /TRST (Test Reset) (optional).

If you’re looking at a PCB with many test points, which ones are the JTAG pins? Also which test points are which signals? Sometimes the PCB manufacturer will give clues on the silk screen. Other times you’re on your own. [Joe] designed the JTAGulator to help find these pins.

Continue reading “JTAGulator Finds Debug Interfaces”

A Retro, Not Steampunk, Media Center

[toddfx] wanted to put his Raspberry Pi to work and set about creating one of the best stereos we’ve ever seen: It’s called the Audio Infuser 4700, and turns a conglomeration of old disused stereo equipment into a functional piece of art.

[toddfx] used a Raspberry Pi to stream music over WiFi, but also wanted to play some classic vinyl. He took apart an old Yamaha YP-D4 turntable. stripped it to the bone, and created a fantastic oak enclosure around it. To this, he added a seven-band graphic EQ, aux jacks (both in and out), and a tiny 5″ CRT from an old portable TV.

Where this build really gets great is the fabrication. The front panels have all their graphics and lettering engraved via a toner-transfer like method using copper sulphate and salt. [todd] got the idea from this thread and we have to say the results are unbelievable.

Even though this awesome device only used for music, [toddfx] used the tiny color CRT to its fullest. Flick one switch, and it’s an oscilloscope-like display. Flick another switch, and it’s the output of the Raspberry Pi loaded up with a few MAME games including Pacman, Asteroids, and Space Invaders.

[toddfx] put up a build page for his Audio Infuser and an awesome video for his project, available below.

Continue reading “A Retro, Not Steampunk, Media Center”

3D Printering: The Problem Of Thingiverse

Most makers, I’m sure, enter into the 3D printing world with a goal in mind. Whether that’s printing enclosures for projects, Warhammer figurines, robot chassis, or even a mechanical computer, there is usually some obvious utility in having a 3D printer at home. 3D printers are a machine tool, though, and any time it’s not being used means it’s an investment with a lower return, or at the very least a really cool toy gathering dust.

Where then do you find new stuff to print that you don’t design yourself?

For the longest time now, Thingiverse has been the largest repository to share, browse, and download object other people have made. Even I have some very stupid stuff up on Thingiverse and have made use of a few random objects I found on there. This does not mean the 3D printer community particularly likes Thingiverse, however: Last year, Makerbot, the people behind Thingiverse, changed the terms of use so (allegedly) Thingiverse owns everything uploaded to their service. Couple this with completely unsubstantiated rumors of things being removed from Thingiverse that compete with Makerbot products, and you have a perfect storm of people unsatisfied with an online repository of 3D objects.

There is a huge market for an online repository of user-submitted 3D objects that isn’t controlled by Makerbot, and many have attempted to enter the fray. Defense Distributed, the guys behind the 3D printed AR lowers and all-plastic handguns launched DEFCAD, a Thingiverse clone, made an attempt by mirroring thousands of Thingiverse objects, removing the attribution in violation of these object’s licenses. Shady, yes, but at least it’s an option. There are other repos such as Cubehero and the newly launched YouMagine, a repo developed by Ultimaker. the Luke Skywalker to Makerbot’s Darth Vader.

But here is the problem with Thingiverse: even if you would like to get away from using this Makerbot service, it’s still the largest collection of 3D printed objects on the Internet. It has the most users, and is growing more each day than any of its competitors. Putting your objects anywhere else only means fewer people will see them, and fewer still will incorporate your designs into their new designs.

There are a few tools for you to ‘roll your own’ object repository. Github has a great new tool for viewing diffs between different versions of objects. There’s even a lot of work in making the Github landing page more like a Thingiverse page. This doesn’t address the core value of Thingiverse – if all the objects aren’t catalogued in one database, searchable by anyone, it’s just not as useful a site as Thingiverse.

I’m simply not smart enough to offer up a solution to this problem. Therefore, I’m turning it on to you: how should the 3D printer community retain the great value Thingiverse offers while still making something as usable as the now-malagined site? Should any new site mirror objects already on Thingiverse a la DEFCAD, only with proper attribution? Who should control the portal to all the objects, if anyone?

If you have any ideas on how to solve the problem of Thingiverse, drop a note in the comments.

Restoring An Industrial Tractor

tractor

[Nickolas] dropped us a tip about a Youtube channel where [stevewatr] documents the restoration of an Oliver 770 tractor through no less than 133 videos. These videos span the last year, starting with finding the tractor in fairly dense undergrowth. He spends quite a bit of time troubleshooting the engine, explaining his thought process, and showing all of the steps he takes to get the tractor running reliably again. He also delves into fixes for the electrical and hydraulic systems.

In his tip, [Nickolas] said he just couldn’t stop watching, and we agree, this is really a fascinating series. One of the things we love about these videos is that [stevewatr] doesn’t filter out his mistakes. That means we get to see his failures and successes… Everything from how jump starting wasn’t possible with a small jumper wire, to getting the engine to start cold without a primer. That’s the beauty of our fail-of-the-week posts. Absorb it all, and you’ll be prepared when you run into related problems yourself.

[stevewatr’s] last video doesn’t show a completed tractor, so we look forward to seeing what happens as the project progresses. Even if you aren’t interested in having a tractor of your own, you can certainly use some of this information while building your own personal mech. Give it a try!

Electrified Yard Equipment Hauls Grass

mower2

[AmpEater] spent the summer converting yard equipment from internal combustion to electric power. The conversions run from a relatively tame Wheel Horse, to an insane Cub Cadet. The Wheel Horse lost its Kohler engine in favor of a hydraulic pump motor from a crown forklift. 48 volt power is supplied by MK lead acid gel cells. An Alltrax 300 amp controller keeps this horse reigned in.

On his Reddit thread, [AmpEater] says he is especially proud of his Cub Cadet zero turn ride on mower. For those who aren’t up on lawn implement terminology, a “zero turn” means a mower with zero turning radius. Zero turn mowers use two large wheels and tank style steering to turn within their own radius. We bet this style mower would also make a pretty good robot conversion, however [AmpEater’s] zero turn is still setup for cutting the grass.

After pulling the V-twin motor the 48 volt Motenergy ME-1004 was put in place. Batteries are 3 x Enerdel 48V 33 amp hour lithium ion packs. The packs are wired in series to provide 144V nominal. Right about here is where our brain started to melt. A 48V motor on 144V has to mean magic smoke, right? This is where the motor controller magic comes in.

Continue reading “Electrified Yard Equipment Hauls Grass”