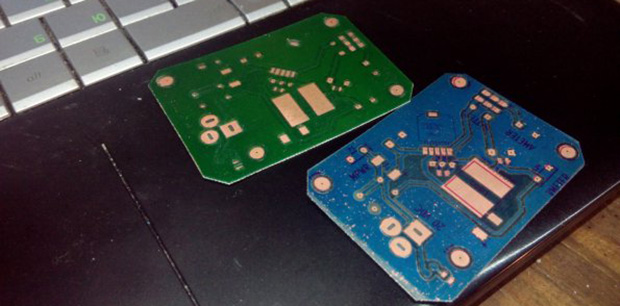
Making a few PCBs with the toner transfer method is a well-known technique in the hacker and maker circles. Double-sided PCBs are a little rarer, but still use the same process as their single-sided cousins. [Necromancer] is taking things up a notch and doing something we’ve never seen before – double-sided PCBs made at home, with color silkscreens, all make with a laser printer.
For laying down an etch mask, [Necro] is using a Samsung ML-2167 laser printer and the usual toner transfer process; print out the board art and laminate it to some copper board.
The soldermasks use a similar process that’s head-slappingly similar and produces great results: once the board is etched, he prints out the solder mask layer of his board, laminates it, and peels off the paper. It’s so simple the only thing we’re left wondering is why no one thought of it before.
Apart from the potential alignment issues for multiple layers, the only thing missing from this fabrication technique is the ability to do plated through holes. Still, with a laser printer, a laminator, and a little bit of ferric or copper chloride you too can make some very nice boards at home.


Wow, very impressive. I have wanted to try my hand at PCB at home but these days so easy to get a few boards from places like OSHPark.
The question is whether its a true SOLDER mask, or just a color mask :).
Good point, I wonder if the heat from soldering will affect it.
Logical, if you use heat to transfer it on the board,some external heat source could mess it up, but +1 for the idea and the looks!
Okay, answering all questions ina batch.
1. Alignment is NOT an issue. Just print two sides on one sheet, bend the sheet so that the layers are aligned. Put the PCB into the sandwitch and laminate. Voila.
2. The solder mask isn’t as good as the professional. Properties depend much on toner. Samsung’s toner looks like a decent dielectric. Heating it up to 190 degrees with a heat gun makes the surface glossy and hydrophobic. So we can tick it as having protective functions. If you solder with paste and heatgun, is indeed works as a solder mask. More or less. With a soldering iron it takes careful soldering, since heated tip easily scratches it. To sum up: for a few homebrew boards it is well worth it.
Okay, answering all questions in a batch.
1. Alignment is NOT an issue. Just print two sides on one sheet, bend the sheet so that the layers are aligned. Put the PCB into the sandwitch and laminate. Voila.
2. The solder mask isn’t as good as the professional. Properties depend much on toner. Samsung’s toner looks like a decent dielectric. Heating it up to 190 degrees with a heat gun makes the surface glossy and hydrophobic. So we can tick it as having protective functions. If you solder with paste and heatgun, is indeed works as a solder mask. More or less. With a soldering iron it takes careful soldering, since heated tip easily scratches it. To sum up: for a few homebrew boards it is well worth it.
Oh, and did I mention that it is FAST? It takes me roughly 30-40 minutes to make a double-sided board, including printing, laminating, etching, applying the mask and drilling? Once I get CNC drill up and running it would be even faster.
I’m surprised the toner works as a soldermask… if indeed it does. Soldermask is more than just being non-conductive and pretty, it needs to withstand the heat of soldering, be somewhat abrasion resistant, and importantly, not have solder stick to it readily.
Vitrea 160 glass paint works fairly well for all the above. Toner-transfer mask onto the pads (do it twice for extra coverage), light coat of vitrea thinned with some methylated spirits (I airbrush it on which produces the best result), allow a couple hours to dry (they say 24, but I just wait until touch dry, I use a very thin coat), bake at 180 degrees for about 40 minutes. Cool. Acetone and rubbing will remove the toner and vitrea from the pads without affecting the rest of vitrea (it does soften slightly when wet with acetone so be a little gentle). Other types of glass paint do not work well, only get the vitrea.
Alternatively UV cured soldermask ink is readily available on ebay, but getting a good finish with that stuff is a real PITA.
Example with the 160
http://www.flickr.com/photos/93638530@N08/11885554945/
(I’ve also used purple which looks nicer than that red but don’t have a picture handy, a somewhat more opaque cover, although it might just be I didn’t put a thick enough red coat on there)
This guy is going from zero to working board in less time than it takes you to apply the solder mask. For prototyping purposes the soldermask is purely functional, who really cares if it isn’t perfect.
The point is toner solder mask can hardly be called functional, it’s only value is looking pretty.
Scratch test: http://youtu.be/4lcUBO6IGNM
Depends much on the toner. Heating the mask after application makes it WAAAY more scratch resistant and it can withstand ultrasonic bathing in C2H5OH (Hell yeah!)
Example with UV ink from eBay:
http://essentialscrap.com/tips/1.5_layer_pcb/soldered.jpg
Going to try red ink next, apparently white is the worst color for soldermask, because the exposing light doesn’t penetrate it as easily.
I would like to make a PCB on my own but don’t know where to start. Any instructable on this technique?
I don’t recommend using toner transfer.
Toner transfer is fraught with pitfalls from minor differences in technique and equipment. Your printer, laminator, ink, and paper will all be different from the ones you see people use, and whether they play well together is a matter of chance.
The article above is very good in that he tells you exactly which printer he’s using by model, but there’s still no guarantee that the next replacement cartridge he gets will give the same results. Even a replacement cartridge from the original manufacturer might have a different ink formulation.
You can get first results more easily with less chance of error using photo-etch methods. Get pre-sensitized boards and google “photo-etch PCB” on youtube or Instructables.
Once you’ve made some boards and have completed a few projects, if you want to try a different method you’ll have something to compare to.
For your first few boards, use the method least likely to have problems.
Do not let Okian Warrior’s reply deter you from trying toner transfer. It is true that it probably won’t work perfectly the first time you try it, but after about three tries, you should have a working solution. Try different laser printers, different toner densities(usually maximum), and different transfer mediums(transparency film, magazine or catalog pages, glossy photo paper, etc.) until you find your perfect combination. Once you find your particular working combination, you will be all set to make excellent boards consistently into the future, quickly and cheaply.
There are many novice Instructables if you search, but I personally wouldn’t refer my worst enemy to that site, so here is a link that I found by simply searching and looking for a match that is from a reputable source:
http://reprap.org/wiki/DIY_PCBs_double_sided_toner_transfer
PS: It seems like printing using all three colors to create black(or two colors to create an offset color) would deposit more toner than just printing in black. I seem to recall some printer drivers allowing the option to not use the black toner, but instead print a whole color page(including the black portions) using the colored toner only.
Agree. Do not let the naysayer’s comment deter you from trying toner transfer. It works out.
In my experience less toner is better, unless your pcb consists mostly of filled zones. But I make pretty fine detailed boards with 0.5mm pitch TQFP and the such. More toner -> squeeze, joined track, less toner -> fine separation.
This really depends on the pressure you apply. With laminator – even the thickest toner layer doesn’t squeeze, while with clothes iron it’s easy to screw up.
Okian Warrior is annoying. For so many examples, go visit Slashdot.org and read awhile. Naysaying is too mild of a word to use when describing his techniques. I’m pretty sure that nothing anyone could possibly do would be critique-free in that regard. No matter what you do and how you do it, he’ll tell you it’s totally wrong, you suck for even trying, and you should go DIAF. NEVER follow Okian’s advice. Even if he tells you something you know for a fact is true, like the sky is blue and the Earth is round, immediately begin looking for an alternate source of information and do not reply to him. If he learns that he was in fact correct, the ensuing gloating is stomach turning. Do NOT give him that pleasure!
Also some hints:
1)
You do not have to sacrifice a good blank PCB to test your prints and transfers by etching them. You can tell if they are worthy of etching by looking at the boards after your heat transfer and medium removal to see if they are worth etching by closely examining them under a microscope or a lighted magnifier(or magnifying glass and flashlight). If the transfer didn’t come out well enough, you can clean the board back to bare copper, and try again so your only cost is in the paper and toner. It’s also easier to experiment with one-sided boards first to get the process down.
2)
Many tutorials describe the use of a laminator. While this would be a worthwhile investment if you decide you like the process as it is inexpensive, it is not necessary unless you decide you want to continue to use the toner transfer process. In the interim, a clothes iron will suffice for experimentation.
3)
If, after etching, you find that your initial transfers do not provide enough protection to the copper from the etchant because the toner is not thick enough(ie: you can see reflections from the underlying copper), you can print multiple transfers, and apply them on top of each other in layers. For example, print two of the same layout, then iron on the first. After cooling, carefully align the second on top of the first layer, and laminate again for double the toner. Any extra toner left in undesirable location can be removed with a scribe or knife before etching.
The best part about the toner transfer method using a laser printer alone is the extremely low cost(no UV sheets to buy) and the ability to take your design from the computer layout, to actually soldering components onto your new board within the space of one hour or so….
“and the ability to take your design from the computer layout, to actually soldering components onto your new board within the space of one hour or so”
Toner transfer is not really any faster than UV exposure (using dry film or presensitised) for one off, and it’s slower for multiples.
If you want to save a few dollars but waste a lot of time – go toner transfer. If you want to get high quality results – do as Okian Warrior suggested and go pre-sensitised photo etch.
Board production houses may do things on a larger scale and use more professional equipment, but there’s a reason they do photo etch and not toner transfer.
Also, if you’re doing photo etch it’s easy to then use a proper solder mask like Dynamask 5000 dry film. Toner may look like a soldermask, but lets be honest it isn’t. I’d be prepared to use it for the silkscreen (i.e. text) but unfortunately it doesn’t come in the most useful colour – white.
Actually – it does come in white! A few sellers on aliexpress offer white toner powder. And I will be experimenting with it some time later.
Regarding quality – toner transfer works awesomely if you use a proper lamination machine. If you use a clothes iron – you’re screwed up. ML-2167 & laminator gives me 0.15/0.15 tracks/spacing quite stable. 0.10/0.10 even if the etchant is fresh and warmed up.
So my choice is toner transfer. Less chemicals to mess with.
White toner – now that might be useful! I look forward to seeing your results. If I had a laser printer at home I’d definitely give that a try myself.
Fair enough that you prefer toner transfer, but it’s definitely not for me.
Whilst your toner mask looks good, I’d worry about it standing up to the heat of soldering. If you already have a laminator I can recommend trying real solder mask. All you’ll need is a cheap UV lamp from eBay. This guy documents it pretty well.
http://www.instructables.com/id/Dry-Film-Solder-Mask/
I already have an UV lamp. Both ‘black light’ and that hard UV one they use for disinfection before surgery. I tried the photoresist method a few times, and it all takes just too much time to figure out all the needed stuff. Toner transfer is way faster, since you don’t need the development stage.
Although, if you really prefer photoresist – think of trying the blue laser for exposure (seen on HaD in recent years, gives awesome results).
The issue with white toner is that it is not labeled as compatible with any laser printers I own. But since I have a few old LaserJet 5L and one LaserJet 5P thingies I don’t mind screwing up – it’s worth a try. Just in case I’m lucky.
Old, ive done this a while ago… even made a youtube video… http://www.youtube.com/watch?v=0bLAg38knjA
Cudos to you then… and Necro!
… as for me this was a “slap my hand to my head so hard it left a handprint” kinda thing. So obvious… so simple… so worthwhile… that it was entirely overlooked till seen here.
We still don’t have the ultimate answer I’m seeking… but this will make things look a lot better than bare copper on fiberglass and for that I’m quite thankful. A clear plastic enclosure is approaching reality
Pulsar makes a solder resist film that works pretty well. Just press and peel.
Been there, done that years ago using a HP Color Laser CP1215. The toner even resists a IR-Reflow if care is taken of the amount of solderpaste applied to the pads. The main disadvantage is, that the toner is non resists against most chemicals used in diy pcb making (i.e. acetone)’
Proof:
https://dl.dropboxusercontent.com/u/5641160/IMG_5750.jpg
MAX9704 2x10W Class-D amp
I use pure medical grade alcohol (C2H5OH) for washing off the flux. It doesn’t dissolve the toner and washes off rosin nicely.
Giving the board a nice finish with urethane spray looks like a very good idea.
What about C4H10O2?
Regards.
I never tried that stuff. I only use acetone for toner removal and C2H5OH for washing the flux.
Kinda hard to tell when your formula can mean at least 7 different chemicals. In case you mean some isomere of butanediol, it shouldn´t harm the toner. (Ethoxyethanol and dimethoxyethane could possibly dissolve it.) At least in case your toner has the same composition as my HP-15.
Oh, and better write it in groups – like for example CH3-CH2-CHOH-CH2-OH. It takes more time, but prevents confusion. Sorry for being chemistry nazi. :-)
Search for “dynamask” on ebay, thats what I’ve been using for solder mask on my homebrew pcb’s the past few years. Works like a charm, and the price isn’t too bad either. Here’s a video of it: http://www.youtube.com/watch?v=B0Syj4awcc8
I’m surprised that nobody mentioned http://www.pcbfx.com/main_site/pages/products/toner_foils.html
Silly question probably… but instead of applying silkscreen and “solder mask” in seperate runs, couldn’t you just print your silkscreen directly on the solder mask? Or am I misunderstanding something?
Yes, this is totally possible.
Right now I plot to .ps from kicad, that place it onto one sheet and colorize in inkscape. I was just to lazy to do that by hand in inkscape, so applied it in separate runs during initial testing. In future I plan to write a script that will automate merging of silkscreen onto the mask for me and setting proper colors.
And inkscape surely DOES open a lot of possibilities for PCB artwork that was never possible with conventional mask.