A while back [Dave] decided he wanted to build his own keyboard. [Dave] has no experience in design, or dealing with manufacturing companies, or even sourcing materials – he just wanted to see if he could do it.
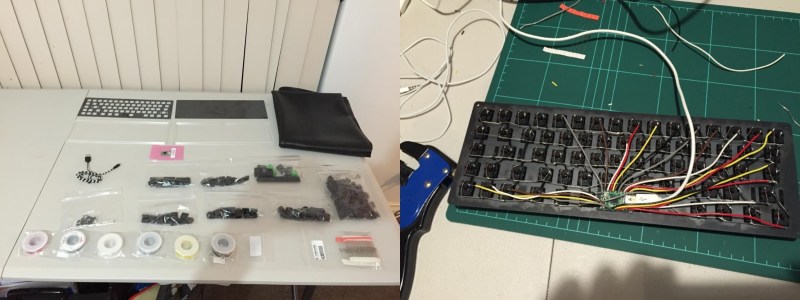
That’s the beauty of the DIY world – most of the time, you can do it, you just don’t know it yet. The keyboard is made out of laser cut steel and acrylic sheets. The switches and key caps are Cherry MX Browns, supplied by GONSKeyboards Works. A Teensy 2.0 lies at the heart of the keyboard acting as an HID device, and the whole thing assembled looks pretty slick – but it wasn’t easy getting to that point.
As [Dave] explains in his article, designing the enclosure from scratch was the hardest part. Seriously, how would you design a keyboard? Do you look at the keyboard you already have? He started researching different DIY keyboards and stumbled upon [Matt3o’s] Brown Fox Keyboard – a simple yet elegant design that he would take a few design cues from. He then learned how to use DraftSight (Free 2D CAD software from the people who make SolidWorks). He admits the learning curve is pretty steep; if you’ve never used CAD before.
Once he had it all figured out he was able to sketch up the layout, but when he tried sending it off to the manufacturer, they wanted a completely dimensioned drawing – you know, instead of just taking the CAD flat pattern and putting it into the CNC machine…
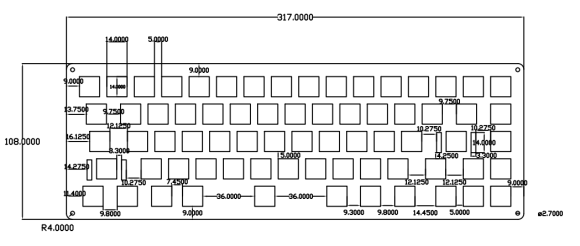
[Dave] admits “If anyone here is a Draftsman, I apologize for this filth.” However, the company was able to use it! So if it works it works – though they probably used the flat pattern and just had the drawing for reference. But to be fair, working as a mechanical developer, I’ve seen worse drawings. Much worse.
But for [Dave’s] reference, and any other designers in training, it could be cleaned up considerably just by dropping a few decimal places, as some manufacturers would see over three zeros as an indication that it has to be accurate down to the micron… which would be incredibly expensive. Oh and keeping the dimensions off of the actual part using leader lines (extended dimension lines) also keeps the drawing neat and tidy. That’s just Drafting 101 – I am by no means an expert.
Anyway, back to the hack. Lucky for [Dave], everything fit perfectly when he put it altogether, saving him from having to modify the design. All that was left was the tedious task of wiring up all the switches to the diodes and then to the Teensy, whose small size is normally a blessing, but in this case becomes very fun to wire.
He’s also done a great job explaining the entire process, which is invaluable to anyone interested in jumping into the design world, and for [Dave] this is just the beginning. He’s already planning version 2.0 which will feature his own PCB!


GONSKeyboards Works don’t make Cherry switches, Cherry make Cherry switches.
He didn’t say they made them, he said supplied them :)
If you don’t need custom keycaps, it’s cheaper to buy a complete keyboard and take it apart.
That doesn’t work if you can’t buy a keyboard with the layout you want
I mean taking it completely apart, i.e. remove the switches from the PCB.
That sounds like an annoyingly large amount of desoldering work.
Turn the board upside down, heat the back with a hot air gun/paint stripper, and bang it on something to knock the keys out.
You will be disappointed if you try this with a modern day keyboard. not much to solder anymore. It’s usually just two flexible sheets with printed lines.
That’s why you take apart a Cherry keyboard.
“and bang it on something to knock the keys out.”
I like your style
Wow the price for this keyboard is nuts and there is not a single advantage. Id rather buy a keyboard. remove controller replace and then simply paint over keys with new symbols and use custom controller to send new data. all for 1/10 of the price and wireless!
In other words, you would use what you already know, which is valid. If someone did that, however, your comment would be: “Big deal! Why is this even here?!”
your comparing against a keybaord made with the cherry switches? cause they aren’t cheap, I seen keyboard make with them run up as much as $1000. and I think some people acutally buy them
Useless…
If you read the beginning of his post he explains precisely why he made it. Not for the price, not for features, for making it — period. It was a learning process for him, which is going to open up the doors to more complex projects for him to tackle in the future. Half the projects are on here are the exact same way — it’s the hacker mindset. Sure you could take the easy way out (buying something) or you can have the pleasure of making something and being proud of it.
Dont ever be proud of wasting money and time. He could have done it more custom. This isnt a hack. There is nothing ro learn with premade buttons that cost a ton. If he would have made the buttons from clay or wood then it would be a learning experience. Learning how to wire buttons isnt a huge skill. The coding is the only important thing here and not even. Its a glorified arduino. do it from scratch with no libraries and then you would have learned something and could be proud.
You are a massive cunt, you know that?
Haha thanks
sure because he can’t be proud about learning design skills or how to use a CAD program. wow snob much? your whole post drips with arrogance and distain for people with less skill then you. just because you don’t think it’s an achievement doesn’t make it a waste of time.
I never said it wasnt an achievement lol I said it was a waste of money. And not huge skills on the hardware part. For all I know he has way more skills than I do. It doesnt matter. What matters is I should have the right to voice my opinion and it was basically … what a waste of money. I never said I didnt like it and he shouldnt be on hackaday. I like the keyboard and would congratulate him in person if I could.. but that price list kills me. Being smart also means making a project repeatable for all. What about all those people who cant afford to recreate this? Oh wait u dont care…
Your parents having you was a huge waste of time and money. They could have just molested some kid at the bus stop instead.
Ah parent jokes… anymore? Did I blast something up ur Ass there? I think I hit a nerve lmao
https://github.com/AtomSoftTech/RemoteSeven
This project was also a waste of time and money. You could have gotten a $50 android tab instead.
Yes you are right… oh wait.. nope you arent lol. Tablets dont have rf or ir unless its a galaxy or > $100
If nothing else, this was a learning exercise in – getting a case made from a CAD design. With feedback from Hackaday on Drafting 101.
This is indeed an awesome build. I think it came out beautiful! The only flaw was the price otherwise kudos!
Apparently the recommended approach to building something is to buy one and paint it? Atomsoft thinks because he makes useless crap that already exists in better forms elsewhere, that building things is a waste of time and money with no discernable advantages. Also you should shun anybody that tries.
What a wanker.
http://bit.ly/1sEr8m3
Lol UK Guy I guess.. I never said his project was useless. Just a waste of money. Like I said before I like it and its cool but… pretty tuff for people without the cash to recreate. Which is something important for hackaday
Have you even read hackaday? There are heaps of projects that would cost thousands to recreate.
This project cought my interest. And it sux that its so pricey. So i commented on it. Is that a crime? If you like CRAP then like it. If you hate good projects then thats on you. If you dont like my comment then screw you. lol
Have you ever opened a modern day keyboard? i guess not, the guy said in his build report he is not good at soldering, then its almost impossible to swap the controller with such tiny wires.
Ah I got a fanbase now… yes! Thank you all lmao. Please, dont stop yet.
Yep. you are right.
that gonkeyboard site is uterly ignored by the ‘keyboard community’ (yeah, there is such a thing).
you can do your own design with custom fabrication for less than they sell their cases only… what a joke.
if you want to see a REAL job of designing a keybboard, head to http://www.key64.org/
Cool, thanks for the link! I didnt kniw there was a “keyboard community” hah! Thats awesome!
While I’d never go through all the trouble to make a full-size keyboard (because, quite frankly, I’m in love with my Razer), this is a great reference read for if I ever get around to making custom controllers and mini-keyboards for things.
This kind of reminds me of the infinity keyboard by massdrop- reportedly, it’s designed by members of the keyboard/massdrop community. Check it out here: https://www.massdrop.com/buy/infinity-keyboard-kit?share=1
Also, for naysayers about the price, the very popular Ducky Shine 3 costs around 120$, and people spend a hella lot more on keycaps, which can cost huge piles of money. It’s just another luxury hobby, not too dissimilar from audiophiles.
I see some wonder “why” he made this keyboard when it’d be much cheaper, and easier, to buy a new keyboard and take it apart?
I’ve made a vast number of things in my days that could’ve been bought for a lot less money than I spent making them – especially for those projects that failed…
But I learn nothing from buying already existing stuff, unless taking it apart and reverse engineering it, and today I actually build stuff that is not available to buy – all because I’ve made a lot of stupid projects!
Dave – your keyboard looks great and I’m sure typing is even greater knowing you built it yourselves! Be proud of this project – which is actually a damn big project with many variables that can go wrong.
Myself is happy with my WASD v1 keyboard. Sadly they have changed the keycaps in the v2 model and no longer have the same ability for customisation. Regardless, if I didn’t already own this keyboard I’d be tempted to make my own after reading your writeup :)