
[Ramon] was always fascinated with pianos, and when he came across a few player piano rolls in an antique shop, a small kernel of a project idea was formed. He wondered if anyone had ever tried to convert a player piano into a full MIDI instrument, with a computer tickling the ivories with a few commands. This led to one of the best builds we’ve ever seen: a player piano connected to a computer.
[Ramon] found an old piano in Craigslist for a few hundred dollars, and once it made its way into the workshop the teardown began. Player pianos work via a vacuum, where air is sucked through a few pin points in a piano roll with a bellows. A series of pipes leading to each key translate these small holes into notes. Replicating this system for a MIDI device would be impossible, but there are a few companies that make electronic adapters for player pianos. All [Ramon] would have to do is replicate that.
The lead pipes were torn out and replaced with 88 separate solenoid valves. These valves are controlled via a shift register, and the shift registers controlled by an ATMega. There’s an astonishing amount of electronic and mechanical work invested in this build, and the finished product shows that.
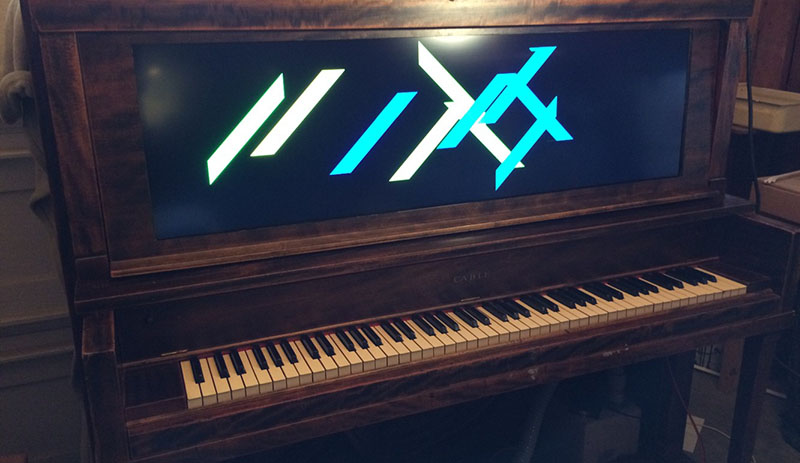
As if turning an ancient player piano into something that can understand and play MIDI music wasn’t enough, [Ramon] decided to add a few visuals to the mix. He found a display with a ratio of 16:4.5 – yes, half as tall as 16:9 – and turned the front of the piano into a giant display. The ten different styles of visualization were whipped up in Processing.
The piano has so far been shown at an interactive art exhibit in Oakland, and hopefully it’ll make it to one of the Maker Faires next year. There are also plans to have this piano output MIDI with a key scanner underneath all the keys. Very impressive work.
Video below.


Well it ain’t no disclavier but it is neat, how about a wireless connection to the laptop and hide the wires coming out of the bottom of course.
The cables at the bottom were only power to the unit via an extension cord, and a cable coming out of the power strip to my laptop, which DOES control the system over WIFI. An Airport express also lives in the piano to publish its own wireless network.
Oh, cool, nice job.
The two cables coming out of the bottom are an extension cord, and a power supply cable to my laptop, which I used over WIFI to control the piano. The piano also has an Airport Express in it that publishes its own network that my laptop can join and thus control it.
Over at one of the California Universities there is an effort to restore the wonders of the player piano. Go here http://tinyurl.com/mxc9qr6 there it seems they are at work at Stanford. It seems they also have a few of the ones who were used to cut the rolls.
The e-valve is a great add-on to any working player. There is a lot of fun in pumping and expressing the music rather than having it just fully automatic. I would add lyrics to the display. Also “piano roll’ display to the screen, as that is a help when pumping to see breaks and accents.
that screen tho…
Does those pianos make loudness changes in notes? Because the valves he used are On or OFF, could it be half opened?
The vacuum pump has a control on it that changes overall volume because it increases the suction and thus the force of the hammer strikes. The solenoids have a distinct on/off and the old bellow array works in much the same way. I don’t think I can control the strength of the hammer strike by cycling the solenoid, but it warrants further exploration.
It seems like you could work on the response time of the mechanical hammer versus the actuation response of the solenoid – that there would be a solenoid duty cycle that would be so swift that the hammer wouldn’t strike the key and between that and the “standard” actuation would be a (likely non-linear) response that could be exploited for expression. It would be a simple (and probably annoying) single-hammer test to try.
It certainly warrants exploration. But not all MIDI files have such information, and some of it isn’t quite accurate. I’ll give it a try when I have time. The amount of RAM available on the ATMega limits how much it can deal with each key.
In the September 1977 issue of Byte magazine, there’s an article (p 112) detailing the author’s experience with interfacing a player piano with a microcomputer; he utilized electromagnetic valves of some arrangement, controlled using peripheral driver ICs (SN75452). A custom 8-wire serial interface was constructed to minimize the cabling needed to control it. The author doesn’t say what kind of microcomputer he was using, but one could speculate that it was likely some S100 bus 8-bit beast of the era.
A following article (p 122) details the anatomy of a certain kind of player piano, known as a “reproducer”. The purpose of such a piano was to come as close as possible to allow the piano to reproduce the “nuances” of the pianist who recorded the roll. The article covers everything about this system, which was really a digital control system done in pneumatics; the author even remarks that it incorporated something akin to a mechanical DAC (!). It also seems like the system had the capability to “loop” (return to beginning of roll and continue to play).
All in all – player pianos are fascinating machines of a bygone era. I’ve often likened the concept of how a (basic) CPU works to that of a very fast player piano; each clock cycle stepping a counter which updates the “address” for the memory, and other clocks in sync with the base clock setting or reseting status lines to transfer data in and out of memory, into registers, or telling the ALU what to do with a register or two (or the contents of memory) – with the memory being the really long “piano roll” of “notes” (each “note” being an operand and some data – again, basic design here – there’s a ton of ways to represent and build a CPU of course).
Play a black midi file on it!
I’ve got a few, and I may in the future. But those files are pretty intense. I don’t want to damage my already kinda delicate old piano.
Haha! Don’t kill the machine, please!
I would like to spread the notes played on a grand piano across 3 piano frames (randomised) any idea how I could do this????
my mechanical capability is way, way above my coding(Arduinos are cheap, I am trying to build a dashboard for my 1978 Mini with one!)
It would be easy to do given what I’ve already built. You’d run 3 clients in your session each configured for either randomness or a certain note range. Ping me and I’d be happy to help out.
Hey Ramon, I’m sitting on a shiny new raspberry pi and I’m new to programming but I have a ton of mechanical background. I’ve always loved orchestrions and I think it would be fun to build one over time. Right now I’m just brainstorming to try to figure out how to get from a midi file to I/O and I don’t really know where to start or what that program would look like. Any suggestions?
The old reproducing pianos had expression holes that would signal a pressure regulator to vary the strike.
Pulling midi velocity data out to do this would do this for you.
The reproducers would also play regular rolls and the operator could manually control expression.
With a midi editor, one could add expression to non expression files.
This is not hard to do, albeit a tad time consuming.