The word “restomod” is a bit nebulous, but it’s normally used in the automotive world to describe taking an old car and making it better-than-new with all the technological improvements the original builders would have used, had they been available. We think the word applies to [Alnwlsn]’s MIDI-actuated player piano, because what are those punched rolls of paper, but the MIDI of the 19th century?
Unlike a lot of automotive restomods though, this one is mostly reversible. He did drill few holes and slots in the original wood, but nowhere that it would alter the integrity or original operation of the player piano mechanism. The MIDI-controlled solenoids just poke the same key paddles from below that the pneumatic mechanism used. From the listener or operator’s perspective, unless the doors that reveal the music scroll or lack thereof are open, the piano behaves exactly the same. Except now it has access to the whole wide array of tracks that exist in MIDI form, rather than a paltry selection of hard-to-find piano rolls.
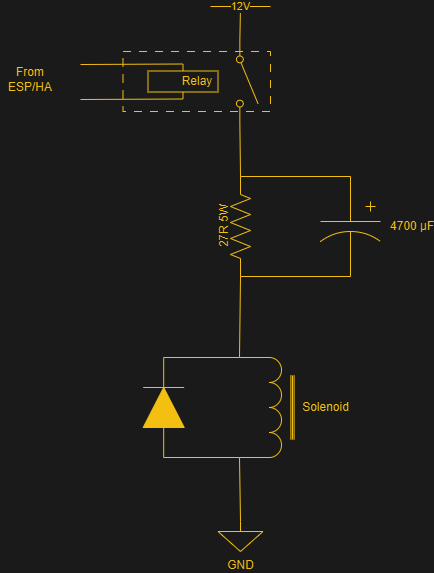
Each of the relays is driven by a MOSFET via shift registers to get 88 outputs out of the single Pi Pico in charge, with a level shifter involved to get the RP2040 speaking 5 V logic. If you’re wondering how that gets volume control, no, the piano isn’t smacking keys at full volume all the time. He’s using the RP2040’s powerful PIO to create a sort of PWM signal to soften the solenoid blows when needed. To save his power supply, he’s also got it set up to stagger the pulses, so multiple relays aren’t pulsed at the same time when the MIDI file calls for chords.
There was actually more overlap between player pianos and MIDI than you might think, given this presentation of an Apple ][ being used to create the piano rolls.
Continue reading “Leaky Player Piano Gets MIDI Upgrade In YouTube Restomod”