If you’ve had the chance to add a Form 1+ 3D printer to your basement, you might find the post-print cleaning step a bit tedious. (A 20-minute alcohol bath? Outrageous!) Fortunately, for the impatient, [ChristopherBarr] has developed the perfect solution: a post-print agitator that cuts the time in-and-out-of the bath from 20 minutes to about two.
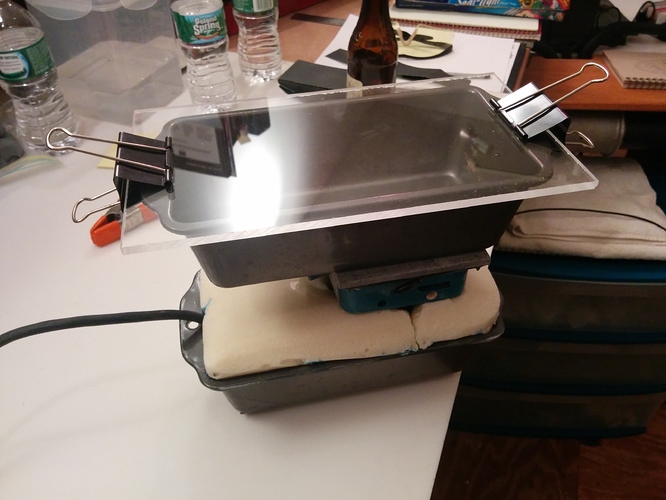
[ChristopherBarr’s] build is the right conglomerate of parts we’d expect when keeping the price down for this hack. He’s combined a palm sander, a couple pints of urethane expanding foam, and two loaf pans into one agitating mechanism that he’s dubbed “the Loafinator.” With the urethane expanding foam, [ChristopherBarr] achieved a near-perfect fit of the sander inside the loaf pan, now that the foam has filled in the remaining contours to hold the sander in place. Best of all, the sander hasn’t been sacrificed for this build; instead, the foam holder was assembled in three stages and isolated from the sander with a layer of plastic wrap to enable later extraction.
[ChristopherBarr’s] simple, yet practical, hack serves as an excellent solution to a number of hobbyists looking to “get things agitated.” While his device is able to polish off the uncured resin from his resin prints much faster than the conventional approach, we’d imagine that a similar build could greatly expedite the PCB etching process in a muriatic-acid or ferric-chloride based PCB etching procedure–far more quickly than our previous automated solution. The time-saving comes at a price; however. Once you’ve installed your very own Loafinator alongside your printer, expect a few nosy neighbors to start asking for visits to check out your new motorboat.


I’m not sure about using it for etching PCBs. I tried using an ultrasonic cleaner to speed up etching and it made no difference at all. I must write that up at some point. A failed experiment is useful if it saves someone else the trouble of repeating it.
The commercial board etchers that I’ve worked on all sprayed the etchant against the boards from spray bars. The etchant dropped into a sump, where it was filtered and pumped back into the spray bars. In this way, a large copper clad board could be etched in less than a minute (they actually rolled through the machine on an open-roller type conveyor so the machine could spray both sides of the board simultaneously). The etchant in this case was ammonium hydroxide, real fun stuff to get on your skin.
I’ve always assumed that you want continually expose the copper to fresh etchant by circulating it. By spraying it like DainBramage suggests or using an air stone like Burningfeet recommends.
I picture an ultrasonic cleaner agitating, but not doing much to circulate to the etchant.
I speed up the process by placing on container on a heating pad. I use just enough chemical to do the job – typically 10cc of the ammonium persulphate solution, so can’t use the bubbler stone.
The homemade heating pad was a tin lip with a couple of 10W resistors and a thermostat circuit under it.
Similar, I use ferric chloride, but I heat it up on the stove. pcbs will float in it and etch in less than a minute.
:D I will do the same… Nice idea!!!
Two quick points, 1st in my personal adventures in etching pcbs I have found a simple aquarium bubbler stone (different stones seem to produce different size / volumes of bubbles, (experiment and your milelage may very) to be all the agitation you need to speed the process and I wonder if anyone has experimented with immersing these prints in a similar stream of fine air bubbles,
2nd I can’t help but picturing a large set of breasts whenever motorboats are mentioned.
For a finer stream of more bubbles, try the wooden air”stones” used in DIY reef skimmers (possibly also in real skimmers, but I’ve never worked with those). It produces a more elegant stream of bubbles, which might help you in better agitation (more bubbles = more surface area to carry etchant) or it might just be a bust (finer bubbles might carry less etchant weight). We can debate it all night, or someone might try it, and call it the DigiEtcher :D
Burningfeet: I can’t help but picturing a large set of breasts whenever motorboats are mentioned
Digigram: or it might just be a bust
I see what you did here. B^)
FormLabs doesn’t say 20 minutes. A gentle shake for a minute, then let it set for 10 minutes. If you use MadeSolid resin, I think it’s just a couple minutes without all the expense and fuss.
I do want to try ultrasonic cleaner on dissolvable support filament. I understand that’s what Stratasys and 3D Systems does. Otherwise, it takes a day and a lot of fuss. Basically, clean out softened material about an hour in and the remaining residue is clean after another day’s soaking.
While I agree with the above comments that this might not be the most effective for PCB’s (I’ve used the ‘bubbler’ technique) I had been looking into parts to build a automotive ‘parts cleaner’ for use in my garage when I’m degreasing car parts (got to have a hobby). Using a vibrating sander as the agitator instead of ultrasound elements for boats (supposed to keep the hull clean) is a lot cheaper and I can get it easily. Thanks for the great idea!