Art of 3D printer in the middle of printing a Hackaday Jolly Wrencher logo

3D Printering: Wash Parts Better And Make Solvent Last Longer

SLA printing in resin is great, but part washing can be a hassle. The best results come from a two-stage wash, but that also means more material and more processing steps. Fortunately, there are ways to make it easier and more effective. One such way is to use a part washing machine, and I’ll cover a DIY option to make your own, but despite what the advertising implies for the commercial ones, a wash machine isn’t a cure-all.

Let’s go through how to get the best results from part washing, how to make the solvent last as long as possible, and how to dispose of the eventual waste.

Resin-Printed Parts Need Washing

All parts printed in resin emerge from the printer coated in syrupy, uncured goop. This needs to be removed completely, or the print ends up sticky and no amount of drying or additional UV curing will change that. (There is a way to fix sticky prints, but it’s better to avoid the situation in the first place.)

Simple part washing can be done with nothing more than a jar in which to rinse and soak a small part for about ten minutes, but agitation and a secondary wash will go a long way toward better and more consistent results. As mentioned, part washing machines like to present themselves as a one-appliance solution, but best results still come from a two-stage wash, and that means some additional steps.

Continue reading “3D Printering: Wash Parts Better And Make Solvent Last Longer”

Etching A PCB In Ten Minutes.

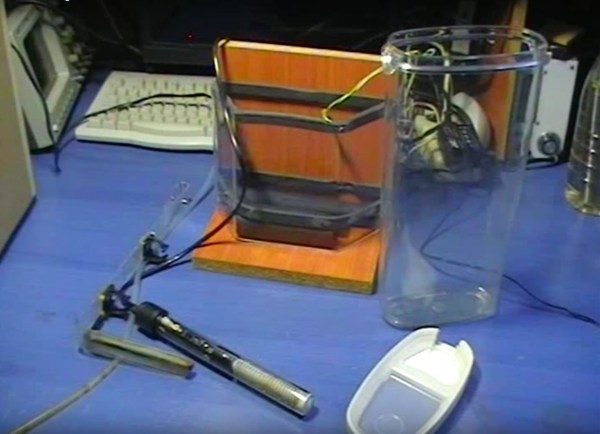
Most circuit boards any maker could need for their projects can be acquired online at modest cost, but what if you need something specific? [Giorgos Lazaridis] of pcbheaven.com has designed his own etching bath complete with a heater and agitator to sped up the process of creating your own custom circuit boards.

[Lazaridis] started by building a circuit to control — in a display of resourcefulness — a fish tank heater he would later modify. The circuit uses a PIC 16F526 microcontroller and two thermristors to keep the temperature of the etching bath between 38 and 41 degrees Celsius. The fish tank heater was gingerly pried from its glass housing, and its bimetallic strip thermostat removed and replaced with a wire to prevent it shutting off at its default 32 degrees. All of it is mounted on a small portable stand and once heated up, can etch a board in less than 10 minutes.

Continue reading “Etching A PCB In Ten Minutes.”

Home-brew Vibration Cleaner Leaves Your SLA Prints Squeaky-Clean

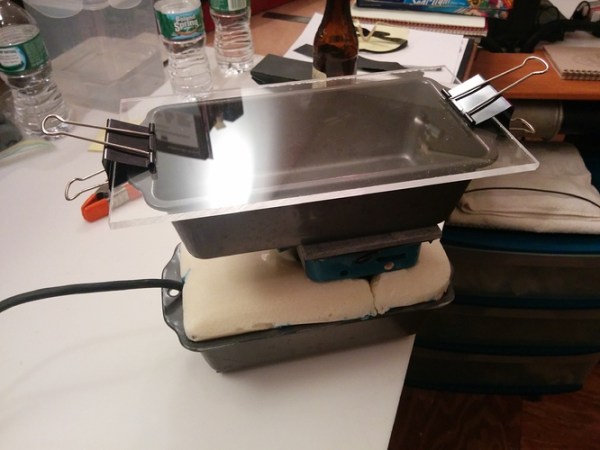
If you’ve had the chance to add a Form 1+ 3D printer to your basement, you might find the post-print cleaning step a bit tedious. (A 20-minute alcohol bath? Outrageous!) Fortunately, for the impatient, [ChristopherBarr] has developed the perfect solution: a post-print agitator that cuts the time in-and-out-of the bath from 20 minutes to about two.

[ChristopherBarr’s] build is the right conglomerate of parts we’d expect when keeping the price down for this hack. He’s combined a palm sander, a couple pints of urethane expanding foam, and two loaf pans into one agitating mechanism that he’s dubbed “the Loafinator.” With the urethane expanding foam, [ChristopherBarr] achieved a near-perfect fit of the sander inside the loaf pan, now that the foam has filled in the remaining contours to hold the sander in place. Best of all, the sander hasn’t been sacrificed for this build; instead, the foam holder was assembled in three stages and isolated from the sander with a layer of plastic wrap to enable later extraction.

[ChristopherBarr’s] simple, yet practical, hack serves as an excellent solution to a number of hobbyists looking to “get things agitated.” While his device is able to polish off the uncured resin from his resin prints much faster than the conventional approach, we’d imagine that a similar build could greatly expedite the PCB etching process in a muriatic-acid or ferric-chloride based PCB etching procedure–far more quickly than our previous automated solution. The time-saving comes at a price; however. Once you’ve installed your very own Loafinator alongside your printer, expect a few nosy neighbors to start asking for visits to check out your new motorboat.

Continue reading “Home-brew Vibration Cleaner Leaves Your SLA Prints Squeaky-Clean”

PCB Agitator From A Broken CD-ROM Drive

pcb-agitator

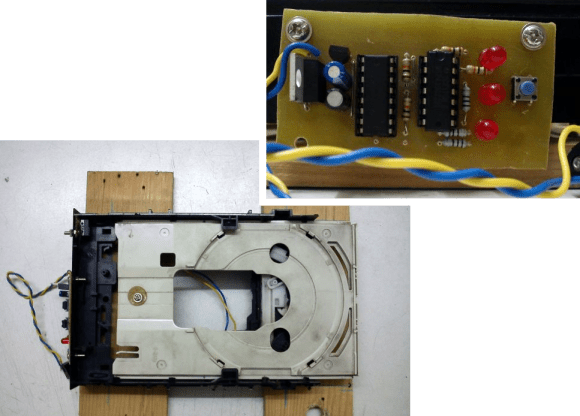
Etching PCBs goes a lot better if you agitate the solution in order to carry away the dissolved copper and get fresh etchant to the area. With that in mind [Rohit Gupta] designed a mechanism in Sketch Up before realizing he was going about it the hard way. He ended up basing his agitator on a broken CD-ROM drive instead of starting from scratch.

He uses the CD sled from the drive, ditching the lens and its support structure. To get direct access to the motor that drives the tray he uses an L293D H-bridge chip. This is controlled by an MSP430G2231 microcontroller. The driver board seen in the upper right includes a voltage regulator, three status LEDs, and one user input switch. Once triggered, the sled will move back and forth, contacting an old mouse microswitch which acts as the limiting switch. We find it entertaining that [Rohit] prototyped the circuit on a breadboard, then used that success to etch the final circuit board (shown in the video below).

If you’ve been following the hacker creed and never getting rid of any junk you’ll have no problem finding a donor drive to make one of your own. But just in case you can’t get a hold of this hardware a similar agitator can be built using a hobby servo.

Continue reading “PCB Agitator From A Broken CD-ROM Drive”

Cheap And Easy PCB Agitator From An Old CD-ROM

cdrom_pcb_agitator

Instructables user [mzsolt] enjoyed making his own PCBs, but he wanted to speed up the etching process just a bit. While some people put together elaborate bubble tanks and agitators, he wanted to keep his simple and more importantly, cheap.

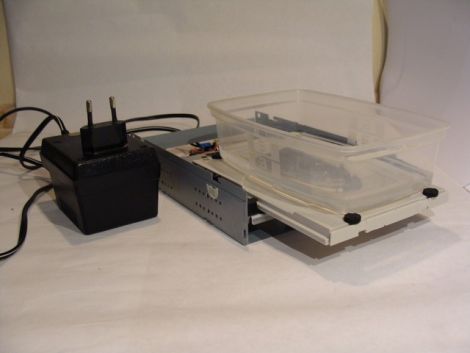
He looked around the house and discovered an ancient CD-ROM drive that was collecting dust, which he figured would make a great agitator for smaller projects. He picked up a decade counter and a handful of other cheap components, then got busy pulling the drive apart. He connected the motor and the drive’s limit switches to the decade counter, which controls the entire setup.

When powered on, the drive ejects, taking his container full of etchant with it. When the drive hits the outer limit switch, the decade counter reverses the motor until it hits the inner switch, reversing the motor once again.

As you can see in the video below, it works reasonably well. He suggests using a variable power supply to regulate the motor’s speed, but a variable pot would probably work just as well. Obviously the agitator is best suited for smaller projects, but since it was so cheap to put together, you won’t hear us complaining.

Continue reading “Cheap And Easy PCB Agitator From An Old CD-ROM”