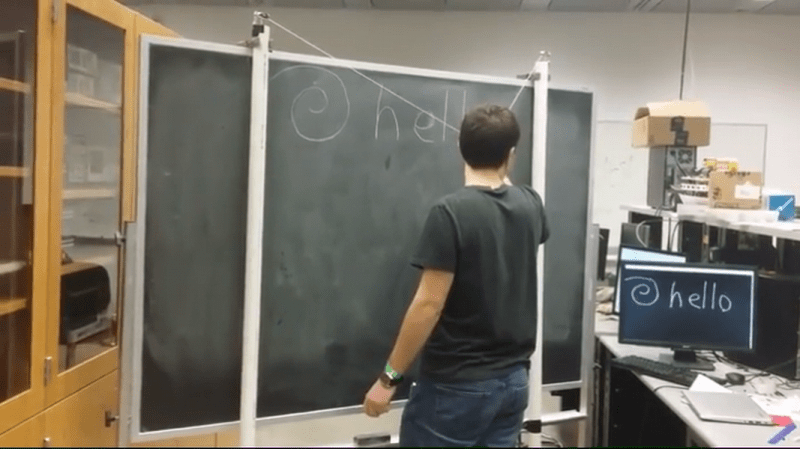
Digital White/Black Boards or “Smart Boards” are very useful in modern classrooms, but their high cost often makes it difficult to convince administrators from loosening their purse strings. Cooper Union’s 2nd annual HackCooper event in New York wanted students to design and build hardware and software projects that both solve real problems and spark the imagination. At the 24 hour hackathon, the team of [harrison], [david] and [caleb] decided to put together a low-cost and simple solution to digitizing classroom black board content.
A chalk-holder is attached to two strings, each connected over a pulley to a weight. The weights slide inside PVC pipes at the two sides of the black board. Ultrasonic sensors at the bottom of each tube measure the distance to the weights. The weights sit in static equilibrium, so they serve the purpose of keeping the string taut without negatively interfering with the writer.
With a couple of calibration points to measure the extent of displacement of each weight, board width can be determined, making it easy to adapt to different sizes of boards. Once calibrated, the system can determine position of the chalk over the board based on some trigonometrical calculations. Since they had just 24 hours to hack the system together, they had to use a hand operated radio with a couple of buttons to provide user control. Pressing the “Write” button starts transmitting chalk movements to the digital screen. A second button on the radio remote serves to “Erase” the digital screen. After receiving the chalk position data, they had to do a fair amount of processing to eliminate noise and smooth out the writing on the digital screen.
A server allows the whole class to receive the chalk board data in real time. After each “Erase” command, the chalk board state is saved and logged on the server, thus allowing previous content to be viewed or downloaded. If only text is written, optical character recognition can be used to further digitize the content.
What makes the project really useful is the low cost. The sensors cost a dollar. The other parts – PVC pipe, weights/pulleys, Arduino and the Radio key fob – were all bought for under 40 dollars. For some additional cost (and maybe more time in their case) they could have automated the detection of when the chalk was actually doing the writing. The team have made their code available on Github. For a Chalk board at the other end of the cost spectrum, check this one out. Video below.
[via Reddit]


It’s a {great} hack!
does anyone know which ultrasonic sensors they are using?
Yes I’d like to know that too– ultrasonic sensors for $1? Never seen those before!
Search for HC-SR04 on ebay. They really are about $1.
Indeed, they are. Just don’t expect all of them to work. I have had about 25% of the SR04 fail from my cheap china / ebay supplier. If you are receiving constant results of 3000+ (in centimeters), then you are not alone. I have several of these duds.
While it’s a nice hack, it requires setting up the board beforehand, and I can see those strings becoming tangled fairly quickly. It would be a fun learning experience and certainly worth the effort if your goal is gaining experience in interfacing hardware and software, but if you actually want a reliable pen-tracking chalkboard or whiteboard, there are other cheaper, easier options.
Johnny Lee already made a multi-touch whiteboard system using only a Wii remote (which requires a Bluetooth interface) and one or more IR LEDs attached to the pens.
Video here:
http://youtu.be/5s5EvhHy7eQ
Details and drivers here:
http://johnnylee.net/projects/wii/
What’s a blackboard?
A whiteboards ghetto cousin.
Also known as a Chalkboard
I suspect you could use a microphone to detect the sound of the chalk on the board, to save having to manually activate the recording. You could also use a similar (duplicated) setup to track the position of the eraser, and probably the same microphone to detect when it is in contact with the board, to detect how much of the board is being erased.
What about expanding on this idea and using a microphone/transducer of some sort bonded to the slate at each corner measuring vibrations through the chalk board, then measuring the delay between each one and triangulating the position from there. Perhaps also sensing the different waveforms and intensities produced by the chalk and the eraser.
I would expect the idea of the microphones not to work for sliding the chalk on the board. It could definitely work for taps, like this keyboard app, if it really works: http://techcrash.net/develop-a-vibration-based-virtual-keyboard-for-smartphones/
May be a piezo speaker disc to sense the blackboard vibrations is easier. A mic would picks up all kind of noises and you have the hard problem of figuring which is made by the chalk.
I would use an ultrasonic transducer (like the ones already in the range finders) and high pass filter the signal. Point it across the surface of the board from one edge and the narrow beam angle these thing have combined with the chalk rubbing on the board being an excellent source of ultrasonic noise should mean near no false positives.
Why not simply have a switch in the bottom of the chalk holder that gets depressed when you push the chalk against the board?
Why not just a spring loaded push button in a chalk holder, when you write you push the button down and record what you write, when you let go the button opens and stops recording.
This project is neato fella!
Reminds me of a similar thing done a few years back by Evan Roth using a ball mouse as the encoder and an arduino to read the input.
https://vimeo.com/35944224
No reason that the system couldn’t do the pythagorean theorem fast enough to display real-time.
Cool. But couldn’t you just buy a $5 webcam and take photos?
You would need to go far beyond those $5 Chinese “HD” webcams that are really 0.3 megapixels, but CSI zoom-enhanced to hell.
The $40 range Logitech ones isn’t that good. By then might as well find a used Canon with CHDK scripting support to take a picture by external shutter control.
what i do find kinda weird about this hack is:
if they decide to use ultrasonic sensors anyways, then why not use them at 3 corners of the board, with a transmitter in the chalk holder, so as to have a “no strings attached” solution?
My engineering physics instructors would have hated it. They had three levels of blackboards, wrote on them like madmen and, when they finished one, shoved it up and without slowing began on the next board.
We had to write very fast to keep up.
I seem to remember from a few years ago, active transducers that could be mounted on a wall, blackboard, etc. Worked to detect touch based on the same principle as a SAW (surface acoustic wave) touchscreen. Whatever happened to that?