A Real-Time Networked VU Running On The ESP8266

Even though the ESP8266 WiFi chipsets are really cheap (and can be somewhat challenging to work with), they still pack a lot of processing power. For instance, [Mr.jb.swe] took one of these modules and made a stand-alone live VU meter with WS2812B LED strip. The VU runs entirely on the ESP chip, without any additional microcontroller. It’s an example we think a lot of projects could follow to do away with unused horsepower (extra microcontrollers) sometimes used to avoid programming directly on the ESP. The stuff you can do with these modules is wild… did you see this WiFi signal strength mapping project?

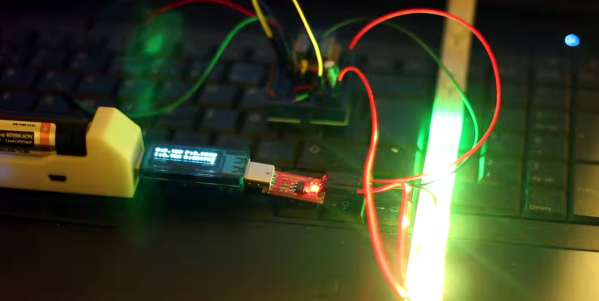
The ESP chipset acts as a UDP client which receives packets from a WinAmp plugin that [Mr.jb.swe] wrote. The plugin continuously calculates the dB of whatever track is playing and streams it over WiFi to his ESP8266. He also mentions that the ADC of the ESP chipset could be used to sample audio as well, although that pretty much eliminates the need for WiFi.

The whole setup is very responsive even though the processor is parsing UDP messages, driving the WS2812 strip, and driving a small OLED display for debug—and it doesn’t even use a separate microcontroller. [Mr.jb.swe] also posted snippets of his code to get you started on your own project. Check out the videos after the break to see it in action.

Continue reading “A Real-Time Networked VU Running On The ESP8266”

Blackboard Digitization For Under $40

Digital White/Black Boards or “Smart Boards” are very useful in modern classrooms, but their high cost often makes it difficult to convince administrators from loosening their purse strings. Cooper Union’s 2nd annual HackCooper event in New York wanted students to design and build hardware and software projects that both solve real problems and spark the imagination. At the 24 hour hackathon, the team of [harrison], [david] and [caleb] decided to put together a low-cost and simple solution to digitizing classroom black board content.

A chalk-holder is attached to two strings, each connected over a pulley to a weight. The weights slide inside PVC pipes at the two sides of the black board. Ultrasonic sensors at the bottom of each tube measure the distance to the weights. The weights sit in static equilibrium, so they serve the purpose of keeping the string taut without negatively interfering with the writer.

With a couple of calibration points to measure the extent of displacement of each weight, board width can be determined, making it easy to adapt to different sizes of boards. Once calibrated, the system can determine position of the chalk over the board based on some trigonometrical calculations. Since they had just 24 hours to hack the system together, they had to use a hand operated radio with a couple of buttons to provide user control. Pressing the “Write” button starts transmitting chalk movements to the digital screen. A second button on the radio remote serves to “Erase” the digital screen. After receiving the chalk position data, they had to do a fair amount of processing to eliminate noise and smooth out the writing on the digital screen.

A server allows the whole class to receive the chalk board data in real time. After each “Erase” command, the chalk board state is saved and logged on the server, thus allowing previous content to be viewed or downloaded. If only text is written, optical character recognition can be used to further digitize the content.

What makes the project really useful is the low cost. The sensors cost a dollar. The other parts – PVC pipe, weights/pulleys, Arduino and the Radio key fob – were all bought for under 40 dollars. For some additional cost (and maybe more time in their case) they could have automated the detection of when the chalk was actually doing the writing. The team have made their code available on Github. For a Chalk board at the other end of the cost spectrum, check this one out. Video below.

Continue reading “Blackboard Digitization For Under $40”

Flux Capacitor

Great Scott! A Flux Capacitor Notification Light

If you are into your social media, then you probably like to stay updated with your notifications. [Gamaral] feels this way but he wasn’t happy with the standard way of checking the website or waiting for his phone to alert him. He wanted something a little more flashy. Something like a flux capacitor notification light. This device won’t send his messages back in time, but it does look cool.

He started with an off-the-shelf flux capacitor USB charger. Normally this device just looks cool when charging your USB devices. [Gamaral] wanted to give himself more control of it. He started by opening up the case and replacing a single surface mount resistor. The replacement component is actually a 3.3V regulator that happens to be a similar form factor as the original resistor. This regulator can now provide steady power to the device itself, as well as a ESP8266 module.

The ESP8266 module has built-in WiFi capabilities for a low price. The board itself is also quite small, making it suitable for this project. [Gamaral] used just two GPIO pins. The first one toggles the flux circuit on and off, and the second keeps track of the current state of the circuit. To actually trigger the change, [gamaral] just connects to the module via TCP and issues a “TIME CIRCUIT ON/OFF” command. The simplicity makes the unit more versatile because an application running on a PC can actually track various social media and flash the unit accordingly.

Automatic Garage Door Opener Works For Your Cat

Using an Arduino or Raspberry Pi to perform a task in the real world is certainly a project we’ve seen here before, and certainly most of these projects help to make up the nebulous “Internet of Things” that’s all the rage these days. Once in a while though, a project comes along that really catches our eye, as is the case with [Jamie’s] meticulously documented automatic garage door opener.

This garage door opener uses an ATMega328 to connect the internet to the garage door. A reed switch is installed which lets the device sense the position of the door, which is relayed back to the internet. [Jamie] wrote an Android app that can open and close the door and give the user the information on the door’s status. One really interesting feature is the ability to “crack” the garage door. This is done by triggering the garage door opener twice with a delay in between. From the video after the break we’d say this is how [Jamie’s] cat gets in and out.

We love seeing projects that are extremely well documented so that anyone who wants to make one can easily figure out how. Internet-connected garage door openers have been featured in other unique ways before too, but we’ve also seen ways to automatically open blinds or chicken coops!

Retrotechtacular: Teleprinter Tour, Teardown

This week, we’re taking the wayback machine to 1940 for an informative, fast-paced look at the teleprinter. At the telegram office’s counter, [Mary] recites her well-wishes to the clerk. He fills out a form, stuffs it into a small canister, and sends it whooshing through a tube down to the instrument room. Here, an operator types up the telegram on a fascinating electro-mechanical device known as a teleprinter, and [Mary]’s congratulatory offering is transmitted over wires to her friend’s local telegraph office hundreds of miles away.

We see that the teleprinter is a transceiver that mechanically converts the operator’s key presses into a 5-digit binary code. For example, ‘y’ = 10101. This code is then transmitted as electrical pulses to teleprinters at distant offices, where they are translated back into alphanumerical data. This film does a fantastic job of explaining the methods by which all of this occurs and does so with an abstracted, color-coded model of the teleprinter’s innards.

The conversion from operator input to binary output is explained first, followed by the mechanical translation back to text on the receiving end. Here, it is typed out on a skinny paper tape by the type wheel shown above. Telegraphists in the receiving offices of this era cut and pasted the tape on a blank telegram in the form of meaningful prose. Finally, it is delivered to its intended recipient by a cheeky lad on a motorbike.

Continue reading “Retrotechtacular: Teleprinter Tour, Teardown”

Mapping WiFi Signals In 3 Dimensions

[Charles] is on a quest to complete ever more jaw-dropping hacks with the popular low-cost ESP8266 WiFi modules. This week’s project is plotting WiFi received signal strength in 3D space. While the ESP8266 is capable of providing a Received Signal Strength Indication (RSSI), [Charles] didn’t directly use it. He wrote a simple C program on his laptop to ping the ESP8266 at around 500Hz. The laptop would then translate the RSSI from the ping replies to a color value, which it would then send to the ESP8266. Since the ESP8266 was running [Charles’] custom firmware (as seen in his WiFi cup project), it could directly display the color on a WS2812 RGB LED.

The colors seemed random at first, but [Charles] noticed that there was a pattern. He just needed a way to visualize the LED over time. A single frame long exposure would work, but so would video. [Charles] went the video route, creating SuperLongExposure, an FFMPEG-based tool which extracts every video frame and composites them into a single frame. What he saw was pretty cool – there were definite stripes of good and bad signal.

wifiPOVThumb
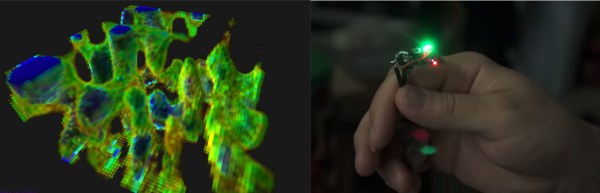
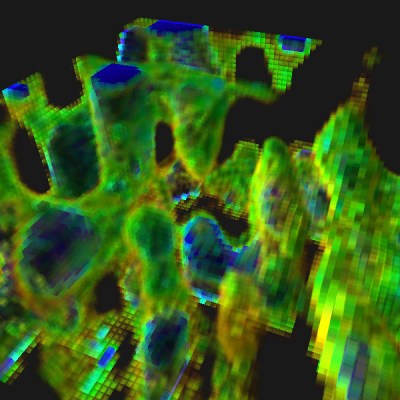
Armed with this information, [Charles] went for broke and mounted his ESP8266 on a large gantry style mill. He took several long exposure videos of a 360x360x180mm area. The videos were extracted into layers. The whole data set could then be visualized with Voxeltastic, [Charles’] own HTML5/WEBGL based render engine. The results were nothing short of amazing. The signal strength increases and decreases in nodes and anti-nodes which correspond to the 12.4 cm wavelength of a WiFi signal. The final render looks incredibly organic, which isn’t completely surprising. We’ve seen the same kind of image from commercial antenna simulation characterization systems.

Once again [Charles] has blown us away, we can’t wait to see what he does next!

Continue reading “Mapping WiFi Signals In 3 Dimensions”

Logic Noise: 8-bits Of Glorious Sounds

Logic Noise is all about using analog circuits to make sounds. Preferably sound that will be enjoyable to hear and useful for making music. Now, the difference between music, sound, and noise is certainly in the ear of the behearer, but you must admit that last installment’s simple square wave lacked a little something. (Although the sync oscillator circuit extension was kinda cool.)

This week, we’ll take our single wimpy square-wave oscillator and beef it up by adding a bunch of sub-octaves to the mix. And we’ll do it using a chip that’ll be really useful for us in the future as well: the 4040 binary counter chip.

Counters (binary or decimal) are going to be fertile ground for more musical noise experiments. Why so? Because octaves are just doublings or halvings of frequencies, and because a lot of rhythmic patterns have factors of two underlying them.  Just think about the most basic drum pattern you know: bass drum on the one, snare on one and three, and hi-hats on one, two, three, and four. Each different instrument fires off twice as frequently as the one before it.

But for now, enough blabber. We’ve got an oscillator to build.

Continue reading “Logic Noise: 8-bits Of Glorious Sounds”