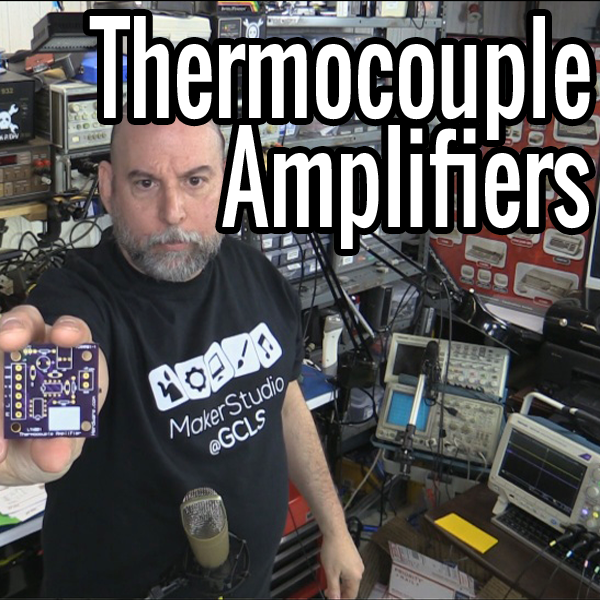
A Thermocouple is a terrific way to measure temperature. The effects of temperature change on dissimilar metals produces a measurable voltage. But to make that measurement you need an amplifier circuit designed for the thermocouple being used.

with Internal Capacitors
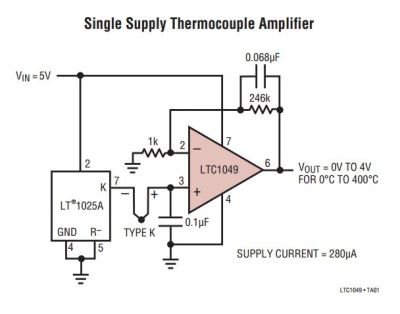
While researching “Zero Drift Amplifiers” as a follow-up to my video on Instrumentation Amplifiers I noticed the little schematic the front page of the LTC1049 datasheet which is shown here. I thought it was an ideal example of an analog application where some gain and some “gain helper” were needed to accomplish our useful little application of amplifying a thermocouple probe.
In the video I don’t really talk much about the thermocouples themselves other than the type I see most of the time which is type K. If you’re not already familiar with the construction of these probes you can find an informative write-up on thermocouples and the different types on the Wikipedia page and you might also want to check out the Analog Devices app note if you would like to know more. What I will cover is a reliable and precise way to read from these probes, seen in the video below and the remainder of the post after the break.
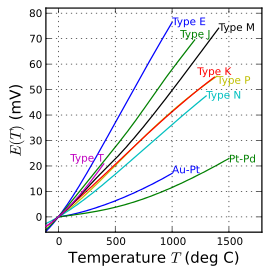
Different thermocouples sensors have a different temperature coefficients meaning that they will generate different amounts of voltage for the same change in temperature, usually specified in volts per degree of Celsius (v/◦C). Knowing the temperature coefficient of a sensor is only half the equation, we also need to nail down the zero point, meaning that we establish a calibrated reference point. Applying a known temperature such as immersing the sensor in ice water would be a simple if inconvenient way to establish a known reference temperature. Basically we could zero out and measure the change in volts per degree C from there. Below is a graph showing

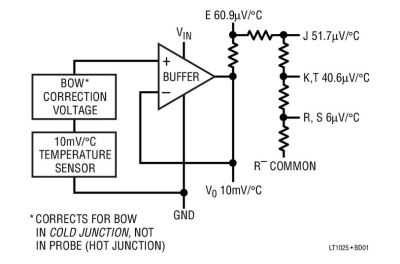
Alternatively we could use a Cold Junction Compensator (CJC) such as the LT1025, a chip made to not only replicate the different temperature coefficients of the various thermocouples, but also give us a pretty reasonable calibration.
Behind the scenes the CJC acts as another thermocouple or thermometer and changes the voltage as seen by the thermocouple, which is at room temperature in our case, and also corrects for some other non-linearities. With the thermocouple being driven by the CJC the output of the thermocouple is then fairly linear and fairly calibrated.

For this quick demo I went one step further and used a chipset from Linear Technology called the LTK001 (PDF) which is comprised of an LT1025 CTC and a matched amplifier known separately as the LTKA0x. A quick glance at the specifications for the LTKA0x shows a lot about why it works in this application: it has a high open loop gain and very low input currents and input current errors. Analog Devices has a good write-up on open loop gain (PDF), we can talk more about bias current and errors in the future.
The schematic I used is here and was a composite of a couple of different sample circuits, if I were to do this circuit as a production run I think I would include a trim pot as well (and a calibration procedure.).
The PCB layers are shown below and I can make the Gerbers available if anyone is interested.The bottom is a ground plane fill which is why ground traces aren’t easy to spot.
Using this circuit you can realize a simple thermocouple amplifier which should give you enough gain to interface to your favorite controller providing it has an Analog to Digital Converter (ADC). As this reads out in millivolts per degree Celsius you will have to do the conversion to Fahrenheit in software which should be straightforward.


Once upon a time thermocouples required special connectors since using ordinary screw terminals would make an additional pair of dissimilar-metal junctions. Can you compensate that out of these circuits?
I deal with thermocouples industrially, and generally, the amplifier connection is to normal screw terminals these days. It’s a single point and they are compensated for, I believe. Now, if you have other junctions along the way, then yes, you must use the correct matched set of terminals/plugs to get an accurate reading.
We used to account for things like the kovar leads on TO-5 cases having a small additive temperature coefficient depending on whether it was inside a feedback loop or not, etc. etc.
These days with software usually involved with a measurement, a good calibration procedure can usually take out a lot issues that creep in, with the results being better the closer to ideal the original signal is.
Also the Cold Junction Compensator uses an approximation for “bow” correction and appears to spread the approximation out over the various outputs, another source of error at some level.
If all your other dissimilar junctions are at the same temperature the Seebeck EMF is equivalent to a single junction of the first and last metals.
If you want to measure in the 0.01’s of degrees, then no – the only option is to have a well defined hot and cold junction. I’m working in a company that does measure in that range using thermocouples and yes, there is quite some material controlling being done on the physical side of things
Dealing with industrial signal converters, there is usually a temperature reference bonded to a leg of the terminal block to provide an accurate CJC.
Can you please send PCB Gerbers on rohan23990@gmail.com ?
Thnx in advance
Unless you’re measuring insanely high temperatures, there’s no good reason not to use a pt100 or pt1000 RTD instead of a thermocouple. They’re more reproducible, no drift, and no need for cold junction compensation.
Yes, there is. You can make any amount of thermocouples cheaply, quickly, and easily. All you need is the thermocouple wire itself and a way to weld the tip. RTDs, not so much. From a maintenance perspective, it makes a lot more sense to keep a spool of thermocouple wire on hand, than needing a drawer full of spare RTDs. Also, when a thermocouple breaks, you can replace it in seconds with a pair of wire cutters and a propane torch.
Or weld it with a big cap. Non precious metal thermocouple wire (T) are cheap and come spooled and jacketed in zip cord like insulation.
Or a rewound savaged transformer from a microwave oven… I’m currently using these when I need to weld small stuff (or melt something just for the sake of it)
I used DIY carbon arc welder – alligator clip with mechanical pencil lead and a small adjustable bench supply (less than 10V and an amp or so). Worked pretty to weld the twisted end of the wires into a nice small round junction.
I tried using the plasma arc from my solid state Telsa coil adjusted all the way down to 10-ish watts, but it was too hot and harder to control.
How exactly is the big-cap-welding done? I have some Type K wire left and I’d like to give it a try.
Thermocouples can withstand quick temperature changes and vibrations. If you hit thermocouple with hammer, heat it to 300°C and then throw into freezing water, probably no damage will happen. Try same thing with Pt100.
I tend to use the good old OP07 and any cheap temperature sensor for cold junction compensation. Data processing is done in software. Works really well – with three-point calibration (ice water, boiling water, melting solder) the accuracy is 2-5K with respect to +/- 0.5K calibrated temp sensor.
This is the way to go, especially where you’re measuring high temperatures. An OP07 and TMP35 each feeding into separate ADCs on a micro is usually good enough. Way cheaper than those fixed function thermocouple amp ICs.
We used to use the OP01 and OP05 which suffered from some popcorn noise back in the 70’s, and then the OP07 when it came out, all from from PMI. They used to make some great stuff, looks like they were bought by Analog Devices. We used to add a matched transistor pair to the front end of an OP07 as our instr amp.
Another way to use a thermocouple is the MAX31855. Just connect the thermocouple, no other parts needed, digital output. I’ve tried it, works even with an external multiplexer for more than one thermocouple, and on a breadboard:
https://groups.google.com/forum/#!msg/de.sci.electronics/YEWNNwx-bXI/NT-cdnWah44J
Cool Frank.
One pitfall with the MAX31855 you can have, is to rely on the internal fixed amplification. With the J-type version the sensitivity is set to 57.953 µV/°C which is fine if you measure 1000°C, at say 200°C according to a J-type datasheet you would need 53.895 µV/°C, which results in a whopping 15K error.
I usually grab an AD7792. It comes with pre-amp, 50/60 Hz filtering, current source to detect broken sensor, and extra ADC channels for measuring cold junction with NTC. Only needs NTC, resistor, and a few caps as external components.
Cool. I like being able to mux in a gain and zero reference and null out in software providing the mux is mostly neutral.
There is a widely used thermocouple amplifier from analog devices, the ad595:
http://www.analog.com/en/products/amplifiers/specialty-amplifiers/thermocouple-interface-amplifiers/ad595.html
Cool. My last vid used AD so I switched it up to Linear Tech.
I think an Attiny861 with differential gain could be used as a “simple stupid” alternative
All depends on what you want to get out of it which is the cool part of designing. There is often a near-infinite number of ways to do the same thing.
This is kinda an old school analog approach?
Today, you’d use a thermocouple to digital converter like a Maxim MAX31855.
Okay that part sucks for RF susceptability and reading below freezing temperatures.
But calibrating and drift of thermocouple amps is a hassle.
This circuit is mostly pre-calibrated, the amp is a zero-drift type which typically do their own drift correction which is what led to showing it.
Okay, my first impression on reading the title of this blog was “amplifying sound using thermocouples”…
The World Book Encyclopedia I had as a child had a “candle powered radio” build instruction which used a multitude of
dissimilar metal junctions to power a small amplifier for a crystal diode AM receiver.
There are thermocouples that directly power a valve just from the voltage they produce which is kinda cool.
I added a safety valve on my vintage stove that just does that. A thermocouple is heated by the pilot light, which provides enough juice to keep a valve open.
You can make this without electricity by using closed tube which flame heats. As pressure grows inside tube it keeps valve open.
It’s possible to evaporate thermocouples onto split mica or blown glass with so little thermal lag that they are microphonic – responding to the change in temperature caused by adiabatic compression of air of the sound waves.
Ok, it’s mostly off topic but someone mentioned sound and I may not get another chance to drop that into a conversation this lifetime. :P
I figured there was a path between motion and voltage in there but assumed that it would be limited to low frequency. It is hard to work the word adiabatic into a casual conversation. :)
My question would then be would there be desirable qualities of a sound (pressure) made this way compared to other methods?
Bil,
Would it be possible to get the gerbers (or Eagle) files you offered?
Thanks!
Hi Eric, I am working now on getting that up for you, I will follow-up when done.
A zip containing the gerber files is at http://www.herdware.com/shop/analog/thermocouple-amplifier/ closer to the bottom. It is zipped in a way to be compatible with OSKPark format I believe. You can email me at bilherd@hackaday.com if you have any questions.
Hi Bill,
Thanks! I’ll just buy one since you have them for sale – it saves me from making yet another Mouser order. Thanks for making them available.
Eric
The schematic attached to this project does not match the pictures in any way shape or form. According to the schematic, power comes in on J3, but the picture of the board shows J3 to be the J or E thermocouple connector. Additionally, your schematic shows the output signal on J2, but the picture shows J2 as the R or K thermocouple connector. And worst yet, the schematic shows U1 as the LTC1049 amp and U@ as the LT1025 thermocouple amp. This is exactly backwards from the photos and drawings. This makes it almost impossible to know where to connect what if you don’t really know what you’re looking at. Also, the schematic leaves out the pot that you are apparently using to adjust the gain.
I like LT’s explanation of why you need an IC for cold junction compensation.
In the LT1025 datasheet, they are talking about the cold junction traditionally being held in a slurry of ice water and say “To date, IC manufacturers efforts to make microminiature thermos bottles have not been totally successful. Therefore, an electronically simulated cold-junction is required for most applications.”
I love it when someone sneaks a joke into a datasheet.
I want to measure differential temperature. Two (identical) thermocouples are connected in back to back fashion so that I get signal proportional to difference in temperature only. This signal is very small, typically 1 or 2 mV. How to correctly amplify/measure it?
You could use one cold junction and two thermocouple amplifiers or two complete thermocouple amps circuits as shown and then output to an instrumentation amp http://hackaday.com/2015/03/16/instrumentation-amplifiers-and-how-to-measure-miniscule-change/ to do the math. I have an instumentation amp up on Tinde and the Thermocouple amp is up at herdware.
Can you define accuracy of this circuit?
I need to know the calculated accuracy of this design! please tell Sir….
Hi Rajinder, There are many things that can effect the accuracy such as the temperature range you want to use the circuity itself at and things like absolute accuracy vs relative. For best results you would actually test/calibrate by checking it at a low temperature and a high; freezing water and boiling water being two readily available sources. There are published specs for the components and there are various versions that cost a little more. You can email me at bil @ hackaday.com directly if you have other questions or an example use.
how can i interface through spi a thermocouple max6675 with pic 16f876 with proteus (micro ci)
Hi Bil,
This is a great write up and video! Do you have any of these thermocouple boards for sale? I’d like to purchase some.
Check out Tindie
https://www.tindie.com/products/Herdware/thermocouple-amplifier-and-cold-junction-compensator/?pt=full_prod_search
Thanks Bil!!
How come there is no check out button?
Morning Guys,
Do you perhaps have any information on using a thermocouple to read negative temperatures, ie a circuit diagram and code / formula for converting the negative side of the scale ?
I have been asked to spec for a cold storage system and its been a struggle to find concrete information on accomplishing this. Any help would be greatly appreciated.
hi Bil.
I should amplitude thermocouple voltage with op07 or lm324.can I use from lm35 for could junction?? I can read
ambient temperature with lm35 and then add by themocouple voltage. can you send me a map with op07 for amplitude thermocouple voltage??
can you help me Bil?
I started with using LT’s application circuit that uses 0.1uF caps,255k gain resistor, and a 100 ohm trim pot. However my circuit is not behaving at all (no change in output moving from ice bath to boiling water). You used a 0.068uF cap on the gain instead and a lower valued resistor. Would this just affect accuracy and speed of response or could it also affect the larger function of the amp?