[David Hopkins] built a seven segment clock, but not in a way you would think. Typically, if one wants to make something like this, one would start off with some seven segment LEDs. [David] wanted to kick it up a notch and use RGB LEDs to get access to the wide array of different colors, but found off the shelf assemblies cost prohibitive. So, he did what any good hacker would do. He made his own.
 The easy part consists of Neopixels, an Arduino Nano and a DS3231 Real Time Clock. The hard part consists of Plasticard and a polymorph diffuser. Plasticard also goes by the name of Polystyrene and comes in sheets. [David] describes Polymorph as a type of moldable nylon that softens with heat, with a working temperature low enough that boiling water will suffice.
He was able to cut out the individual segments to make an impressive looking desk clock.


I think they are actually neopixels…
Nice clock though
ws2182b
He’s referring to the spelling error.
Maybe the misspelling was a strategy to increase engagement. If so, it worked :)
Sorry, accidentally hit report….please disregard.
Anywho it did attract attention from the OCD.
Fixed. Thanks!
I really like the wipe effect. It’d get a bit much every minute, but hourly would be cool.
From scratch? Try again: http://hackaday.com/2009/05/07/make-your-own-leds/
(To be fair to [David Hopkins], “From scratch” was [Will Sweatman]’s addition, not part of the project description.)
Also to be fair, making something from scratch does not imply construction of all of the ingredients from scratch. If you disagree with me, think about making a cake from scratch. Unless you own a rather large farm, it is extremely unlikely that you will construct (or farm) all of the individual ingredients.
If you want to create an apple pie from scratch, you must first create an universe.
-Carl Sagan
I am going to sound like a butthead, but you don’t use “an” with “universe.” It is just one of those rules that contradicts normal English rules, in favor of sounding sane. I know, I know, you aren’t an English major, just saying for those who also questioned the unnatural sound of the sentence you made. Okay, now I feel better. BTW the English I have used in this statement isn’t perfect either, but that is above my pay grade.
sure, just hot-glue the usb port to the structure….
LOL
someone needs to tell this guy about perf boards, at the very least!
He has a bitchin’ clock. You have a bitchy comment. He wins.
Dang it…again report instead of reply, please disregard.
Hot glue is way better than my normal solution of bailing wire and duct tape…
No bubble gum?
Only if it needs to be REALLY strong…
Awesome clock.
BTW HAD please move the report button elsewhere. Most people are using the mouse in their right hand and tend to move there to click reply. I’ve done this a few times myself with the report instead of reply.
Thank you
Agree on the report thing, just make it a tiny flag somewhere. Now it occupies the spot your eyes end up when finished with a post. In this editor thing the post button is in the same (logical?) place.
A very strong +1 for this.
My favourite forum has the reply button where HAD has the report one.. I’ve reported comments unintentionally numerous times when I wanted to reply instead.
I think I know which forum that is!
Is it all of them except for HAD?
>_>
I too am guilty of the accidental “Report comment” clicking.
The Arduino Nano is sacrificial (£2 per unit), and the holes in the USB port were covered with capton tape first. Its not elegant, but its fairly tidy.
If I had the budget/time/capability of making a more professional looking housing (3d printer etc), I would probably spin a board with everything on instead of using modules, instead, this was bashed out over 2 days from concept to working ‘product’.
so, your software never needs updating? amazing.
that was my point. it was funny to see the download port, so to speak, used as a glued support structure ;) you could dab glue around and still make the usb port accessible in case you needed to change firmware.
the housing is not what I was commenting on. suggestion was to mount the nano on perf board, either solder directly from nano to perf (I also sacrifice those cheap nanos, so I fully ‘get’ that thinking) or use the .1″ headers. put the nano on the perf board, use the 4 holes on its corners with some standoffs and you COULD glue those standoffs to the box. I’ve done that, it works fine for short-term and in some cases, even long-term ;) if you don’t want to drill or can’t drill, hot-melt and some standoff posts works fine and you still have a serviceable project.
here’s a quick project I did that kind of shows what I’m talking about:
https://farm9.staticflickr.com/8701/17015270169_230193a288_n.jpg
except I did use some of those .1″ headers, but as you can see, I did not need every pin on that particular build and I only had some headers on-hand and, well, some pins did not get coverage, lol. on some other builds, I have omitted the sockets entirely and sacrificed the nano, also saving some height.
but you can see there are standoffs and after this photo, I mounted that board onto a base. it could have been glued down (dab some hot-melt on the bottom of the 4 spacers, quickly, then press to the surface and wait 10 secs for it to hold). and if you need to move it, its not permanent.
perhaps for your next build, you can move up to a more serviceable style of build. just trying to give you some advice..
aaaah I understand… the misunderstanding… as it were, its really not clear from the pictures now I look back at it.
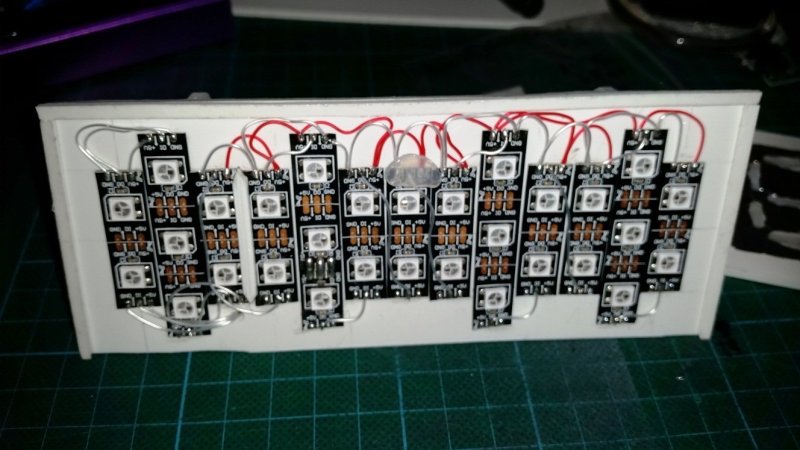
This shows it when running from the back:
https://cdn.hackaday.io/images/335371441268725426.jpg
There is a miniUSB shaped hole cut out of the stand and the nano is glued into it, this helps with the mechanical rigidity of the thing (USB cables pulling on the Nano as things are moved about), so the port is used for programming and power.
30 LEDS @ ~55mA each = 1.65A Max, 825mA average, USB charger can deal with that no problem.
I could also access the ICSP with pogopins if needed, but that’s quite a bit of hassle.
Using perfboard is a good semi-permanent solution, I usually go from breadboard straight to point-to-point soldering which I find easy enough to play with as I have a decent Metcal soldering iron and plenty of Kynar wire. I often only use perfboard for mounting buttons/position critical things.
I seem to like making the projects small and neat but only to the point of using breakout boards and hotmelt glue :-) I suppose its speed and size that governs that.
Good tip for getting the stand-offs in the right place there, I will remember that for the future. :-)
I’ve been thinking about this sort of project for a long time (without doing anything about it, of course), and this excellent project is giving me more ideas…
Now all is left is the easy part of building it.
0ver time the polystyrene may react with the additives in PVC. I have had a handful of polystyrene things damaged due to additives from other plastics.
The polymorph, shapelock or whatever you wish to call it is not nylon, nor PVC. It is PCL (PolyCaproLactone) and has usually no additives/plasticizers that can damage other plastics.
Plasticard is polystyrene sheets. Wires are typically, though not always, jacketed PVC.
I made no mention of PCL or nylon.
I have made 7seg displays numerous times … Never considered using addressable leds!