
We’ve seen them before. The pixel-perfect Portal 2 replica, the Iron Man Arc Reactor, the Jedi Lightsaber. With the rise of shared knowledge via the internet, we can finally take a peek into a world hidden behind garage doors, basements, and commandeered coffee tables strewn with nuts, bolts, and other scraps. That world is prop-making. As fab equipment like 3D printers and laser cutters start to spill into the hands of more people, fellow DIY enthusiasts have developed effective workflows and corresponding software tools to lighten their loads. I figured I’d take a brief look at a few software tools that can open the possibilities for folks at home to don the respirator and goggles and start churning out props.
Making Blueprints
Time spent here with an initial design can form the backbone for part locations throughout the process. [Harrison Krix], the mastermind behind VolpinProps, takes his time with blueprints made in Adobe Illustrator. Don’t want to spend money? No problem. Inkscape and LibreCad land as the open source vector illustration alternative.
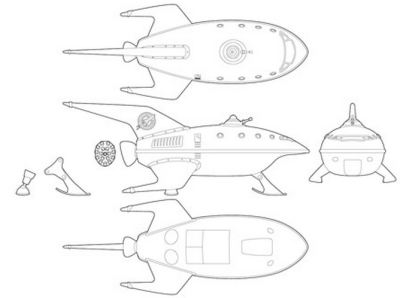
Once the initial drawings are done, CAD and 3D-modeling software can flesh out the 3D-details with features that track the original reference.
Get into a 3D Modeling Groove with Blender
In the world of prop-making, replicas take a slightly different approach from traditional engineering CAD and drafting workflows. In many cases, “if it looks right, it is right” is a tight-enough constraint to make believable props, and while CNC machinery might come into play to spin a few parts, you wont need three-decimal-point precision to get a few heads to turn. With this criteria, Blender becomes an excellent choice for making 3D models of our intended parts. Though it supports comprehensive rendering and animation features, we can just take advantage of the excellent mesh-editing tools for 3D modeling.
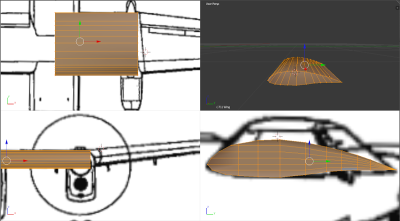
If you’re looking for a classy node-based 3D modeling alternative, have a go at Antimony.
Ripping Game Files Directly
To make props from 3D video games, why not take inspiration from the original model itself? [Angus Deveson] did just that in his model-ripping tutorial using Milkshape 3D to convert the uncommon game file format into a familiar 3DS or STL format ready for 3D printing. Its worth mentioning that the raw 3D file stored in your video game may be a less-than-sufficient starting point, however. As [Stormleader] on the RPF forums explains, the 3D rendering trick known as “normal-mapping” enables video game developers to combine a low-resolution 3D model with a high-resolution texture that enhances the perceived level of detail without relying on the original high-resolution model.
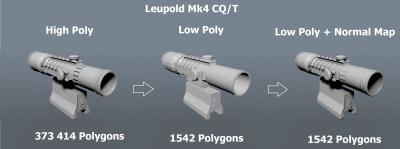
The net result is that 3D models included in the game start at an inherently low resolution–possibly too low for a detailed replica. Nevertheless a low-res model may be sufficient for a foldable Pepakura (papercraft) model.
Lastly, keep in mind that making profit from models exported from the game is a violation of the game’s terms of service.
Papercraft Tools
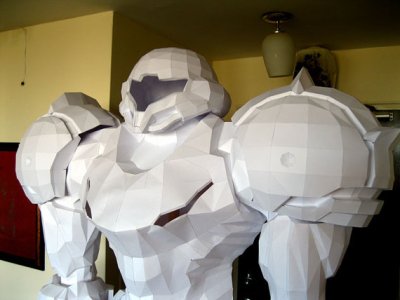
With a 3D model made in Blender, our first steps of bringing that model into the real world might arrive in the form of paper. Pepakura, a low-cost 3D-model-unfolding software package does what you’d think. It unfolds a 3D mesh into a flattened vector graphic that we can print, cut, and fold back into a replica of the original model. Once reinforced with fiber-glass or cheesecloth, the structure is durable enough to don at the con without falling apart. The process of cutting, folding, and reinforcing is a long one, but fortunately the cutting step can be drastically expedited with a nearby laser cutter. Since not all workflows are the same, fellow DIY CNC enthusiasts have developed additional software tools, like dxf2gcode for easy file conversion. Finally, if you’re still not interested in shelling out the $38, Blender artists have arrived on-scene to deliver a Blender plugin that will also rip a mesh into a printable 2d file format.
The Community

Onwards
When a prop is done right, the lines between what’s real and what lives in our imagination get a little hazier–and that’s a good thing! From the folks here at Hackaday, thanks to all the prop makers who’ve blurred the lines behind what’s real and what lives in our imagination, altogether making the real world just a little bit cooler.


The saddest part is, as technology develops to make things simpler, by and large the costumes have gotten worse. People build pepakura armor, and then do no finish work, sort of like 3-D printing a prop and not sanding the surface. The craft has sort of left it, and as many of the sites (not excluding some or all the ones listed) around don’t let members post any criticism, regardless of how constructive, the trend becomes all-pervasive. “Good enough” has become the rule and has chased away most of the people that want to do as good a job as they can. Harrison is probably one of the few individuals I know that still blends old-school and new-school effort. And lets not even get into the discussion of when people sell pepakura files based on models they ripped off a video game, in violation of the ToS.
I wonder though if maybe it isn’t that the costumes are getting worse, but rather more people are wearing costumes because it is easier to make. So now the number of crappy costumes has risen but the same people who have the time and/or money to invest in a good costume are still doing so.
Really though?
I see youtube videos of small children doing things I was struggling to do in professional settings with large budgets just 15 years ago.
Not costume making, but close enough.
In the recent past, to become a model maker, for instance, was basically an aprenticeship requiring proposition – now days you can learn the entire craft and be discovered and employed using youtube and maker spaces.
The devil is in the details and most people give up before they start doing dry brushing and other aspects that are what make things look good.
it just makes the people that do the finish details look that much better than the rest.
I also think part of it has to do with the ‘SMUGNESS’ of internetters….
When someone, lets a young learner takes their time to put something together, be it a hack or a prop or a costume, and the first post says ‘did that in my mothers womb, nothing new here, blah blah….’ will do a lot to discourage a some one trying to learn the process. So.. many sites lock down the critics, and now said learner doesn’t get any feedback and may never see that there’s a next step before your done.
for instance, a friend of my cousin (who lives in the US VI), was recently doing some ‘ART’ work on a panel van, it looked great and all. But he never heard of color sanding before I explained it to him. He just never heard the concept, but as soon as I explained it he understood and realized that could be what was missing to take his ‘ART’ to another level.
there’s nothing wrong with criticism, unless it’s only point is to criticize…..
Its a ramp people. The new tech arrives, people use it because its there. Having it at all is a novelty so quality is less important. Later they decide they want it to look better. And so the effort goes there and it does…. Fear not Cosplay peeps, Time marches on…
So what did this article have to do about the tools used by people who make propellers?
B^)
What I’d like to see are Vader or Storm Trooper motorcycle helmets that are Snell rated.
I don’t understand the making community’s obsession with Blender. There are so many better options for free 3D modeling software.
blender is free
Can you give some examples of better tools?
I never got accustomed to blender’s UI, but I did not spend considerate time with it. I use it sporadically (once every three months or so) and have to look up some basics every time.
In the past I spent much time modelling in 3d studio max, and the UI was easier to get into, at least for the things I did with it (architectural visualisations).
Since I dumped Windows in favor for Ubuntu, I stuck to blender. It has matured a lot over the last years, but as mentioned before the UI is hard to grasp.
OnShape. Runs in cloud so OS doesn’t matter.
OrShape actually looks way cooler than I expected
Still – it can seriously not compete with Blender, nor blender with it – very different 3D modelling paradigms.