Recreating The Quadrophonic Sound Of The 70s

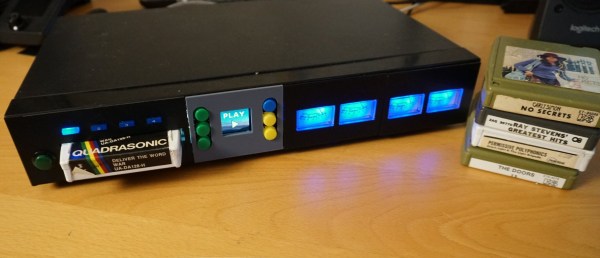
For plenty of media center PCs, home theaters, and people with a simple TV and a decent audio system, the standard speaker setup now is 5.1 surround sound. Left and right speakers in the front and back, with a center speaker and a subwoofer. But the 5.1 setup wasn’t always the standard (and still isn’t the only standard); after stereo was adopted mid-century, audio engineers wanted more than just two channels and briefly attempted a four-channel system called quadrophonic sound. There’s still some media from the 70s that can be found that is built for this system, such as [Alan]’s collection of 8-track tapes. These tapes are getting along in years, so he built a quadrophonic 8-track replica to keep the experience alive.

The first thing needed for a replica system like this is digital quadrophonic audio files themselves. Since the format died in the late 70s, there’s not a lot available in modern times so [Alan] has a dedicated 8-track player connected to a four-channel audio-to-USB device to digitize his own collection of quadrophonic 8-track tapes. This process is destructive for the decades-old tapes so it is very much necessary.

With the audio files captured, he now needs something to play them back with. A Raspberry Pi is put to the task, but it needs a special sound card in order to play back the four channels simultaneously. To preserve the feel of an antique 8-track player he’s cannibalized parts from three broken players to keep the cassette loading mechanism and track indicator display along with four VU meters for each of the channels. A QR code reader inside the device reads a QR code on the replica 8-track cassettes when they are inserted which prompts the Pi to play the correct audio file, and a series of buttons along with a screen on the front can be used to fast forward, rewind and pause. A solenoid inside the device preserves the “clunk” sound typical of real 8-track players.

As a replica, this player goes to great lengths to preserve the essence of not only the 8-track era, but the brief quadrophonic frenzy of the early and mid 70s. There’s not a lot of activity around quadrophonic sound anymore, but 8-tracks are popular targets for builds and restorations, and a few that go beyond audio including this project that uses one for computer memory instead.

Continue reading “Recreating The Quadrophonic Sound Of The 70s”

An Open-Source Antikythera Mechanism

When the Antikythera Mechanism was first discovered, it wasn’t viewed as the wonder that we know it today. Originally the divers who found the device and the first scientists to look at it wrote it off as an astrolabe or other some other common type of clock. It wasn’t until decades later when another set of scientists x-rayed the device and surveyed more of the shipwreck where it was found that it began to become one of the more important archaeological discoveries in history. There have been plenty of attempts to recreate this device, and this replica recreates the mechanisms of the original but is altered so it can be built in a modern workshop.

The build, which took the creators several years of research and development to complete, started off with the known gear schemes found on the original device. However, the group wanted to make it with modern technology including 3D printers and laser cutters, so although they worked from an understanding of the original 2000-year-old device there are some upgrades and changes to accommodate those who want to build this in a modern workshop. Gears made from plastic instead of brass have more friction, which needed to be reduced by building custom bearings machined out of brass. And to complete the machine a number of enclosures of various styles are available to use as well.

Additionally, all of the designs and schematics for this build are open source for anyone to build or modify as they would like, although the group putting this together does plan to sell various parts for this as well. There will be some issues with use, as they point out, since the ancient Greeks didn’t have a full enough understanding of cosmology to get a machine like this to stay accurate for two thousand years, but it’s a fascinating build nonetheless. Reasearchers are still discovering new things about this device too, including the recent find of an earliest possible start date for the machine.

Building An Energy Sword Replica From Halo

A good many of us whiled away the hours of our youths playing Swords Only deathmatch in Halo 2. The Energy Sword, aka the Plasma Sword, was the star of the show, with its devastating glowing blades granting us scoreboard domination. [Arnov Sharma] has now built a quality replica of this science-fiction weapon.

The build starts with a 3D design drawn up in Fusion 360. The parts are then 3D printed, with opaque filament used for the handle and translucent PLA filament for the “blade”. Inside the blade elements are twenty WS2812B LEDs, creating the characteristic glow that made the Energy Sword so tantalizing to find in game. An ATtiny85 is charged with running the LEDs, with the aid of an IP5306 chip to act as a boost converter for the lithium-ion battery supplying the juice.

[Anton] admits that the sword was built for the sole purpose of beautifying his maker space. That’s something we can respect, because we’d love to have one hanging on the wall at home. We’ve featured some other fun gaming replicas before, too.

Continue reading “Building An Energy Sword Replica From Halo

A tiny TV playing Super Mario All-Stars

The SF1 Mini Is A Homebrew Version Of An Obscure Nintendo Console

The Super NES is arguably the best known console of the 16-bit era. It typically came in the form of a grey box with either grey or purple buttons, and an angular or streamlined design, depending on whether you lived in North America, Europe or Asia. Compact and mini versions followed later, but there were also a few lesser-known models released during the SNES’s heyday in the early 1990s. One of these was the Sharp SF1: a CRT television with a built-in Super Nintendo. The cartridge slot was located at the top, with the controllers connecting at the front. The internal video connection even provided better image quality than a typical SNES setup.

Some light soldering required.

The SF1 was never sold outside Japan and is quite rare nowadays. But even if you can find one, the bulky CRT will take up a lot of space in your home. [Limone] therefore decided to build himself a smaller replica instead. His “SF1 mini” comes in a 3D printed case that holds a 5.5″ TFT screen, stereo speakers, and connections for game paks and game pads.

Thankfully, [Limone] didn’t sacrifice an original SNES to make this project: instead, he used a DIY Super Nintendo kit developed by a company called Columbus Circle. This kit contains a modern replica of a SNES motherboard and is intended for custom builds like this. However, the layout of the motherboard didn’t match [Limone]’s intended design, so he desoldered several components and re-attached them using a huge web of magnet wire. An RGB-to-HDMI converter connects the SNES’s video output to the TFT screen and provides for remarkably sharp graphics.

[Limone] explains the build process in detail in the video embedded below (in Korean, with English subs available). We’ve seen a couple of neat SNES replicas, some small and some particularly tiny, but this has to be the first SF1 replica.

Continue reading “The SF1 Mini Is A Homebrew Version Of An Obscure Nintendo Console”

Life-Sized Colonial Viper Touches Down In Australia

Don’t worry, this 8.4 meter (27 foot) Australian Viper won’t bite, but it’s likely to do a number on any Cylon Raiders that wander too close to Canberra. As recently reported by Riotact, creator [Baz Am] has been painstakingly piecing together this 1:1 scale replica of a Colonial Viper Mark II from the reimagined Battlestar Galactica series in his shed for several years now, and at this point things are really starting to come together.

On his personal site, [Baz] has been maintaining a build log for the fictional spacecraft since 2017 that covers everything from the electronics that power the cockpit displays to the surprisingly intricate woodworking that went into the lathe-turned 30 mm cannons. He’s even documented interviews he conducted with members of the show’s special effects team in his quest to get his version of the Viper to be as screen-accurate as possible.

Plywood bulkheads are mounted to an internal metal frame.

No matter how you look at this build, it’s impressive. But one thing we especially appreciated was the skill with which [Baz] manages to repurpose what would otherwise be junk. For example, the main cockpit display is actually an in-dash navigation system pulled from a car, and the engine’s turbine blades are cut out of aluminum road signs. He’s even managed to outfit the Viper with an array of real aircraft instruments by collecting broken or uncalibrated units from local pilots.

While the Viper might look like it’s ready to leap into action at a moment’s notice, there’s still quite a bit of work to be done. The craft’s fuselage, made of metal, wood, and foam, needs to be coated with fiberglass, sanded, and then painted to match its televised counterpart. [Baz] says that process will take at least another year, but also mentions off-hand that he’s thinking of adding a functional reaction-control system with cold gas thrusters — so we’re going to go out on a limb and say this is probably one of those projects that’s never quite finished. Not that we’re complaining, mind you. Especially when you consider the shaky track record the Battlestar Galactica franchise has when it comes to neatly wrapping things up in the finale. Continue reading “Life-Sized Colonial Viper Touches Down In Australia”

2022 Sci-Fi Contest: The Winners Are In

The Sci-Fi Contest closed out on Monday, and we put our heads together and picked our favorites. And it was no easy task, because in addition to many of the projects simply looking stellar, many went all-out on the documentation as well, making these stellar examples that we can all learn from, whether you’re into sci-fi or not. But who are we kidding? From the responses we got, you are.

The Winners

[RubenFixit]’s Star Trek Shuttle Console is a Trek themed escape room in a box. The project’s extraordinary attention to detail and exhaustive project logs absolutely won our judges heart. From the LCARS graphics to the 3D printed isolinear chip bays and mimetic crystals, it’s all there. [Ruben] estimates about 300 hours of work went into this one, and it shows.

We had no shortage of robotic projects in the contest, but [RudyAramayo]’s R.O.B. won our judges over. This one is not a joke, weighing in at over 140 lbs of custom metalwork and righteous treads. It’s also made out of some expensive hardware all around, so maybe this isn’t your weekend-build robot. We love the comment on the Arduino test code suite: “For gods sake man, you must test your code when it becomes an autonomous vehicle.”

Finally, [zapwizard]’s Functional Razor Crest Control Lever is a prop and a video game controller in one. We can totally see Grogu playing with this, and we were wowed by the attention to detail in the physical build — with custom gears and a speed limiter — as well as the attention to prop-making detail. Some parts are custom-cut stainless steel plates. 3D printed parts are covered in aluminum tape and chemically aged. Awesome. Oh yeah, it’s also a working USB joystick.

These three winners will be receiving a $150 shopping spree at Digi-Key.

Continue reading “2022 Sci-Fi Contest: The Winners Are In”

Cheap Ghostbusters Toy Turned Convincing Prop

As you might expect, the release of last year’s Ghostbusters: Afterlife has not only lead to renewed interest in the old 1980s toys and tie-in merchandise, but has spawned a whole new generation of blinking plastic gadgets to delight children of all ages. Of course, for folks like us, that means more hardware to hack on.

In a recent post to the official Ghostbusters YouTube channel, professional prop maker [Ben Eadie] shows off some of the tricks of the trade when he takes a $15 USD “PKE Meter” toy from Hasbro and turns it into a screen-quality prop. Even if you’re not looking to get an early start on your Halloween costume, the techniques demonstrated in this video could be easily adapted to other projects. For those whose next ideal home improvement is a fireman’s pole and an ectoplasmic laser-confinement grid, you might want to grab a couple of these toys while they’re still cheap for eventual conversion.

Uncovering the silver makes the piece look worn down.

The biggest takeaway from the video is probably the finishing techniques, as they could be used on any sort of realistic prop build. [Ben] starts by using a cabinet scraper to smooth out the lines on the plastic toy, and any holes are filled with the familiar baking soda and cyanoacrylate glue trick. Once the surfaces have been prepped, all the principle parts are sprayed with an adhesion promoter, followed by a coat of silver, and then the final black color.

This allows him to create a convincing “chipped paint” effect by strategically sanding or scraping through the top coat. Dabbing some toothpaste where you want the device to look worn down before spraying the final coat makes the process even faster, as it will prevent the top coat from sticking to the silver in the first place.

Unfortunately [Ben] doesn’t spend a whole lot of time explaining the electronics side of things, but it doesn’t look like there’s anything too complex going on. All the original gear is stripped, and it gets replaced with a microcontroller which we believe is an Adafruit ItsyBitsy nRF52840 Express. This is connected to two strings of tiny APA102 addressable LEDs which are run down the “wings” (we especially like the 3D printed lenses used to replace the original solid pips), and one that’s used to provide the iconic sine-wave display.

While the last PKE meter build we saw did detect radiation, we have to admit that in terms of looks, this one takes the top spot. Especially when you consider how cheap the thing was. All you need now is a Proton Pack, and you’ll be ready for Halloween.

Continue reading “Cheap Ghostbusters Toy Turned Convincing Prop”