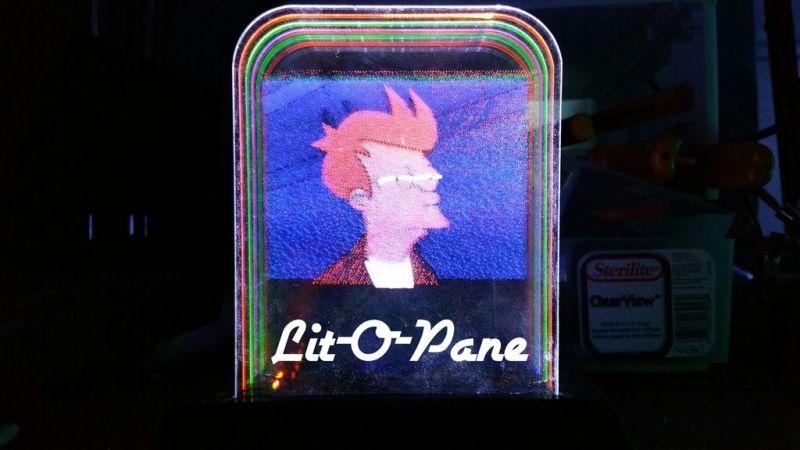
Edge-lit art has been around for a very long time, and most people have probably come across it in a gift shop somewhere. All it takes is a pane of transparent material (usually an acrylic sheet) with the artwork etched into the surface. Shine a light into the sheet from the edge, and refraction takes over to light up the artwork. However, this technique is almost always limited to a single pane, and therefore a single color. [haqnmaq] wanted to take this idea and make it full-color, and has written up a great Instructables tutorial on how to accomplish this.
If you want to make something like this yourself, the only thing you really need is a laser cutter and some basic electronics equipment. The process itself is so straightforward that it’s surprising that it isn’t more common. You start by taking a photo of your choice and use an image editor to break it up into three photos, one for red, one for green, and one for blue. Each of those photos is then etched into an acrylic pane with a laser cutter. When the panes are positioned in front of each other and edge-lit with their respective LEDs, a full-color image comes to life.
This isn’t the first edge-lit artwork project we’ve featured, but it definitely has the highest fidelity. Because [haqnmaq’s] technique uses three colors, you can use his tutorial to reproduce any photo you like. You could even take this a step further and create animated photos by adding more panes and lighting them up in the correct sequence!


very neat technique but it doesnt look like he’s making colors via RGB combining.
go on…
That could be interesting. It might take some very accurate laser cutting.
I guess if you were being really fancy, you could etch triangles instead of dots and illuminate from all four edges in different colours.
Better still if possible etch the surface with thousands of prisms and just illuminate it with white light. Or maybe do that lens trick that was on here a while back and etch the surface to different depths to change the brightness if light focused through it. One of each of these for each colour and you can project colour images.
As it’s possible with triangles to display different images for different directions of light. It should be possible to show animations (:
I do not believe etching triangles and edge lighting the same sheet of acrylic with four colors will work the way you think it would. If such a thing was possible, you would see such multi-colored/single sheet projects.
While that’s a neat idea, it’s unfortunately not how these panels work. The principle is called frustrated total internal reflection, light entering the panels through the sides is trapped except where the boundary is frustrated by imperfections in the surface of the presence of other materials. It’s easy to do with a laser cutter because you just have to pulse the laser over the surface, but there’s no way to make the effect sensitive to direction–at least not like that.
Not sure if serious or didn’t read the Instructable
Kinda both? He’s using 4 panes there which doesn’t make sense if you’re just combining RGB. I think the fourth is to boost the brightness of white.
Yes, he uses a fourth pain for white as is mentioned in the instructable.
Oh the pain!
Clever.
Using an Arduino to set fixed colors on some WS2812 LEDs… Seems a bit overkill. You only need a few resistors and LEDs of each color for the same result.
He did it for ease of tuning the relative brightness of each color. I guess you could do this with a POT but I think PWM control via the Arduino is simple enough.
“uint32_t R = strip.Color(255, 0, 0);
uint32_t G = strip.Color(0, 255, 0);
uint32_t B = strip.Color(0, 0, 255);
uint32_t W = strip.Color(255, 255, 255);”
Doesn’t look like he is adjusting brightness control. Also, PWM is not required for WS2812. They use a serial protocol.
Last but not least, the LED settings could have been moved to the setup() section. Those LEDs retain the last setting until you update them (or turn them off).
You modify those lines to adjust the color and brightness. I go over that in the instructable near the end, in the step about tuning and calibration. Thanks for the tip about putting it in the setup. I will have to do that.
Storing an 8bit value in a 32bit integer… Yep.
Yeah, I kind of address this in the instructable, but I am not a computer programmer in any way. I modified a neopixel sketch from adafruit to get it going. I really need to look into it more, as I am sure there is a much more elegant way of programming it.
Wot? They make LEDs *without* WS2812s now? That’s unpossible.
It’s probably easier to buy the WS’s, they come ready-mounted on nice convenient strips. And they do use PWM, although it’s the WS controller itself that does that. The alternative would be either building a manual PWM setup, or using lots of resistors to drop the current. One resistor per LED, for however many dozen LEDs he’s got surrounding the plastic.
This time it probably was the simplest way to do it.
And nice project!
Not sure if this is awesome or amazing?
I see what you did there. +1
I wonder if it would be possible to laser engrave the acrylic to make it act like a diffraction grating. Theoretically, you could light a full color image with only white light that way. Might be something interesting for someone with access to the materials and tools to try.
Every diffraction-based colour thing I’ve ever heard of has been more or less nanotechnology. At least using nano-sized particles. Would be cool, it’d be bordering on holography, or actually would be holography.
Looks cool but would probably look better if pattern diffusion or half-tone patterns were used instead.
Pedantic mode on!
“Shine a light into the sheet from the edge, and refraction takes over to light up the artwork.”
Actually, light travels through the acrylic due to total internal reflection (which, like refraction, is caused by the acrylic and air having different indices of refraction), and it “escapes” through the engraved areas because they “frustrate” this process, hence FTIR: frustrated total internal reflection.
Pedantic mode off!
Nice effect! I’ve been wanting to make a layered design like this and then turn layers on and off for animation.
Try if you could trap light with lamination sheets. They would be incredibly thin.
This is exactly how LCD backlights work: thin plastic sheets etched with patterns to evenly distribute the edge lighting.
Good idea, but would the thickness be uniform enough for good light transmission? Also, what would be a good way to engrave the design in the surface?
I’m really impressed by how well the colors turned out. The dithering really was a smart step here, I don’t think I would have worked otherwise. Good job! I actually have access to a laser cutter through my lab so I will definitely try this out… :)
I’ve been working on this for the past 5 years, and was recently awarded a patent on the process. Solid effort for a first attempt! I believe this will change the future of printing as we know it. It will never replace traditional print, as we know it, but it will become a new form of print with numerous advantages to ink-on-paper. Kudos! Get in touch, if you would like to discuss.