Resin casting lets you produce parts that would be otherwise impossible to make without a full CNC and injection molding set-up. It costs about as much as a 3d printer, 300 to 600 US dollars, to get a good set-up going. This is for raw material, resin, dye, pressure chamber, and an optional vacuum degassing set-up. A good resin casting set-up will let you produce parts which are stronger than injection molding, and with phenomenal accuracy, temperature resistance, and strength. I will be covering various techniques from the simple to advanced for using resin casting from a hacker’s perspective.

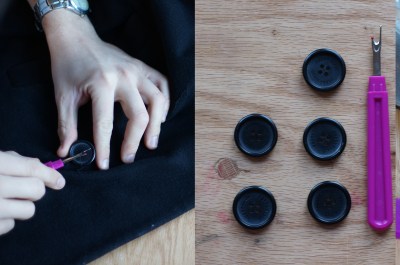
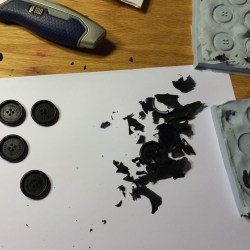
Today I will be replicating a part exactly. I searched my house for a pending project. I wish I had a more exciting part to duplicate, like a broken hinge or plastic case that I’d like in a different color, but I lost a button on my favorite coat. So I’ll be making a matching set of buttons.
You’ll need a basic resin casting set-up. For the raw materials, I duplicated the suggestions from the Guerrilla Guide — the standard handbook for fabricating things in your own workshop. So far this has worked out great. I’ve also had a lot of fun casting urethane rubber for wheels and flexible parts, but that’s for another chapter.
I do recommend deviating from the Guerrilla Guide in one regard though. Absolutely skip the purchase of a vacuum degassing chamber if you are on a budget. Buy a pressure casting set-up. As long as you cure both your molds and your resin under pressure you won’t have many issues. The most bang for your buck will be a cheap pressure casting chamber made from a paint pot and a discount compressor. I waited for a 20% off sale at my local import store and got my set up for about 150 US Dollars, pot, pnuematics, compressor, and all.
There are a few other accessories I’ve found to be very handy. One is a miniature paint mixer; most of my resin casting is done at small scale. The silicone doesn’t care as much but the resin demands that it be mixed very very well or it will cure improperly (usually with strange and baffling material properties, like being weirdly rubbery, or super brittle and sticky at the same time). I also recommend a box of nitrile gloves, the good kind surgeons might use. Most of these chemicals won’t harm you today, but you may build up an allergy to them from constant exposure, which would be hideously inconvenient tomorrow. Also, a trustworthy electronic precision scale. I bought a used Made In USA +-0.01g scale for 25 US Dollars of eBay. It improved my results dramatically. I also recommend the purchase of a brick of soft Plasticine. This is a modeling clay that is oil based and never dries out. Make sure you get one that specifically mentions being sulfur free or it will interfere with your silicone. You can use the clay to do all sorts of magic to plastic parts. It’s also reusable. Lastly, some lead weights or shot bags and a ton of rubber bands; these are used to hold your molds together.
Preparing the Part You Want to Duplicate
Once you have your set-up together, the process is relatively straight forward. First remove the plastic part from its assembly and clean it thoroughly. The silicone will pick up amazingly small defects. You’ll replicate finger prints and dust. It’s pretty spectacular. You may also want to take this time to spray the plastic with a mold release. You’ll want to let the release dry and polish it off. It’s usually optional, as silicone doesn’t stick well to many thermoplastics, but if you have a questionable textured surface, you might as well. It may cause some detail loss.
Most duplicated parts will need a two part mold. You’ll hold the parts in position and cast one half of the mold, then, leaving the parts in the silicone, you’ll cast the mating silicone mold on top. There are two methods I employed. My usual is to use light glues like rubber cement, or blue tack to hold the part onto a flat surface, and then build the keys and sprues using modeling clay on this flat surface. I usually get a better seal between the mold halves this way.
Unfortunately, I generated a fail of the week; so for this tutorial, I’ll go with the other method, which is to embed the parts in a base of modeling clay. I find that this method is exceptionally hard for a non-sculptor to work into a flat surface, and the clay gets everywhere. It works well, though so don’t be deterred from this. I would even say it is the better method of the two. Don’t get the hard modeling clay if you want a good time of it though.


Making a Mold of the Part
So, first take some foam core and lay your parts out on it. Think about the orientation of the pour. You will be displacing air and replacing it with bubbles. You want clear path for the air to leave and the resin to enter. There will also be some flashing after the pour is complete. The better you make your mold, the less flashing there will be. In this case I did a shameful job, so there was a bunch of clean-up work to do before my part was done. I decided that the edges of the buttons would be the most easily repaired of defects so I picked that as the parting line for my two part mold.
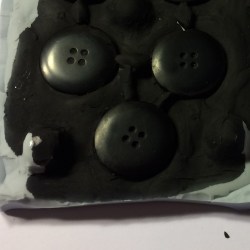
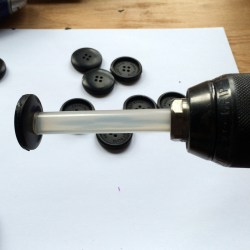
I then layered the bottom of my mold with Plasticine clay. My clay is terribly hard, so I put it in a plastic bag in a hot water bath to soften. I pressed the buttons boring side down into the mold. I want to get the most difficult side captured in the silicone first. Then I took my index finger and pressed some indexing holes into the clay. This will help me line up the mold later. I would recommend using something more precise, like a pen cap, but it was what was on hand at the time. Lastly, I took a toothpick and carefully sculpted the clay to make a nice even line around every button. I also cleared the button holes, as it is a good idea to have difficult geometry captured on one side of the mold only.


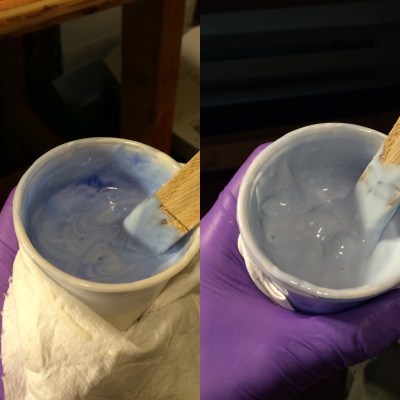
Next comes the fun part. Pouring the first half of the mold. For this I estimated that about 190 grams would be enough. I used a very sophisticated equation to come up with this figure; my scale can only weigh up to 200 grams, and this looked like a lot. Carefully weigh out the two components of the silicone. Again, very very puzzling things happen when you don’t. Next, stir forever. You have a while before the silicone begins to set, so stir. Stir until your arms burn. You can’t over do it. You should end up with a very uniformly colored, bubble filled, slime. If you have a vacuum degassing chamber, now is the time to do that. Next comes pouring time.
If you are going to pressure cast the resin you absolutely must pressure cast the mold at the same pressure you will cast the resin. This way any air trapped in the mold will compress to the right dimension under casting pressure. For a detailed mold, take a brush and gently brush silicone onto the most detailed surfaces. Then, take the silicone and hold it as high above the positive as you can, and start pouring a thin stream into the mold. This breaks most of the larger bubbles and trades them for smaller bubbles that won’t matter as much to the pressure casting process. Pour until you fill the mold and then place the mold as level as you can into the pressure chamber.


Depending on your silicone, now comes the wait. Mine takes about 12 hours to cure. Once the period is over, take the mold out of the chamber and remove it from the foam core. Flip it over and carefully remove the clay. Ideally you can do so without disturbing the item you would like to duplicate. Now, you can either go ahead and cast the next half of the mold and carve the sprues into the mold after, or you can make the sprues now with modeling clay. Both have their advantages and disadvantages. For this one I decided to make the sprues out of modeling clay.
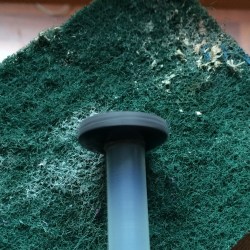
Note how the sprues are placed so that air can flow up and out of the mold without leaving behind bubbles. I took a razor and pressed against the edge of the sprues to minimize the contact area with the part.


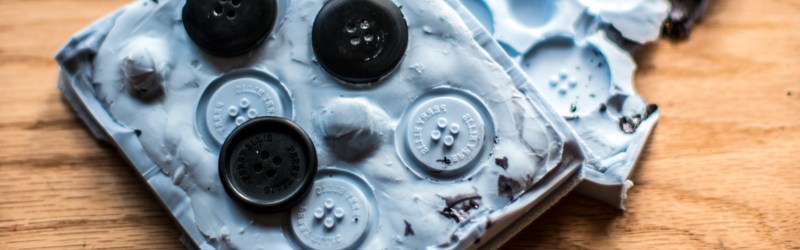
Once the mold has cured, it comes time to see if all our work paid off. First separate the mold halves by simply cutting a quarter inch (6mm) off the edge of the mold all around. Then carefully peel apart the two halves. Once you have them separated remove all the originals and clay. If you decided not to make clay sprues, this is the point where you carve in sprues using a knife of chisel.
Fit the halves of the mold back together and sandwich them between something inflexible. Wrap the whole assembly with rubber bands.
Finally, Time to Cast the Part!
Set out all your equipment. The scale being the most important. Weigh out the positives to get a good estimate of how much resin you’ll need to fill the mold. Then add a decent amount to that number, in this case I just doubled it, for short runs it’s better to waste than to redo.
Put a plastic cup on the scale and zero it. Add a few drops of colorant to the cup. For something this size, just dipping the end of the mixer into the pigment jar pulled out enough to dye all the parts. Tare it again. Pour in A and B part in the ratio described by your resin. Then mix forever. Again, the more you mix the better your result.
Pour the resin into the mold until it fills up, then tap the sides. The level of the resin should go down. Tap and fill until you can’t anymore. Then put the whole assembly into the pressure chamber and pressure cast again. Now we wait.


Once we have reached the demolding time for the resin (this is usually found in the datasheet) it is safe to demold. Take all the rubber bands off and separate the mold.Since I used entirely too many rubber bands and planks of foamcore I had some serious flashing issues. These broke off easily though, but I had to spend some more time polishing the edges.
Once the parts were finished I sewed the buttons back onto the coat. I’m not the best at tailoring, so I’m certain I’ll lose another button, but that’s okay because I have three extra waiting for that day! Even if I lose them all I still have a mold. I could even cast them in a different color if I’d like to look like a concierge. Pretty cool!


Good tutorial, thank-you
Great article, and hopefully I’ll have a future project in which I’ll have a go myself. One question though: perhaps I missed it while I was reading, but how do you keep the two mold halves separated? Is that by spraying (silicone?) with the spray can on the top side of the bottom mold part?
Yes, you use a mold release formulated for silicone to silicone contact to keep the two halves from joining. I use Stoner A324 for this.
Terrific results! Trying to evaluate the merits of the casting methodology though (expanding on what you said in your 1st line)… what exactly is the appeal versus using a low cost CNC like a Shapeoko?
Thanks!
I recommend reading the http://lcamtuf.coredump.cx/gcnc/ guerrilla guide to see what you can do with a CNC and resin casting. I’ve used it for prototyping really really successfully: http://dammitcoetzee.com/2015/11/even-an-easy-kickstarter-is-hard/
Thanks for this Gerrit, it was super interesting to see what you went through.
And what about the change? You can not clip it together…
With skill, you can duplicate very complicated designs that wouldn’t be possible without a 5 axis machine, with the same basic materials that he displayed here. The process for duplicating large bronze sculptures isn’t all that different than how he duplicated the buttons. (though of course, using bronze) Think about the kind of CNC you would need to duplicate say.. https://upload.wikimedia.org/wikipedia/commons/b/bd/Laocoon_and_His_Sons.jpg
It would take some time, but I guarantee you that I can make a duplicate of that in resin using a pretty simple tool set.
Interesting! This would definitely be a PITA case (i.e., impossible) for a Shapeoko to create, and I understand that duplicating with the resin method is more realistic.
However, the keyword is “duplicate” verus “create”. A CNC would excel at creating this, whereas the resin method is meant exclusively for duplication — am I understanding this correctly?
I am surprised these methods don’t get more time in the light in the DIY/Maker community. They are tried and true, and the parts you can produce are of significantly higher quality than 3d printing. Granted they do take a bit more work, but if you are wiling to invest a bit of time, the results are well worth it. I guess the whole process of making the mold scares people off… With a CNC and some easily machinable material, you can make anything you can think of using this method! From what I gather the worst drawback to using urethanes is that a lot of them are very difficult to glue…
In any case, the Guerrilla Guide is a great resource to learn how to do this…
I agree, it really is a phenomenal prototyping process. 100% worth the time investment for the quality parts that come out.
Also another +1 for The Guide. In my opinion the Guerrilla Guide is one of the finest pieces of technical writing ever written. It’s what got me started with resin casting.
Resin is carcinogenic, 3D printing is food-safe.
Most 3d printer filaments are not food safe. Most resins are not food safe. You can buy food-safe filament, and you can buy FDA approved resin. It’s just a thermoset plastic after all, nothing mysterious; they’ve been used in food machinery since we invented plastic.
While impressive for making multiples or replacement parts, the first thought that comes to mind – is this technique only works if you have an original to copy. Otherwise, you need to first create an original – w/ a CNC, 3D Printer, ball of modeling clay and scalpel, etc.
Absolutely! That’s when you can start to make some really cool parts. I’ll be covering some of that in future tutorials.
;Well, if one has a broken gear, couldn’t they glue (or place) the pieces together for casting. Even if the resulting cast is incomplete, the gear could be rotated to make a pattern for the missing teeth? I’m thinking maybe a two step process, first make an imperfect copy, and use that to make a better one…
You bet. That’s exactly what I plan to do for an old Tektronix 7A13 differential amp I have. I got it super-cheap because the gear train that drives the 10-turn offset pot has two broken gears in it. I have the broken gears, I have the technology. Now all I need is the time.
I don’t think a two-stage process is required. You just need to make sure to carve out any spaces in the mold that represent missing material in the original. You can then file/sand/grind these to perfection. At that point, why make another copy, unless you want to make spares for when you break the replacement gears?
Awesome post.
I understand the motivation for trying to ditch the vacuum. This is OK for a button but I would not do it for functional part, like a gear for instance. Those air bubbles you compressed might bite you when the part has thin walled cross sections. Vacuum jig is not much more expensive or complex.
One more time… http://partsbyemc.com/pub/mold-making.htm
No need to spend money on foamcore. Use free corrugated cardboard from discarded boxes.
Use pieces of masonite, pegboard (which is masonite with holes), wooden boards, pieces of PVC fence rail, anything rigid and flat to sandwich the molds together. Also, for larger molds the rubber bands won’t do, especially if you get into large volume castings. The biggest thing I make is a park light lens for the 1963 and 1964 Buick Riviera. Takes over 300 grams of resin and the mold weighs about 10 pounds. I use a couple of pieces of white shelf board from a Home Depot cull bin and two mold straps.
I should update that to add about covering ordinary cardboard with cheap packing tape, and that hot glue (and cool melt glue) is easily removed from items with rubbing alcohol.
I’ve been making silicone molds and resin castings
Wow! Great advice and great tutorial. I’ve really appreciated your comments on resin casting articles. You have some great info.
My reply got cut off a bit. Was typing that I’ve been doing this for over ten years. I’ve also done fiberglass and grew up with a family ceramics business where I learned about making plaster molds for slip casting.
The same basic techniques apply to all kinds of molds with parting lines, draft etc. Silicone is real nice because you can make a mold of something with zero draft angle and/or use a two part mold where a plaster, fiberglass or metal mold would need three or more parts.
To do three or more part silicone molds, look up how plaster molds fit together with three or more parts. A visit to a ceramic shop that does slip casting will provide much useful information if you can have a look at the molds.
When I started out, I tried forming the complete sprues and vents in the mold. When I hit on the idea of making a bevel around the mold, I first tried forming clay around the inside bottom of the first half form. Just did one that way. The next one I used a bench grinder to make the bevel.
That’s when the (!) came on over my head, cut it with a sharp knife! So now except for a few blobs of hot glue to form some alignment bumps, and the sprue formers as shown on my how-to, I cut the edge alignment bevel and keys (some notches cut deeper) after casting the first part, then use a fiber cutting wheel and grindstones in a Dremel to cut vents and the rest of the sprue after the mold is complete.
Another thing I’ve learned is that if possible it’s best to NOT have the sprue enter the cavity at top center. Bubbles will tend to get trapped just to either side of where the resin flows in. Put the inlet down one side a little so that air vents will be along the top of the cavity. The resin will flow in, down that side then fill up evenly, pushing out the air without resistance. If you have to put the fill at the top, use the Dremel to carve small vent channels close by both sides of the fill entrance to the cavity.
Hi Galane,
I went thru your tutorial carefully. What I am confused with, is the last photo on the bottom of page. could you explain what is shown there? I understand all before staps, specially with the wents for evacuation of air. But on last photo the purpose of this window is different… I see that shape of this window is exactly as shape of cardboard few pictures above, but why it’s there?
For small parts I use lego for mold forms
Lego is awesome for mold forms. Highly adaptable to the size of the item being cast, and silcone just peels right off without the need for a mold release, or other faffing about.
I bought a big box of lego solely for this purpose.
I appreciate the process, but why cast buttons? Just buy a 10 pack on eBay and resew them all on (so they match)
Why climb a mountain?
Because it’s there…
Because if he wants, he could cast them in fuschia, or puce, or bright lemon yellow, or sprinkle the mold with metal powders that can be polished to look like metal.
Could even do transparent colored buttons. With that mold and a syringe he could carefully apply white resin into the raised ridge area in the front half, let that cure then assemble the mold and cast another color for bi-color buttons, with the colored ring that will never wear off like paint would.
That’s a technique I’ve used on some items. One duplicates the look of how an old glass brake light lens was first pressed with red glass then yellow to finish it off, leaving the word STOP showing yellow with a bit of red stuck in the vertical grooves in the letters. Another makes the word MERCURY in white on tail light lenses for the 1957 and 1957 Mercury pickup trucks that were only sold in Canada. The original lenses were all red but someone here in the USA with one of those trucks wanted MERCURY in white on his.
Good Answer!
I also thought it would be good for other antique items, such as (drum roll!) buttons!
Such as those found on military uniforms, or early plastic items that are crumbling to dust…
Probably because he happened to need one, and it’s a small, easy item to use as a demonstration for this article.
Is there a time limit between mixing and pouring, and is it fluid enough that you could use a magnetic stirrer?
The pot life varies depending on the resin and silicone. Smooth On 300Q has a pot life of 30 seconds. It’s very thin so it flows easily into molds. You must have perfect venting, no time to get it into a pressure tank. It’s also impossible to get dark colors (at least with the So-Strong transparent dyes) due to the white color the 300 series cures to and adding too much dye makes it foam up.
Generally, the thicker the casting, the longer you want the pot life so it won’t heat up too much. An overheated casting can shrink, crack, distort or even get hot enough to burn the mold or catch fire.
Ideally, the castings should get just hot enough to finish off the chemical reactions so that they can be demolded and sit without warping under their own weight. Some resins require post-curing with heat, or sit around for a couple of weeks to a month to fully cure. Most of my stuff is made with Crystal Clear 202. I use an old food dehydrator and heat the castings setting on part of their molds for a few hours at about 145F. If I don’t, decently hot tap water will soften them. Some items I post cure in a 200F countertop convection oven. There’s a thing that needs hacked, the oven timer goes for at most 90 minutes and the temp starts at 350F. Would be nice to have the temp start at 200F and be able to set the timer for 2 or more hours.
Convection heat is what you want for this, not radiant heat. Hot air blowing will evenly warm the castings. I first tried a regular oven and ended up ruining a few castings. Major ‘suck back’ problems.
Suck back is a weird phenomenon. If the casting is taken out of the pressure tank too early and taken out of the mold it may warp under its own weight. Leave it in the mold or on part of the mold and areas touching the mold can shrink, sucking back away from the mold. No idea how/why, it just does – at least with urethanes from Smooth On.
I leave everything in a minimum of 24 hours under pressure, no matter the pot life or what the instructions say. 24 hours, won’t have problems, unless the instructions say the resin has a longer demold time, then it stays in longer.
The ambient temperature and humidity also affect casting. In winter I have one of those little under desk heaters I have blowing at the tanks. I’ve also made large silicone molds in a less heated part of my shop by aiming a halogen worklight at the tank. Thought of that after leaving a mold in the tank for over 48 hours and when I let the pressure off the silicone foamed up – then it cured. That was an expensive fail. So cold temps and for some reason high humidity, even in summer, can extend resin curing times. No idea why humidity affects it because it’s a chemical reaction inside a pressure tank. Evaporation is not a factor. Just my experience that castings done on a rainy spring day will need to be tanked longer than when it’s dry. In a room with real nice environmental controls there should be no such issues.
Got too much silicone mixed up? Freeze it! Depending on the silicone, it’ll keep in a freezer from a couple of days to nearly a month after being mixed. If you must work with a faster curing silicone and need to use a lot of it, mix it then pop it into a freezer to get it chilled way down. It won’t freeze solid. One time I forgot I put some mixed Silicones Inc. P60 in for nearly a month and was able to use it to cast a mold. So another time I left some in for over a month and it had started to cure.
Why share what I’ve learned over the years doing casting and mold making? Because this #$^#^#^ is expensive, especially for a hobbyist, and I want people to succeed and avoid problems I experienced while learning. And because it’s highly unlikely anyone else is going to be competition in the items I make. If I was casting figures for RPGs, I’d be “Ha! Figure it out for yourself! HAHAH!”… nahhh, probably not. ;)
A good way of fixing toys that has a broken piece! Thanks =)
So much awesome in one article. And the result is almost indistinguishable from the real one. Kudos my very determined friend! Love it when people go overboard to do something right when they could have just went the easy way (like buy a similar button).
You can actually skip purchasing a vacuum chamber for degas if you buy Smooth-On Mold Max® 14NV silicone rubber. The NV stands for no vacuum. It’s good in a pinch.
http://www.smooth-on.com/Silicone-Rubber-an/c2_1113_1135/index.html
Great information on making plastic castings. Those buttons turned out great. That being said when I need replacement plastic parts I generally use a professional. That being said, I can see how this knowledge can help you resolve a lot of problems. http://www.crownplasticsinc.com/capabilities/custom-fabrication/
Hey Gerrit, Great post. Really need some info from your if I may. I have been trying to reproduce a plastic part for my boat with success. I was able to make the silicone mold, but so far very material I used to cast the part is not strong enough. What did you use for the buttons? Or can you recommend a material that’s durable and won’t brake? Thanks
What polymers are used in home casting of AR15 lower receiver?
Highly recommend http://repository.kln.ac.lk/ to read and download more academic ,practice and policy articles free of charge on this topic.
I require one black plastic musical instrument part roughly the size of a .50 piece. I hope to gain three facimiles of my two originals. Any chance I could pay you to manufacture them? I realize I’d need to mail an original to you. Can post photos on fb…