Last time I talked about the internals of how Bluetooth Low Energy (BLE) handles data. I mentioned that the way it is set up is meant to conserve power and also to support common BLE devices like heart rate monitors. On the other hand, I also mentioned that you often didn’t need to deal with that because you’d use an abstraction layer.
This time, I want to show you how I used the Hackaday special edition Tiny BLE (from Seeed Studios) and its mbed library to do a quick simple BLE project. If you didn’t read the first part, don’t worry. The abstraction is so good, you probably won’t have to unless you want to circle back around later and get a more detailed understanding of what’s happening under the covers.
I wanted something simple for an example so you could build on it without having to remove much code. For that reason, I decided to allow my phone to control the state of a three-color LED via BLE. To do that, I’m going to use a virtual UART and some off-the-shelf phone software. The whole thing won’t take much code, but that’s the point: the abstraction makes BLE relatively simple.
The Hardware
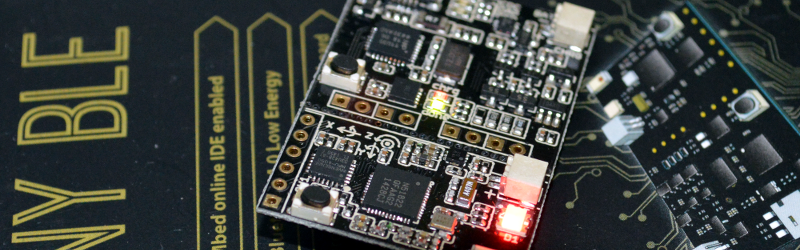
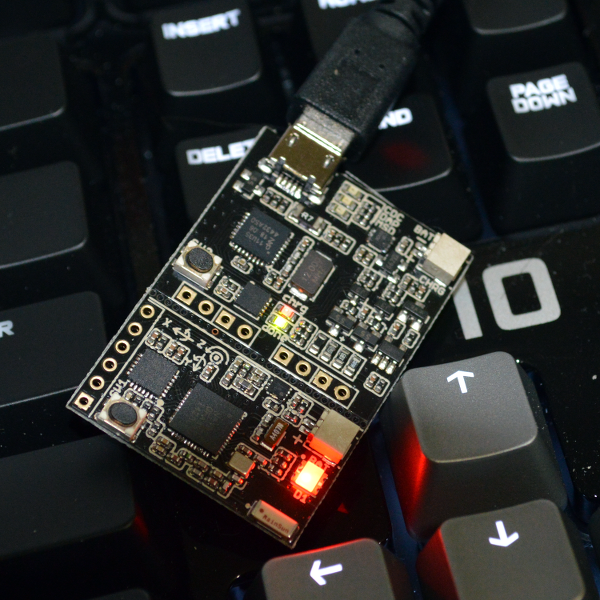 The Tiny BLE board is about the size of a large rectangular postage stamp (see image, right). However, that’s only half the story. The board is two boards joined together with a score line between them. The larger sub-board is actually an interface to program, debug, and monitor the second sub-board (the target board in the right part of the image). This second board is the one with the BLE and other peripherals. It doesn’t have a USB port, but for a stand-alone application, you could program the device, snap the target board off and use it by itself. That board is about the size of one joint of my index finger (granted, I’m a big guy, but not that big).
The programming board has the USB port (which provides a virtual serial port), a button, and it can also measure the current supplied to the target (important because many BLE projects will want to run on batteries for as long as possible).
The target board has an nRF51822 which is the CPU (an ARM Cortex-M0 at 16 MHz) and BLE interface. There’s also a 3 color LED, and button, and an MPU6050 which allows the CPU to use a 3D accelerometer and gyro to determine position and motion. The device has a processor on board which fuses the data and offloads the CPU. Not bad for about $30.
The Environment
The Tiny BLE board uses the mbed online environment. Once you’ve logged in, click on Platforms, find the TinyBLE board and add it to your IDE using the provided button. That’s it. The toolchain is ready to go.
There’s a lot of debate over online IDEs, and it is possible to use other offline tools. However, for getting started, it is hard to beat having the whole toolchain set up in two or three minutes. There’s also a lot of example code to help you get started. You can export from the online IDE to an offline one later, if you decide you need to go that route.
If you want to review how to get started with mbed in general, we’ve done posts on that in the past, including one with the video, below.
The Receiving End
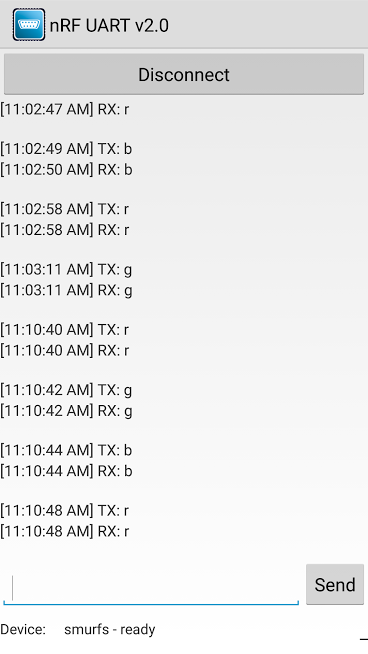 The idea of using a virtual UART sounds great on the embedded side, but you need software on your phone or other device, too, right? Luckily, the UART service works with the free nRF UART apps from Nordic Semiconductors, available for both iOS and Android.
The application is pretty bare-bones. However, it does let you send and receive with the embedded device. You can always figure out the host software yourself in more detail after you get your embedded code working.
A Simple Example
I stripped down a larger example program to create the simple demo (you can find the entire project online). Here’s the meat of the code:
 ble.setAdvertisingInterval(160); /* 100ms; in multiples of 0.625ms. */
 ble.gap().startAdvertising();
 char r[4];
 r[1]='\r';
 r[2]='\n';
 r[3]='\0';

 while (true) {
   ble.waitForEvent();
   int c;
   r[0]=c=uartService._getc();
   if (c<=0) continue;
   if (c=='R' || c=='r') { red=0; green=1; blue=1; }
   else if (c=='G' || c=='g') { red=1; green=0; blue=1; }
   else if (c=='B' || c=='b') { red=1; green=1; blue=0; }
   else r[0]='?';
   uartService.writeString(r);
 }
If you read the last installment, you might remember that the BLE server (the Tiny, in this case) sends advertisements that clients can use to discover the server. In some cases, the data is in the advertisement and in other cases it just informs clients that a service is available. Here, the setup is already done and the two calls at the start simply set the interval to 100 milliseconds and kicks off the advertisement.
Let’s come back to the advertisement set up and look at the main loop. When a BLE event occurs, the code reads from the virtual UART and looks for an R, G, or B and sets the LED as you’d expect. It also echos back the command. Lowercase letters are acceptable and if you enter anything unexpected you get back a question mark instead of the echo. Simple, right?
The actual BLE setup looks like this:
ble.init();
ble.gap().onDisconnection(disconnectionCallback);
ble.gap().onConnection(connectionCallback);
/* setup advertising */
ble.accumulateAdvertisingPayload(GapAdvertisingData::BREDR_NOT_SUPPORTED);
ble.setAdvertisingType(GapAdvertisingParams::ADV_CONNECTABLE_UNDIRECTED);
ble.accumulateAdvertisingPayload(GapAdvertisingData::SHORTENED_LOCAL_NAME,
(const uint8_t *)"smurfs", sizeof("smurfs"));
ble.accumulateAdvertisingPayload(GapAdvertisingData::COMPLETE_LIST_128BIT_SERVICE_IDS,
(const uint8_t *)UARTServiceUUID_reversed, sizeof(UARTServiceUUID_reversed));
UARTService uartService(ble);
You can see that there are callbacks for a client connect and disconnect. In addition, there are various parameters set on the advertising. The BREDR_NOT_SUPPORTED flag tells clients that this is a BLE-only device. The UART service has a certain connection type and IDs, so you can just take those as boilerplate. The short name is the same as the original example, smurfs.
There’s more to the code, but not much more. Most of it involves setting up I/O pins and the local serial port for debugging. Granted, this is a simple example, but that’s the point: A few dozen lines of code results in a BLE “serial port” that can talk to the app back on the phone.
What’s Next?
If you want to play with the impressive motion capture capability of the MPU6050, the standard example you can pick when you start a new project in the editor will get you started (you can also find the code here). This example also uses the UART service, and the code to actually read the MPU6050 is all there.
Of course, you can also build things that don’t use the UART service. The library documentation can help you get started there, but my original point stands: It is good to know the details of the BLE protocol, but thanks to library abstractions you don’t need to know much to get something working. Using the UART service, especially, makes BLE just another transport layer for a serial port, and that’s an abstraction we all know how to live with.


Can you create a uart that sends 32 characters Evert 10ms upp The Phone?
That things massive! Can’t sneakily squeeze that into anything without it being blatantly obvious :P
tell me about it, i was thinking subcutaneous :S
Can I program this board to appear as a Bluetooth keyboard? I’d have a project idea that ‘types’ in certain values into CAD programs, and having it enumerating itself as a Bluetooth Keyboard would save me the hassle of writing a wrapper or some other serial to keyboard converter.
The Teensy can do this with its USB. No need for BLE
Wireless USB?
I’ve prototyped this on a teensy, but having the mitutoyo cable, the adapter, and the usb cable makes it very cumbersome. bluetooth would be low energy enough that it wont be too hefty of a battery i’m hoping
The Adafruit Feather 32u4 will do Bluetooth HID to pretend it’s a keyboard.
oh snap! definitely picking one up, thanks!
Keep in mind that this is Bluetooth LE (as is the Adafruit Feather BLE board), not the other thing also called Bluetooth. There is a “HID over GATT” profile (HOGP) for doing HID via Bluetooth LE, but don’t expect OS support to be quite as universal as for the other, non-LE Bluetooth HID. Most newer OSes support it, but if you’re looking to target an older device or something with weakish bluetooth support you might be out of luck. Windows 7 would be the most likely stumbling block, as MS didn’t support BLE until Windows 8. Also keep in mind that you need an adapter for the PC that supports BLE, not just regular Bluetooth.
If you want to target the older Bluetooth HID, I think Adafruit sell an older non-LE bluefruit which includes HID support in its firmware. I think you can also find copies of HID-supporting firmware that work on the ubiquitous HC-05/HC-06 bluetooth devices, though they’re maybe not technically allowed to be distributed/used. All of those are CSR chipsets underneath, I believe (or maybe the Adafruit module is a TI chipset?). They’re all fairly closed devices, you can’t put your own code on them (unless you buy/pirate 5-figure toolchains), you just communicate with them over a serial link from another MCU. Looks like the Adafruit device with the HID firmware on it is called a “Bluefruit EZ-Key”.
On paper, though, BLE’s HID over GATT is much better than the old bluetooth hid if it will work for you; lower power usage, lower latency, and a much more open ecosystem.
The underlying nrf51822 chip shown in the article certainly supports doing HOGP, and Nordic ship some sample code. Using it in mBed might be more complicated than using the friendly BLE library/wrapper mBed provide, you might have to drop down to programming against the underlying nordic SDK. Looks like somebody has an mBed library/wrapper on github, though: https://github.com/jpbrucker/BLE_HID
I wish you left your contact info so I could pick your brains more :)
I just started using the nrf51822 with the mbed ide last week. It was really simple to set up and use. I like this series of articles as it fits into my current projects.
It would be great if there was a follow up article or if someone could link me to an article about going from prototype to actual release and the steps involved with FCC and CE certification. That part actually has me wondering if I should go down a passive path with my project rather than BLE until I can afford the certifications.
Your best bet for small production runs is probably to use an off the shelf BLE module that already has FCC certification. For instance Adafruit use the MDBT40 in most of their Bluetooth LE boards – it contains the same nRF51822 chip as is in the Tiny BLE
Thanks for the reply espruino, I will check out the MDBT40. I looked around briefly for a developed module but most of the items I found drove the price of my project up. I am shooting for a price point of around $20-25, depending on the rest of the manufacturing costs this module might fit into my budget, thanks!
After following the Tricorder project here for a while, I decided that my phone has a LOT of what the Tricorder has. If I plug in something like Seek thermal imager, all I need is something like a bluetooth device to act as a remote probe to do things like gas analysis and spectrometer type analysis.
SO! Can I use this type of device to communicate with my Android phone relatively easily to achieve my goals?
Got very interested when I saw this as I had been unable to build Get_Started.
However, this also has build errors
Error: Cannot open source input file “BLE.h”: No such file or directory in “main.cpp”, Line: 6, Col: 18
What’s missing?
Did anyone find a way to transmit the MPU-6050 accelerometer data to their phone?
I can’t search right now, but there is a lot of Bluetooth sensor apps on FDroid for Andriod phones.
I can send information from phone using nRF UART, to change LED to red blue green, but did any author some code to send the accelerometer data; my C is not up to scratch.
Hey Williams, Thanks for sharing this info.