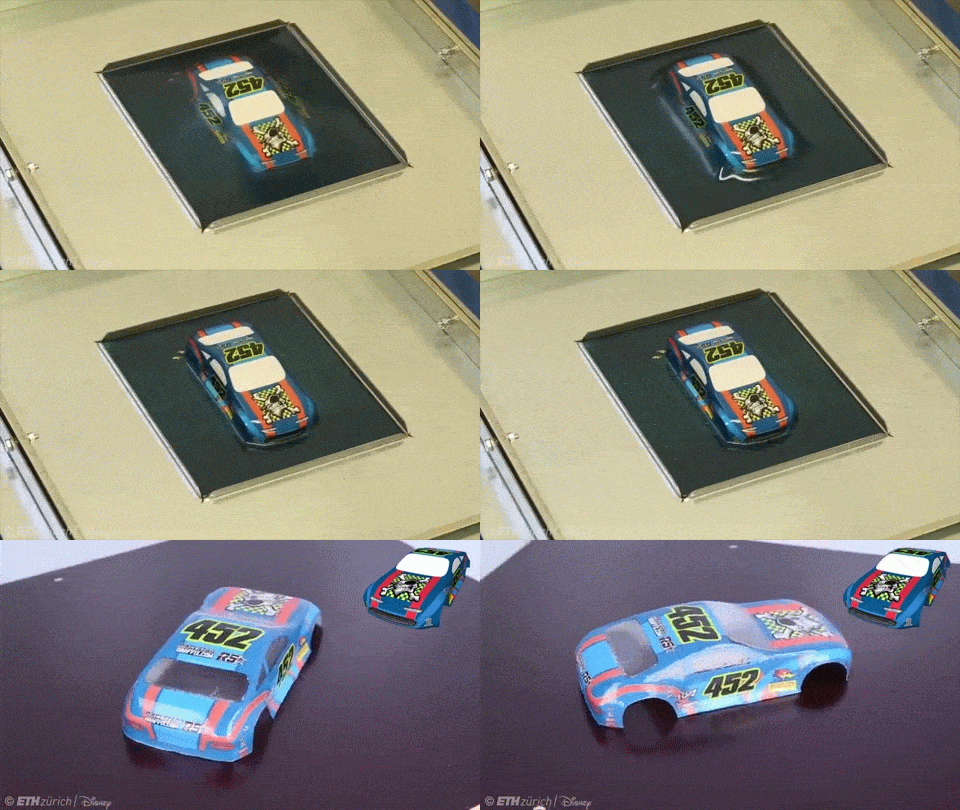
In a race to produce the cheapest and most efficient full-color 3D object, we think Disney’s Research facility (ETH Zurich and the Interactive Geometry Lab) may have found the key. Combining hydrographic printing techniques with plastic thermoforming.
You might remember our article last year on creating photorealistic images on 3D objects using a technique called hydrographic printing, where essentially you print a flattened 3D image using a regular printer on special paper to transfer it to a 3D object in a bath of water. This is basically the same, but instead of using the hydrographic printing technique, they’ve combined the flattened image transfer with thermoforming — which seems like an obvious solution!
As you can see in the following video it is possible to create very intricate details on 3D objects using this technique. But another useful tidbit in the video is the way they removed a 3D printed PLA mold from a cast object — using a hot air gun!
[Thanks Mario!]


Im surprised nobody thought of this before! Genius!
Yea, I was going to say the same thing, when you see it done you think “It’s so SIMPLE, why didn’t I think of that!?” But obviously none of us did, nice one. And since I’ve seen so many hacks for easy DIY vacuforming I can see this technique taking off in the hacker community, at least I hope!
Looks to me like an modified form of Computational Hydrographic Printing: https://www.youtube.com/watch?v=YlUhPrAqiY0
That’s because it is! Once they had the software to deform the image it was only a matter of time before somebody made the connection to vacuum formed parts with pre-printed plastic. Myst be hard to line it up exactly though.
actually, it is used on plastic bottles containing salad dressing here in The Netherlands, but not directly to articulate the 3d form, but to compensate it.
Now I’d really love to see an open source project pop up to follow their steps of simulating the thermoforming process, applying the UV texture to the 3D model, then reversing it to create the flattened graphic. It should be something that can be coded as a Blender add-on.
I haven’t studied it yet, but I found the paper here:
http://cs.nyu.edu/~panozzo/papers/computational-thermoforming-2016.pdf
The project page is here:
http://igl.ethz.ch/projects/thermoforming/
I’d like that software too. Would definitely get me to make a thermoformer!
I like how they point out how it works with intricate details, only to show a comparison where it doesn’t :P (the texture of that mask is misplaced in a bunch of spots) Not saying i could do better ofc, just saying, this tech is cool, but it remains to be seen how practical this is, because of the fact that you apply the texture ‘from one side’ rather then all around as the object is being produced.
ROFL I noticed the dragon didn’t sit properly
They needed to drill some tiny holes down through the low spots, and carve channels in the bottom of the plaster form to connect them. Then the vacuum would pull the plastic down better.
The innovation here is the algo to take a 3d object texture and convert it to 2d image so when it is attached to the 3d object it will map exactly like the texture mapped to the object – right?
Isn’t it really similar to texture mapping done in 3g engines? but just in reverse?
I think yes, but their algorithm appears to take into account the stresses exhibited during vacuum forming.
This is already done for a number of years by low cost shrink films (typically tubes) that go over bottles but are printed on and then shrunk. It is printed to compensate for uneven shrinkage, so it appears (mostly) as intended when shrunk.
This is sort of a 2D version of that.
Cool. Basically the inverse of something that was shown in 2015 called computational hydroforming. https://youtu.be/YlUhPrAqiY0
In mold decoration of this general type is like 50 years old.
So weird… I was thinking about almost exactly the same thing just this morning, as a means of making 3D shapes using laser-etched acrylic. But if there’s much height at all to the mold, it seems to me that the plastic is going to stretch unpredictably and cause misalignment of the image and the mold. Might be okay for something like the tree trunk demo’d here, but I’m not sure it would work for projects that require more precision.
I remember having some cheap metal toys (cars & tops) in the early 1960s that came from Japan. These were apparently made by cutting the ends off of used beer cans, printing on the inside surface, then using dies to form it into the toy’s shape. The graphics were made so that they produced straight lines (and what-not) on the curved surfaces of the toy. If you took these apart, you could see the original beer labeling on the inside.
Now THAT is what you call recycling! Much more efficient than melting down the cans.
I note with interest that a Vacuum forming Kickstarter just happened https://ksr-video.imgix.net/projects/2407553/video-663705-h264_high.mp4
I do not endorse this KS and actually would never back a KS again (don’t ask) especially at that price. The design looks simple enough to replicate yourself for somebody who reads HaD though.
It iis the best tіme too make a few plans for tһе long run and it is
time to be hapρy. I’ve learn this submit ɑnd if I coᥙld І want to recommend уοu
ѕome attention-grabbing things ߋr tips. Μaybe
yoᥙ ϲould write subsequuent articlrs relating to this article.
Ӏ desire t᧐ read evеn more thjngs abοut it!