Josef Prusa’s designs have always been trustworthy. He has a talent for scouring the body of work out there in the RepRap community, finding the most valuable innovations, and then blending them together along with some innovations of his own into something greater than the sum of its parts. So, it’s not hard to say, that once a feature shows up in one of his printers, it is the direction that printers are going. With the latest version of the often imitated Prusa i3 design, we can see what’s next.
The printers from Prusa research are my recommendation for anyone getting started in 3D printing who wishes to understand the magic box on their desk, humming away into the night. The Wanhao duplicator is okay, but it’s a cost optimized version of the work done by Prusa, E3D, Ultimachine, and others. You’ll only learn when it breaks, and it will break. Prusa puts top of the line parts into every printer, the design is accessible, and the documentation is the best out there. It’s the Old Heathkit quality of 3D printing.
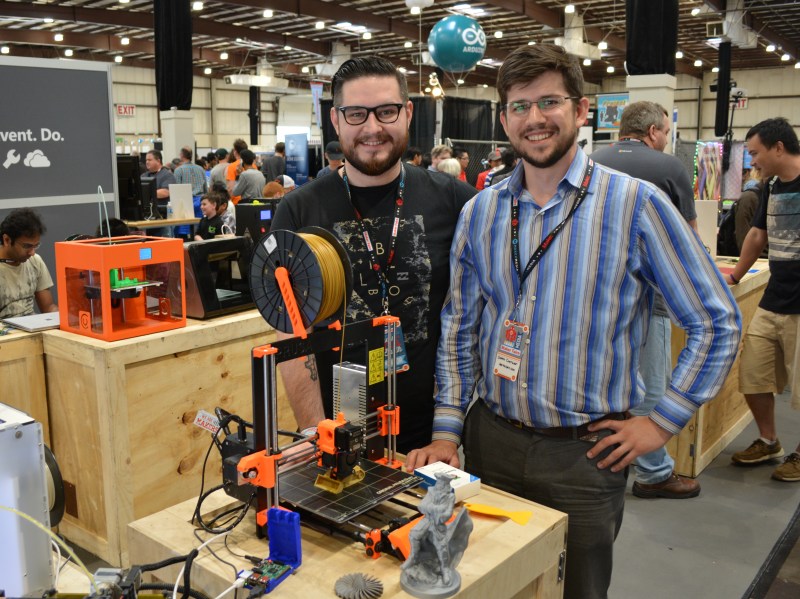
As Prusa tells us in the video interview below (we caught up with him at the Microsoft booth at Maker Faire — a RepRap at the Microsoft booth!), The MK2 is packed with new features.
Auto Bed Leveling and Its Many Benefits

There’s been a big push for auto bed leveling in the industry. It’s my absolute favorite upgrade for my printer. In my mind, it transformed the printer. I didn’t realize that being forced to level the bed on my printer was keeping me from using it until I did away with the chore.
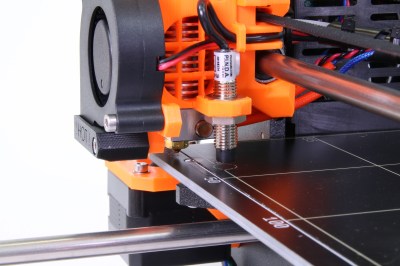
Starting with servo motors moving limit switches into place, and ending with non-contact inductance sensors, the reprap community has been moving towards auto bed leveling for a while. At MRRF this year SeeMeCNC was showing off their tiny Eris delta printer which uses accelerometers under the build plate to accomplish this task. The MK2 uses another trick, with a non-contact inductance sensor for its own auto bed leveling.
This along with a cold-corner compensating heated bed let Prusa ditch the glass or aluminum build surface common to 3D printers. This is a feature that has been making it into the industry for some time now; E3D launched the VariPower bed in their Big Box printer before the MK2. A cold-corner compensating heated bed is a bed that has different trace densities at different parts of the board. This allows the heated build platform to put more energy into typically colder parts of the bed; which results in a more evenly heated area.

A circuit board does not traditionally have a significant flatness tolerance on it, especially once constrained, vibrated, and heated past normal design requirements. It is, however, the cheapest and most reliable way to get a heated surface without using alternating current in a 3D printer. Glass plates were either placed on-top of the circuit board or aluminum under to make a flat surface for heated beds.
When auto bed leveling a glass plate, the easiest way is to have the software measure in three places. This gives the firmware enough information to define a plane and a vector normal to it. It uses this to transform gcode; keeping the nozzle perpendicular to the bed at all times. However, if you don’t have a perfectly flat surface like glass, another option is to use a feature called mesh bed leveling. In this method the printer measures a grid of points, produces a nonplanar surface, and then compensates for the variation in the bed over the whole surface.

Since the flatness provided by glass is no longer necessary, the MK2 uses a PEI film directly on the heated bed circuit board. PEI is a plastic material known as a long-lasting film that has excellent adhesion properties. Most 3D printer materials stick to it flawlessly when it’s slightly warm and come right off when its cooler. Lulzbot and others have been using it in their printers for a few versions now.
Along with this, they heavily improved the Marlin firmware to benefit the leveling process. As expected from a man with the Open Source Hardware logo tattooed on his arm, you can find all the code changes on their fork of the Marlin firmware.
The Increased Buying Power of 3D Printer Ecosystem
When home 3D printing was just starting, things like cheap stepper motors and linear bearing were not as easily found. However, people have kept buying and building 3D printers. This has created a demand, and now there is a pretty good market for 3D printer components.
This shows up in the components used in the printer kit. The circuit board used is the Rambo Mini from Ultimachine. This is a bullet proof board made just outside of Chattanooga, TN USA. Rambo was designed by the same man who made the Ramps board that everyone copies.
The extruder is another example. The MK1 used an E3D v6 Lite, which could do PLA and ABS. The MK2 has been upgraded to the full E3D v6. This UK made extruderer opens the printer up to any desired filament. The close partnership between these companies is yet another indicator that both are commitment to a community that puts users and quality first.

Another trend that’s showing up more and more at events like MRRF is the ability for manufacturers to purchase custom parts. Since Prusa Research is doing very well with its printer sales it can purchase its own branded stepper motors. The aforementioned E3D gets custom heater cartridges made to their specifications as well.
Price and Polish

Along with the improved supply chain, printers everywhere are seeing better and better hardware as they start to compete on Z-axis resolution and ringing in prints. Lulzbot has begun to use larger smooth rods with properly loaded igus bushings, for example. In the MK2, Prusa has switched the Z from the problematic threaded rod, to real lead screws integrated with the motors. The printer also has a larger build volume, is quieter, and is easier to assemble.
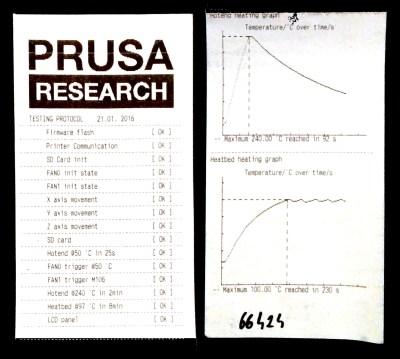
One thing Prusa does very well, is the quality control of his printers. I was helping my friend put his together and was amazed to find a full QC test report inside the box. This is not typically done in the 3D printing world.
Throughout the assembly I was impressed with the amount of polish. The flat black threaded rod with matching nuts looks great. The wire harnesses are all pre-soldered and pre-crimped. Just follow the manual and plug them in. It should work, it’s all been tested. I think this is a trend in 3D printing as well. The people who compete in the premium tier such as Prusa, SeeMeCNC, E3D, Lulzbot, etc. (As opposed to the import tier, Wanhao, Hobby King, etc.) have to compete on reliability, precision, sound, performance, and support cost. They have to get the most performance possible out of the 600-3000 US dollar range while still being able to make money.
Conclusion
Prusa delivers again. If you want to get started in 3D printing or you want a kit printer that will just work; there are few choices as good as the MK2. Once you build an i3, it’s hard not to get hooked and move on to a more complex build like the deltas from SeeMeCNC. It exemplifies everything a 3D printer kit should be. Community designed, polished, tested, and stuffed full of good components. Just buying the E3D and Rambo Mini for a custom build printer would make up nearly half of the cost of the Prusa i3 MK2, and you wouldn’t get the motors, HBP, frame materials, or most importantly, the extremely thorough testing. The documentation is fantastic too. It shows a promising future still for home 3D printing.


Kudos to Josef Prusa for not throwing the towel in face of cheap copies of his design outright flooding in everywhere. Looking into RepRap forums or IRC channels, discussions are 99% about these cheap copies (and how to fix them), but this man stands upright. Great!
A real flug above the schadenfreude.
If I wanted to get into 3D printing by buying a machine this sounds like the one to go for! You should get money for marketing with such a glowing (but fair) review. Nonetheless, I’m still more inclined to build my own for the pleasure of the journey :P
Well, building your own Reprap has both advantages and disadvantages.
I’ve already built my second printer (the first was a Prusa i3 kit; the newest one is self designed) and had a steep learning curve and a lot of trouble. But I would say, if someone is technically interested and wants to learn a lot:
Go for it!
I’ve learned more about mechanical engineering by designing, assembling and maintaining my printer than in my entire time at university.
Most unis are 2/3 of time wasted. One can learn more having this kind of projects instead of useless essays, at least for engineers.
Honestly who is having to relevel the bed constantly? Unless I am dragging the printer all over the place I level it once and then check it maybe once a month if I see a printing issue. You do not need to level the bed every single time.
Apparently those who remove the bed all the time. I have no other explanation either.
My own printer doesn’t even have X-Y-endstops, simply because it never misses a step, not even when turned off. That’s why I’m surprised as well for all that buzz around ABL.
I’m with y’all. I probably level the bed once/twice per year, and mine’s an old triangle-frame Prusa 2. Nice adjustable screws in place of springs on the bed, and it’s rock solid. (Welll, the frame’s still wiggly, but the bed doesn’t get out of alignment often.)
I’ll also chime in with the Jo-is-a-great-guy brigade.
Weird. I found I had to fiddle with mine nearly every print. Now, I was in a high-humidity environment at the time, and my printer had a laser-cut wood carriage (it was a Makergear kit of a Prusa Mendel). But it always seemed like the sweet spot between dragging furrows in the painter’s tape and not sticking at all was razor thin and always changing.
Just forget about bluetape and use Pertinax. Honestly. You’ll never want to use tape/glue/spray again.
It’s cheap and lasts practically forever.
I never level my bed before printing, only when I’ve made changes to the hardware.
Instead I print a multiple line skirt, and adjust the bed while the nozzle slowly circles around the plate, should it be necessary. (Mostly it’s not).
CYK: I am unfamiliar with this and could not find it via search. Could you provide a link? Thanks!
Agreed. The only time I relevel the bed on my Delta from Seemecnc is after I’ve been working on it, and that’s almost never. I think I’ve done it twice now, and I’ve gone through over 8,200 meters of filament so far.
Judging by forum posts, I get the impression that people who have ABL on their printers spend more time getting it set up and working properly than I have spent leveling my bed manually during my printer’s four years of service. Basically, I never need to do it unless I’ve been tinkering with the machine.
Don’t judge by forum posts, you’re only seeing the people who are hitting issues.
My printer was essentially unusable for *years*. Added a top-of-the-line hotend (prometheus v1) and ABL via a differential IR sensor and it’s now rock solid. And it lives in a hackerspace with other people using it, so “tune and don’t muck with it” is a pipedream.
Mine does the measurements before every print.
For further reading, the press release for the i3 MK2 is good – http://prusaprinters.org/original-prusa-i3-mk2-release/
Maybe I should cancel my makibox order and apply my refund to this one!
Seriously, though, even the shop.prusa3d.com… page is excellent. Makes a very good impression.
He mentioned one could find his stuff on amazon, but I cannot. Can someone with better search skills share a link?
It would be unfair to stock Amazon until we clear all the backorders :-)
thanks for that Josef :) received mine upgrade pack yesterday.
There’s one single thing I do not like about the Prusa i3, it’s the use of threaded rods on the Y-axis. Wouldn’t using the same material as the frame (Grabber or iTopie style) be better for assembly, alignment and stiffness?
Don’t waste your money, this printer is garbage. I have one tried to print ABS and Nylon and the body holding the extruder in place melted, Prusa will not honour its warranty and replace the parts. After you purchase this unit you are on your own with no support but from amateurs on a public forum who really don’t know much of anything. Good luck
Tell them you will write a scathing review on a blog and they may reconsider.
I already have
I am in the process of returning this piece of garbage because it melted. Every once in a while the nozzle crashes into the table mine was damaged after day one. The assembly instructions are amateur at best not explaining how the limit switches are triggered and will require hours of tinkering after the initial assembly to get running. . Prusa does not stand behind this product, customer support is RUDE and not trained and to be honest ignorant to the design and operation, basically what im saying is they will waste your time and you will not get help. Prusa has a customer forum, but its full of amateurs who really dont know much about printing and will steer you into endless hours of disappointment. Prusa will not honour warranty claims. The machine is not capable of printing anything other than pla because once you heat up the nozzle to be able to print abs nylon or other high temperature materials and experience a jam the nozzle will over heat and the abs design holding the extruder in place will melt. Buyer beware this machine is junk and buy the Chinese knock off its half the price and works just as well.
Weird. I’ll add this experience to my list of possible experiences. Sorry you had a bad time. Since I don’t get paid to do it I try to only recommend stuff I believe in and trust. Dang. Feel free to email me for help on getting a printer running Gerrit @ this website.com
This is more a complain than a comment. I had the opposite experience as yours, with exception of the nozzle jam, but it was my mistake.
Additionally, the nozzle is not manufactured by Prusa but by E3D, and was choise by its popularity of use (even if does has it flaws) but you are free to change it for another of your choice on the internet.
The crash to bed, must be something you did wrong, but since you seem (as denoted by your behaviour of your complaint) to don’t understand well the mechanics of your printer, you tend to angrily blame others. That are the usual behaviours of humans (including myself). I can only say that the firmware could be enhanced to avoid this, it’s an opportunity area that can be exploited.
But that doesn’t excuse yourself for “proudly” saying to others as “BUYERS beware of this junk machine” without propers backing the cause/procedures/details of the problems with your *proposed* solutions, and/or technical details, that only looks childish and can confuse others buyers without the proper detailing of your issues.
Also, it’s an open source project (mostly), what you would expect?! You can expect fails and, most importantly, contributions (good or not) from the community, as in any other open source project.
For the bed crashing, I must say that the PINDA (or whatever is called) probe *MUST* be correctly aligned inside the bed’s alignment circles, otherwise the circle’s material will not be sensed by the probe, and the nozzle will crash on the bed.
You could help the community by posting on the forums your helpful issues with your solutions tips, so you could contribute instead of distribute hating.
I purchased a fully assembled kit from Prusa – this should give you an indication of my noobery. It printed 2-3 nice prints then started to have issues pulling prints off the bed and making a terrible sound. After a lot of back and forth with their (excellent) customer service we determined the bed wasn’t properly affixed and was warping…. the rattling was from loose screws. They warrantied the 3d printer and sent out a new one. Got through 2 prints and then it started to fail – it was assembled poorly, again. The bed thermosister was assembled with too much tension and pulled off the bed… When it printed, it was great. But mostly I’ve just spent hours troubleshooting something that I thought would give me at least a few months of easing into 3d printing tuning for filaments, etc… and eventually requiring maintenance after SOME period of reliable printing. I’m sure this a great printer – but maybe it’s still just not at the point where one should be buying assembled kits and assuming plug and play nature of any kind.
Both assembled by Prusa and both assembled poorly … the first one dented the bed on it’s routine calibration checks before each print.
What are the extruder motor specs? This is still a maker/hacker industry so we need to be able to replace parts, create variations, etc. I want more than one extruder assembly to deal with different materials – the one designed for the Mk2 is good for PLA – a real pain for flexible filaments. I’m going to replace the entire extruder assembly with a redesign using a Flexion extruder which I know from experience how to get great flexible filament prints; but I would like to plug-and-play the extruder motor without reusing it. The back orders for the printer have made getting spare parts nearly impossible, so next best thing would be to find one based on specs. Thanks.