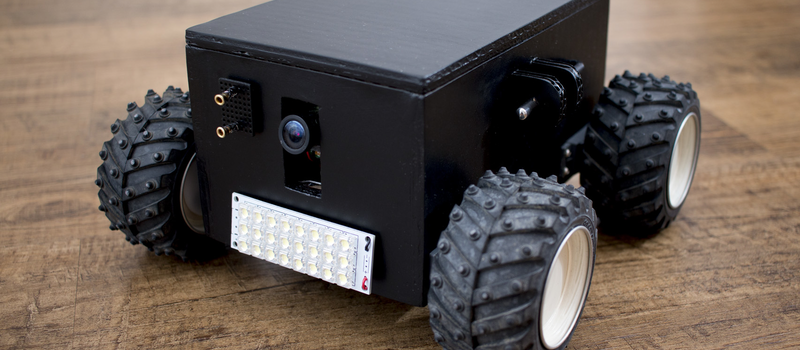
[Miloslav Stibor] may have built Mimobot 2.1 out of cardboard so that it’s not very heavy, but the robot is absolutely no lightweight. Read through his logs (in Czech, or in translation) and you’ll see what we mean.
Our favorite feature is the recharging dock and docking connectors, made respectively out of spring-loaded rivet ferrules and copper-tape-covered cardboard. The video found on that page is also absolutely brilliant: watch in awe as it climbs over children’s books, pulls a wooden train, or scales a mountain of pillows.
We wrote [Miloslav] and asked about the continuous-rotation servos, because they ran so smoothly at low speeds. He replaced the potentiometer with a pair of “carefully matched” 2.2 k resistors, and drives them with a PWM signal. Sounds easy, and obviously works very well. We were always under the impression that it was a little bit more complicated to get proportional control of hobby servos. We’ll have to experiment.
The wheels and lightweight frame (made of “military grade” cardboard — saturated with a wood/paper glue) make it entirely capable in living-room environments covered in cables or rugs, which is something we can’t say about our purchased vacuum-cleaner-bot. And the cell-phone remote interface that lets him control the onboard camera and its elevation and lighting. Driving the thing around with the phone control looks fun.
In short, if you build small robots, give this one a look. Something very much like this is now on our short must-build list. And we can’t wait to see Mimobot v3!


Nice. Great job on the charging station and connector setup. (@50 seconds)
That thing can scale a pillow-fort at 45°; no one is safe. ;)
It looks really good, considering it is cardboard!
It is normal cardboard but covered with a layer of glue. He says that it is as strong as wood in such case.
Oh and the charging connector are two springs from a ballpoint pen :-p Czech DIY ingenuity :)
You can make really strong cardboard by using epoxy resin. I would use the incredibly thin stuff for fiberglass and paint it on a sheet of cardboard, each side. Makes it into an incredibly strong board.
That is such a good idea, I can’t believe I haven’t thought of this before… Now you can’t carve it like you can wood or foam but for quick projects this is a way better idea than buying a plastic box.
Coroplast could be another good option. If you slather it with super glue and glue on a second layer with the corrugations 90deg apart, it becomes very strong. Even like this it’s still easy to work, you can still cut it with a cardboard cutter or tin snips and drill through it with ease.
Ah yeah, that’s a good idea too. Apparently I need to stop buying premade boxes and make my own :)
Perhaps his experience with the cardboard comes from assembling paper models from ABC magazine… Herkules power ;)
Czech peoples: Is Herkules just a white PVA glue? Or is there some magic?
I love cardboard too. And laminated cardboard is double-cool. Soaking it in glue, giving it a nice paint-job, and adding structural elements really made me smile.
Yes, you right , it PVA based glue.
The Magic : maybe Hecules’s DNA :-) , but I doubt so , as it can be used in food industry.
BTW:This glue was/is in every household in CSFR and used by everybody.It is still in production for 60-70 years.
Why does the two resistors replacing the potentiometer need to be carefully matched? If there’s a slight mismatch then the pwm ratio for standstill would just be a bit off from the nominal 50%. Easy enough to adjust in software..
Suppose if the servo is under proportional control then getting it centred gives you an even balance of speed, if it isn’t matched it might not be as fast in forward as reverse or whatever.
Maybe, but I guess that the rest of the electronics as well as the motors have wildly varying tolerances as well. Since the original servo is “self-adjusting” with its internal feedback and the rc transmitter having trimmers for zeroing or seems a bit likely at least…
I think you’re right and you should be able to calibrate around it. I guess he just didn’t want to?
The post I linked in the post is really neat; changing the gain in the feedback amp that changes the proportional response. I’d really like to play around with that someday too. Might make a neat article…
Hi, it is a valid question. There are few reasons why. You can certainly live with potentiometer set to middle-ish position and MiMoBot ver.1 used this setup for almost a year. Just adjust appropriate PWM to stop servo and you are done. It is little bit annoying work. Then any vibrations over time slightly move potentiometer inside servo, your zero-position PWM changes and you can do it again. Moreover, you risk that speed of the servo will be greater in one direction than in the other. But in the fact, most of this issues are solved by Servoblaster. Geat little lib for PWM on GPIOs of RPi. There is a parameter named “idle_timeout” and if you do not send any command to the servo for longer period of time then defined by this parameter, Servoblaster stops the servo completely. So you can refresh desired speed of the servo, for example each 50ms, set “idle_timeout” for 200ms and if you stop refreshing speed, servo is stopped after 200ms even if PWM is 1500us is not perfectly aligned with zero speed of the servo.
It looks like the mini version of the Puma Beatbot.
I’m curious about this glue/epoxy + cardboard material. (I’m currently blocked for this guy’s site but I’ll check it later) can anyone recommend another project that shows how it’s used?