Swapping Vinyl For Cardboard With This ESP32 Turntable

Cardboard is a surprisingly durable material, especially in its corrugated form. It’s extremely lightweight for its strength, is easy to work, can be folded and formed into almost any shape, is incredibly inexpensive, and when it has done its duty it can be recycled back into more paper. For these reasons, it’s often used in packaging material but it can be used to build all kinds of things outside of ensuring that products arrive at their locations safely. This working cardboard record player is one example.

While the turntable doesn’t have working records in the sense that the music is etched into them like vinyl, each has its own RFID chip embedded that allows the ESP32 in the turntable’s body to identify them. Each record corresponds to a song stored on an SD card that instructs the ESP32 to play the appropriate song. It also takes care of spinning the record itself with a small stepper motor. There are a few other details on this build that tie it together too, including a movable needle arm held on with a magnet and a volume slider.

As far as a building material goes, cardboard is fairly underrated in our opinion. Besides small projects like this turntable, we’ve also seen it work as the foundation for a computer, and it even has the strength and durability to be built into a wall or even used as shelving material. And, of course, it’s a great material to use when prototyping new designs.

Continue reading “Swapping Vinyl For Cardboard With This ESP32 Turntable”

The end result of the build, a supersized ultrasonic sensor, held in a person's hands

A Super-Size Functional Tribute To An Ultrasonic Sensor

Sometimes, it’s time to shut down the oscilloscope, and break out the cardboard and paints. If you’re wondering what for, well, here’s a reminder of an Instructable from [CrazyScience], that brings us back to cardboard crafts days. They rebuild one of the most iconic components for an electronics tinkering beginner — an ultrasonic distance sensor, and what’s fun is, it stays fully functional after the rebuild!

This project is as straightforward as it gets, describing all the steps in great detail, and you can complete it with just a hot glue gun and soldering iron. With materials being simple cardboard, aluminum foil, popsicle sticks, some mesh, and a single ultrasonic sensor for harvesting the transmitter and receiver out of, this is the kind of project you could easily complete with your kids on a rainy day.

Now, the venerable ultrasonic sensor joins the gallery of classics given a size change treatment, like the 555 timer we’ve seen two different takes on, or perhaps that one Arduino Uno. Unlike these three, this project’s cardboard skeleton means it’s all that simpler to build your own, what’s with all the shipping boxes we accumulate.

Continue reading “A Super-Size Functional Tribute To An Ultrasonic Sensor”

DIY Shredder Creates Insulation

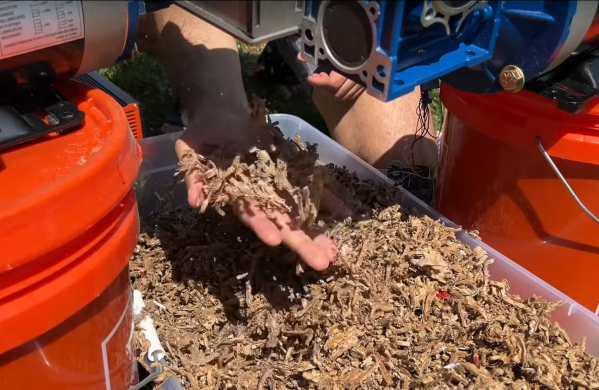
Plenty of us have experience with paper shredders, but there are all kinds of machines designed to completely destroy other materials as well, from metal and plastic, to entire cars. [Action BOX] built their own heavy-duty shredder capable of dismantling things like cell phones and other robust handheld objects, but after seeing what it would physically shred they decided to give it an actual job creating insulation for the attic space in their garage.

The shredder itself uses opposing metal plates arranged on sets of two cylinders, with each cylinder powered by it’s own large motor. In total, the entire system uses around 1.5 kW, so to make their green insulation project as green as possible they decided to power it with an equivalent amount of solar panels. For the insulation they’re using a year’s worth of boxes from various deliveries, and after a time-consuming process preparing the boxes for the shredder, shredding the strips of cardboard, and packaging it in garbage bags their efforts netted them enough to partially fill the space between four ceiling joists. Continue reading “DIY Shredder Creates Insulation”

Clever Mechanism Powers This All-Mechanical Filament Respooler

No matter how far down the 3D printing rabbit hole we descend, chances are pretty good that most of us won’t ever need to move filament from one spool to another. But even so, you’ve got to respect this purely mechanical filament respooler design, and you may want to build one for yourself just because.

We were tipped off to [Miklos Kiszely]’s respooler via the very enthusiastic video below from [Bryan Vines] at the BV3D YouTube channel. He explains the need for transferring filament to another spool as stemming from the switch by some filament manufacturers to cardboard spools for environmental reasons. Sadly, these spools tend to shed fibrous debris that can clog mechanisms; transferring filament to a plastic spool can help mitigate that problem.

The engineering that [Miklos] put into his respooler design is pretty amazing. Bearings excepted, the whole thing is 3D printed. A transmission made of herringbone gears powers both the take-up spool and the filament guide, which moves the incoming filament across the width of the spool for even layers. The mechanism to do this is fascinating, consisting of a sector gear with racks on either side. The racks are alternately engaged by the sector gear, moving a PTFE filament guide tube back and forth to create even layers on the takeup spool. Genius!

Hats off to [Miklos] on this clever design, and for the extremely detailed instructions for printing and building one of your own. Even if you don’t have the cardboard problem, maybe this would help if you buy filament on really big spools and need to rewind for printing. Continue reading “Clever Mechanism Powers This All-Mechanical Filament Respooler”

Giant Keyboard Is Just Our Type

We like big keyboards and we cannot lie, and we’ve seen some pretty big keyboards over the years. But this one — this one is probably the biggest working board that anyone has ever seen. [RKade] and [Kristine] set out to make the world’s largest keyboard by Guinness standards – and at 16 feet long, you would think they would be a shoe-in for the world record. More on that later.

As you might have figured out, what’s happening here is that each giant key actuates what we hope is a Cherry-brand lever switch that is wired to the pads of a normal-sized keyboard PCB. Once they designed the layout, they determined that there were absolutely no existing commercial containers that, when inverted, would fit the desired dimensions, so they figured out that it would take 350 pieces of cardboard to make 70 5-sided keycaps and got to work.

Aside from the general awesomeness of this thing, we really like the custom buttons, which are mostly made of PVC components, 3D printed parts, and a bungee cord for the return spring.

[RKade] encountered a few problems with the frame build — mostly warped boards and shrunken holes where each of the 70 keys mount. After the thing was all wired up (cleverly, we might add, with Ethernet cable pairs), [RKade] rebuilt the entire frame out of three-layers of particle board.

By the way, Guinness rejected the application, citing that it must be an exact replica of an existing keyboard, and it must be built to commercial/professional standards. They also contradict themselves, returning no search results for biggest keyboard, but offer upon starting a world record application that there is a record-holding keyboard on file after all, and it is 8 ft (2.4 m) long. It’s not the concrete Russian keyboard, which is non-functional, but we wonder if it might be the Razer from CES 2018 that uses Kailh Big Switches.

Once the keyboard was up and running, [RKade] and [Kristine] duke it out over a game of Typing Attack, where the loser has to type all the lyrics to “Never Gonna Give You Up” on the giant keyboard. Check it out after the break.

Continue reading “Giant Keyboard Is Just Our Type”

Throw Out That Box? No, Build A Shelving Unit

Are you one of those people who hoards cardboard for someday, and then periodically breaks it all down and puts it out for recycling because you haven’t done anything with it yet? Well, load up a new blade in the utility knife and fire up that hot glue gun, because the [Cardboard Ninja]’s gonna show you how to make a shelving unit from the biggest box in your collection.

[Cardboard Ninja] goes about the build quite smartly, cutting the legs from the four long bends already in the cardboard. This is repeated in the shelves, which are made from the box’s sides — [Cardboard Ninja] takes advantage of the bends when it comes to cutting out the shelves and creates the other three with the edge of a metal ruler. The rest of the cardboard is devoted to supports for shelves and legs.

While you could use this unit to hold all the other, smaller boxen you have lying around, that would be a gross under-utilization. You see, the way this is put together, it can hold upwards of 133 lbs (60 kg) total, provided the rules of weight distribution are followed, and the heaviest things are on the bottom shelf.

That does seem like a lot of weight, but given that this was constructed by someone who has a holster for their utility knife and calls themselves [Cardboard Ninja], I think we can trust their stress tests and just go with it. Given that, it’s always a good idea to anchor shelving units to the wall.

You know, this would make a pretty good entry into the second Challenge of this year’s Hackaday Prize. Remember: this is the final weekend to enter, and the window closes at 7AM Pacific on Sunday, so get hackin’!

Continue reading “Throw Out That Box? No, Build A Shelving Unit”

The shredder after being rebuilt, on the bench top, with the washing machine pulley driving it spinning. It has not yet been fed, but that's about to happen.

Shredder Rebuilt From The Ashes, Aims To Produce More Ashes

What do you do when you buy a broken shredder and, upon disassembly, find its gears in pieces? You might reach towards your 3D printer – this one’s not that kind of shredder, however. [New Yorkshire Workshop] gives us a master class on reviving equipment and putting it to good use – this one’s assigned to help turn their cardboard stores into briquettes for their wood burner.

But first, of course, it had to be fixed – and fixed it was, the crucial parts re-designed and re-built around a sturdy wooden frame. It was made into a machine built to last; an effort not unlikely to have been fueled with frustration after seeing just how easily the stock gears disintegrated. The stock gear-based transmission was replaced with a sprocket and chain mechanism, the motor was wired through a speed controller, and a washing machine pulley was used to transfer power from the motor to the freshly cleaned and re-oiled shredder mechanism itself. This shredder lost its shell along the way, just like a crab does as it expands – and this machine grew in size enough to become a sizeable benchtop appliance.

After cutting loads of cardboard into shredder-fitting pieces, they show us the end result – unparalleled cardboard shredding power, producing bags upon bags of thinly sliced cardboard ready to be turned into fuel, making the workshop a bit warmer to work in. The video flows well and is a sight to see – it’s a pleasure to observe someone who knows their way around the shop like folks over at [New Yorkshire Workshop] do, and you get a lot of insights into the process and all the little tricks that they have up their sleeves.

The endgoal is not reached – yet. The shredder’s output is not quite suitable for their briquette press, a whole project by itself, and we are sure to see the continuation of this story in their next videos – a hydraulic briquette press was suggested as one of the possible ways to move from here, and their last video works on exactly that. Nevertheless, this one’s a beast of a shredder. After seeing this one, if you suddenly have a hunger for powerful shredders, check this 3D printed one out.

Continue reading “Shredder Rebuilt From The Ashes, Aims To Produce More Ashes”