Hackaday Prize Entry: Electronic, Visual Harmonicas

[sholnkin] is tasked with teaching a kindergarten class how to play a musical instrument. No, not those cheap plastic recorders. [shlonkin] is teaching kindergarteners how to play the only instrument that both blows and sucks: the harmonica.

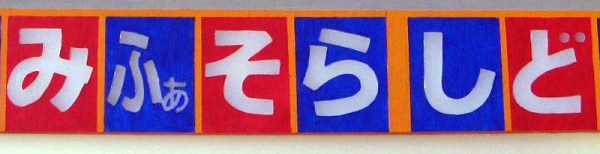
Unlike a classroom of kids with plastic recorders, where the fingering is either right or it isn’t, [shlonkin] needs to teach kids to put their mouth over the right hole, and suck or blow to produce a note. The classroom has a poster laying out the notes on the harmonica, but they needed something better. [shlonkin] envisioned a large illuminated sign that lit up in different colors, and could play the displayed notes with a speaker.

The high-level design for this project includes a Teensy 3.2 with the Audio Adapter breakout driving a small audio amp. The Teensy also controls a bunch of LEDs mounted inside a wooden case. The layout of these LEDs went surprisingly well, and it’s rare to find a backlit panel that is lit this evenly.

As a classroom musical teaching aid, this type of device has been around for decades – deep in the recesses of band rooms in schools across the world, you can find old Wurlitzer pianos with devices that aren’t much different from this simple device. It’s a pedagogical method that worked back then, and should work now.

The HackadayPrize2016 is Sponsored by:

No Frame Buffer For FPGA VGA Graphics

Usually, when you think of driving a VGA–in software or hardware–you think of using a frame buffer. The frame buffer is usually dual port RAM. One hardware or software process fills in the RAM and another process pulls the data out at the right rate and sends it to the VGA display (usually through a digital to analog converter).

[Connor Archard] and [Noah Levy] wanted to do some music processing with a DE2-115 FPGA board. To drive the VGA display, they took a novel approach. Instead of a frame buffer, they use the FPGA to compute each pixel’s data in real-time.

Continue reading “No Frame Buffer For FPGA VGA Graphics”

Reverse Engineering A Nissan Leaf Battery Pack

Batteries wear out. If you are an electric vehicle enthusiast, it’s a certainty that at some time in your not-too-distant future there will be a point at which your vehicle’s batteries have reached the end of their lives and will need to be replaced. If you have bought a new electric vehicle the chances are that you will be signed up to a leasing deal with the manufacturer which will take care of this replacement, but if you have an older vehicle this is likely to be an expensive moment.

Fortunately there is a tempting solution. As an increasing number of electric vehicles from large manufacturers appear on our roads, a corresponding number of them have become available on the scrap market from accident damage. It is thus not impossible to secure a fairly new lithium-ion battery pack from a modern electric car, and for a significantly lower price than you would pay for new cells. As always though, there is a snag. Such packs are designed only for the cars they came with, and have proprietary connectors and protocols with which they communicate with their host vehicle. Fitting them to another car is thus not a task for the faint hearted.

Hackaday reader [Wolf] has an electric truck, a Solectria E10. It has a set of elderly lead-acid batteries and would benefit hugely from an upgrade to lithium-ion. He secured a battery pack from a 2013 Nissan Leaf electric car, and he set about reverse engineering its battery management system (BMS). The Solectria will use a different battery configuration from the Leaf, so while he would like to use the Leaf’s BMS, he has had to reverse engineer its protocols so that he can replace its Nissan microcontroller with one of his own.

His description of the reverse engineering process is lengthy and detailed, and with its many photos and videos is well worth a read. He employs some clever techniques, such as making his own hardware simulation of a Li-ion cell so that he can supply the BMS known values that he can then sniff from the serial data stream.

We’ve covered quite a few EV batteries here at Hackaday. Quite recently we even covered another truck conversion using Leaf batteries, and last year we featured a Leaf battery teardown. We’ve not restricted ourselves to Nissan though, for example here’s a similar process with a Tesla Model S pack.

[HomoFaciens] Shows Off With DIY Paper Printer

[HomoFaciens] is always making us feel silly about our purchases. Did we really need to buy a nice set of stepper motors for that automation project? Couldn’t we have just used some epoxy and a threaded rod to make an encoder? Did we need to spend hours reading through the documentation for an industrial inkjet head? Couldn’t we just have asked ourselves, “What would [HomoFaciens] do?” and then made a jailhouse tattoo gun attached to a broken printer carriage and some other household tech trash?

In his continuing work for his Hackaday prize entry, which we have covered before, his latest is a ink (…drop? ) printer. We think the goal is a Gingery book for CNC.  He begins to combine all his previous work into a complete assembly. The video, viewable after the break, starts by explaining the function of a salvaged printer carriage. A motor attached to a belt moves the carriage back and forth; the original linear encoder from the printer is used for positional feedback.

The base of the printer is a homemade y-carriage with another salvaged printer motor and encoder driving a threaded rod. The positional feedback for this axis is provided by a optical mouse gliding on a sheet of graph paper.  The printer nozzle is a cup of ink with a solenoid actuated needle in it. When the needle moves in a hole at the bottom, it dispenses ink.

As always, [HomoFaciens] makes something that is the very definition of a hack. Commenters will have to go elsewhere to leave their favorite debasement.

Continue reading “[HomoFaciens] Shows Off With DIY Paper Printer”

Evaluating The Unusual And Innovative Perf+ Protoboard

Back in 2015 [Ben Wang] attempted to re-invent the protoboard with the Perf+. Not long afterward, some improvements (more convenient hole size and better solder mask among others) yielded an updated version which I purchased. It’s an interesting concept and after making my first board with it here are my thoughts on what it does well, what it’s like to use, and what place it might have in a workshop.

Perf+ Overview

One side of a Perf+ 2 board. Each hole can selectively connect to bus next to it with a solder bridge. The bus strips are horizontal on the back side.
One side of a Perf+ board. Each hole can selectively connect to the bus next to it with a solder bridge. These bus strips are vertical. The ones on the back are horizontal.

The Perf+ is two-sided perfboard with a twist. In the image to the left, each column of individual holes has a bus running alongside. Each hole can selectively connect to its adjacent bus via a solder bridge. These bus traces are independent of each other and run vertically on the side shown, and horizontally on the back.

Each individual hole is therefore isolated by default but can be connected to one, both, or neither of the bus traces on either side of the board. Since these traces run vertically on one side and horizontally on the other, any hole on the board can be connected to any other hole on the board with as few as two solder bridges and without a single jumper wire.

It’s an innovative idea, but is it a reasonable replacement for perfboard or busboard? I found out by using it to assemble a simple prototype.

Continue reading “Evaluating The Unusual And Innovative Perf+ Protoboard”

Lettuce For Life!

If you take a head of romaine lettuce and eat all but the bottom 25mm/1inch, then place the cut-off stem in a bowl of water and leave it in the sun, something surprising happens. The lettuce slowly regrows. Give it a few nutrients and pay close attention to optimum growing conditions, and it regrows rather well.

lettuce-for-life-hydroponic-systemThis phenomenon caught the attention of [Evandromiami], who developed a home-made deep water culture hydroponic system to optimise his lettuce yield. The lettuce grows atop a plastic bucket of water under full spectrum grow lights, while an Intel Curie based Arduino 101 monitors and regulates light levels, humidity, temperature, water level, and pH. The system communicates with him via Bluetooth to allow him to tweak settings as well as to give him the data he needs should any intervention be required. All the electronics are neatly contained inside a mains power strip, and the entire hydroponic lettuce farm lives inside a closet.

He does admit that he’s still refining the system to the point at which it delivers significant yields of edible lettuce, but it shows promise and he’s also experimenting with tomatoes.

Our community have a continuing fascination with hydroponic culture judging by the number of projects we’ve seen over the years. This isn’t the first salad system, and we’ve followed urban farming before, but it’s winter strawberries that really catch the attention.

How To Set Up And Run A Makerspace

A bunch of people who share a large workshop and meet on a regular basis to do projects and get some input. A place where kids can learn to build robots instead of becoming robots. A little community-driven factory, or just a lair for hackers. The world needs more of these spaces, and every hackerspace, makerspace or fab lab has its very own way of making it work. Nevertheless, when and if problems and challenges show up – they are always the same – almost stereotypically, so avoid some of the pitfalls and make use of the learnings from almost a decade of makerspacing to get it just right. Let’s take a look at just what it takes to get one of these spaces up and running well.

Continue reading “How To Set Up And Run A Makerspace”