Shards of silicon these days, they’re systematically taking what used to be rather complicated and making it dead simple in terms of both hardware and software. Take, for instance, this IR to HID Keyboard module. Plug it into a USB port, point your remote control at it, and you’re sending keyboard commands from across the room.
To do this cheaply and with a small footprint used to be the territory of bit-banging software hacks like V-USB, but recently the low-cost lines of microcontrollers that are anything but low-end have started speaking USB in hardware. It’s a brave new world.
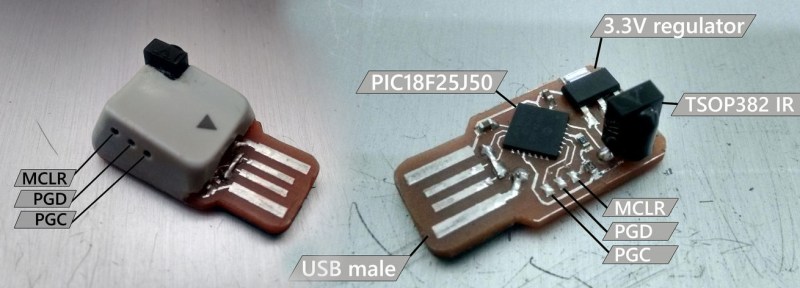
In this case we’re talking about the PIC18F25J50 which is going to ring in at around three bucks in single quantity. The other silicon invited to the party is an IR receiver (which demodulates the 38 kHz carrier signal used by most IR remotes) with a regulator and four passives to round out the circuit. the board is completely single-sided with one jumper (although the IR receiver is through-hole so you don’t quite get out of it without drilling). All of this is squeezed into a space small enough to be covered by a single key cap — a nice touch to finish off the project.
[Suraj] built this as a FLIRC clone — a way to control your home-built HTPC from the sofa. Although we’re still rocking our own HTPC, it hasn’t been used as a front-end for many years. This project caught our attention for a different reason. We want to lay down a challenge for anyone who is attending SuperCon (or not attending and just want to show off their chops).
This is nearly the same chip as you’ll find on the SuperCon badge. That one is a PIC18LF25K50, and the board already has an IR receiver on it. Bring your PIC programmer and port this code from MikroC over to MPLAB X for the sibling that’s on the badge and you’ll get the hacking cred you’ve long deserved.
[via Embedded Lab]


It reminds me the Beetle Leonardo, a cute Atmega32u4 with pins available. It has unsoldered 0.1″ pins, so the IR receiver can just be plugged into. This hack however is smaller and with a PIC, so it’s worth it.
What’s that brown colored PCB material? I seem to remember it from a long time ago. All my PCB’s are fiberglass and look translucent.
Phenolic.
https://en.wikipedia.org/wiki/Phenolic_paper
That’s phenolic/paper material
Ah, now I remember. It goes a darker brown around components that are getting hot.
I always think of it as paxolin, but apparently that’s specifically FR2 version.
Also called “Pertinax”, much cheaper than GF-epoxy.
But one time I also had a light brown/beige/light yellow (difficult to name non primary colors) version. It was harder than the one shown in the picture, but definitely not GF-epoxy. Perhaps it was some kind of paper reinforced epoxy compound.
Ctrl+D … was just feeling … dismayed… the other day when I realised I wanted to do something with IR and the only machine I had free with it was a P133 with 16MB RAM…
A hint – if you make PCB’s this way – make the pad holes as small as the software will allow. It makes it easier to visually center the drill bit and the extra copper also helps guide the drill to the center of the pad.
That’s great advice… I’ll definitely try this next time..????
I’m gonna let you finish, but an attiny45 with v-usb would also be a great choice
Also, how am I gonna impress my hipster friends with a MCU called PIC18F25J50, that’s dry as hell… needs to be african for herder of gnus or something…. or Neuromancer XT Turbo V6i
Jajjajajaja now PIC users are hipsters?
We’ve come full circle!
By destination of “hipster” …. You AVR Fanboys are hipsters.
Definition* dammit this Google keyboard sucks.
Just to satisfy the urge to put an ESP8266 into everything:
By using ESPEasy, you can receive, send and bridge ir without writing a single line of code. Just flash the firmware image and configure it in your browser.
http://www.esp8266.nu/index.php/Main_Page
Glad you liledy project…
Liked the*
Over all I like the keycap use as assembly shell. And What is nice about those PIC18F* is that don’t need a crystal as the internal oscillator lock on USB clock from the host. This feature is also available in some PIC16F* family.
Isn’t a DigiSpark cheaper and roughly the same size?
digispark uses attiny85 which has just 8kb flash while pic18f25j50 has 32kb. also the attiny85 has larger footprint than the one i used.. so It’s not same size.. mine is smaller.
I agree that working on digispark is much easier…. but i wouldn’t call it “building” something.
attiny45 with 4kb in a tssop-8 would also work and is a really small part. You’d probably need to use the USI engine to shift in data from the IR LED and examine it when you have time to do so. V-USB can introduce a lot of latency and you’d be likely to miss some IR bits if you were trying to read it raw.