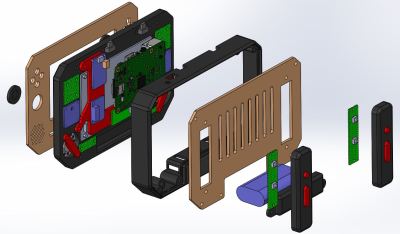
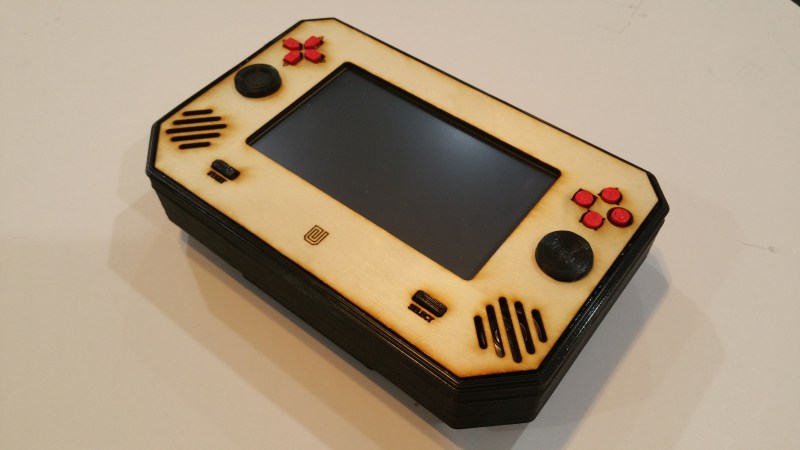
For anyone wanting to get that shot of nostalgia without the hassle of finding an NES Classic, the Retropie project is a great starting point. Of course, it’s not too noteworthy to grab a Raspberry Pi, throw a pre-built distribution on it, and plug in an SNES to USB converter. What is noteworthy, however, is building a Retropie that’s portable and that has the quality and polish of the latest build from [fancymenofcornwood].
 For starters, the laser cut wood case was custom-made. From there, all of the PCBs were fitted including specific ones to handle each set of buttons (complete sets of D-pads, shoulder buttons, and joysticks) and another for the 5″ HDMI screen. It has stereo speakers and its own headphone jack (to the envy of all new iPhone owners), and is powered from a Raspberry Pi 2 running Retropie 4.1. The battery pack shouldn’t leave you stranded, either, especially not if you grew up playing the Sega Game Gear.
The quality of the build here is outstanding, and its creator made a design choice to make it easily replicable, so if you’ve wanted to play N64 or PS1 games while on the go, this might be what you’ve been waiting for. There are lots of other options for getting some fun from a Retropie going though, from building one into a coffee table to re-purposing that infamous Game Gear.
Obligatory clip of this portable playing Doom is found after the break.


A console emulation AGAIN ? Is there nothing more interesting in this world ?
Sure there is, but this is a fun variety of project too.
After I finish my current printing project, I want to design/print/build a portable Pi of my own, mostly for Gameboy Advance emulation. My biggest hold-up is trying to find a decently priced/sized screen that can manage 60fps on the Pi. HDMI is too expensive, SPI is too slow, and my smallest composite screen in 7″, a bit bigger than I’d like.
60FPS? I thought that these games are running around 15-30FPS…
Anyway, maybe this hack could help :)
http://hackaday.com/2016/11/17/slow-3-5-raspberry-pi-lcd-hacked-to-40-mhz-with-esp8266/
I remember that hack. Excellent but a bit more ambitious than I’m willing to spend my limited free time on.
Believe it or not, the old game consoles such as the NES and Genesis (my first consoles) ran at much higher framerates than the 20-30fps of modern systems. The graphics were less impressive, but gameplay was silky smooth.
All I really want is to play Sonic 3 and a couple Gameboy Advance games at a native framerate on a portable system.
How could they run faster? PAL is 25 frames / 50 fields and NTSC is 29.976 / 59.952 fields / frames per second. Even if they internally ran faster, they could not display any more than the specifications of the television they were connected to.
@Galane
Each field was half a frame for 60 half-frames a second. Emulation lets you display the whole frame for each refresh.
there is no distinction into frames and fields because those systems dont go over 1/2 vertical resolution limit
progressive 50/60Hz all the way
https://en.wikipedia.org/wiki/Interlaced_video#Interlace_and_computers
If you’re in the UK 5″ HDMI screens are <£30 on Amazon at the moment : https://www.amazon.co.uk/dp/B013JECYF2/ref=sr_ph_1?ie=UTF8&qid=1484228273&sr=sr-1&keywords=5%22+HDMI That's for an 800×480 screen running at 60Hz. It fits really neatly over the Pi (B+, 2B, 3B) and powers the screen over GPIO connection – so you just connect the HDMI coupler and power to the Pi. You also get touch over GPIO should you need it.
In fact- it looks like the original project is based on that screen.
Excellent source! That’s a very acceptable resolution for my needs.
you can get composite 3″ – 4″ reversing camera monitors for under AUS$60, plus you get a free CMOS camera.
They’ll be 12V though
I’ve been warned about those, though, people saying the picture is blurry.
Also, the stock photos show those zone markers for backup cameras and it’s hard to tell if those markers on on the LCD itself, or added by the camera.
use RAW lcd panel, for example $10 4.3″ PSP screen at 480×272. Drive it directly by digital RGB, PEE has digital RGB output called DPI(display parallel interface)
you will need to make a custom pcb for this (unless you are good at soldering microstrip flex :P)
http://blog.reasonablycorrect.com/raw-dpi-raspberry-pi/
alternatively find broken PSP with working screen – you will get screen, case and a socket for the screen flex.
There was the man in Canada who makes socks for homeless.
And a guy here in Brazil, that is automating Banana harvesting puting one raspberry inside each banana tree. Can you believe it?
Why not a Banana Pi?
Cant. People would harvest it and eat it thinking that it is a fruit from those trees…
The raspberry pi master race is strong in here
You want them hooked up on clocks for weeks again???
How else are they’re going to get their income? Raspberry Pi filler post and 1000 degree knife challenge generate adsense.
Laser cut cases are so lazy. People don’t even bother to sand out the scorch marks. You can’t say the quality of the build is amazing when the builder couldn’t even be bothered with using sandpaper.
I was going to say the same thing but you beat me to it. A little bit of sandpaper, some wood stain and lacquer would give a much more finished look (pun intended).
I think I have already heard about some people who like this appearance.
It might have looked a bit better if he laser cutted some acrylic instead…
Oh yeah? Spec’ing out all of your components and placements, then designing a case that fits them and your use case perfectly is lazy? Curb your critcism… a simple “I can’t wait to see this sanded and painted” would suffice without trashing on the hard work as being lazy.
I agree. Let’s see your Retro Pi case.
Yes. It is lazy to start a project and leave it unfinished. I build full sized arcade machines with vinyl graphics and t molding. I finish the project. When I build a coffee table I sand it, stain it, and urethane it. I finish the job.
Define “unfinished”. I built most of my workshop furniture, and it’s all bare wood. It’s sanded smooth on the work surfaces, but I see no reason for paint or stain because I like the look of bare wood.
You only urethane? No wax? Lazy.
The builder says “glamour shot of the finished console” in the write up. What would lead me to believe that it will ever be sanded and painted? You comment is nonsensical.
Why laser-cut plywood anyway? The rest of the case seems to be 3D-printed, so why not use a laser-cut acrylic faceplate?
Some people like the look that it was made out of a tomato crate by an 8 year old with a magnifying glass on a hot summer day.
As a woodworker, these unfinished cases really bug me when they are presented as fantastic builds. Finish the job. It requires very little skill to use sandpaper and some paint or stain.
That’d really ruin the rough look, though. Not everyone has the exact same taste as you.
Thank you for the reference to Sir Isaac Newton in the title.
And his other famous quote. “Ima let you finish, but I did a better calculus than Leibniz….”
I did some work in this filed too:
https://www.retrohax.net/project-retroblade-v-0-27237-part-one-2/
https://www.retrohax.net/project-retroblade-evolution-part-two/