Wood may seem like a soft, weak material if you’re used to working with steel, but to do good work, you’ll quickly learn you need your tools sharp. Buying and maintaining a good set of tools can be expensive for the home gamer, so [shopbuilt] put together an Instructable on how to sharpen your woodworking tools on a budget.
The trick is to use sandpaper. It’s a good quality abrasive material and is readily available. You’ll want a selection of different grits – low grits to get started, higher grits when finishing. The reason this is cheaper is that you can get a selection of 5-10 different sandpapers for under $20. Getting even a couple of decent sharpening stones wouldn’t be possible at that price. In the long run, they’ll last longer but this is a budget option we’re talking about.
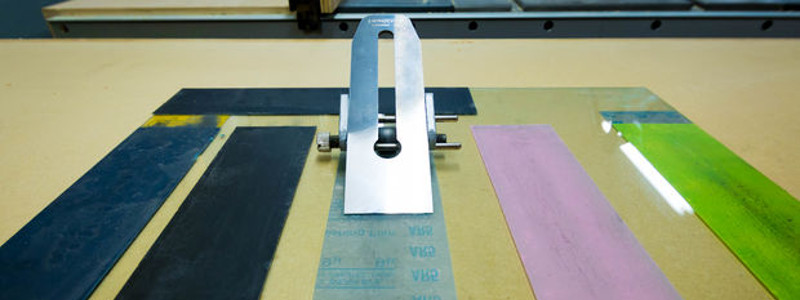
Obviously you can’t just sharpen something with sandpaper – [shopbuilt] suggests mounting the paper to the flattest surface you can find. The use of a tempered glass panel from a fridge shelf is, in our mind, an inspired choice here. 3D printer enthusiasts have been using similar techniques for heated beds for the best part of a decade now.
We love woodworking here at Hackaday, so get your feet wet with these woodworking basics for the hardware hacker.


Unless the blade is *really* screwed up (heavily gouged or at a really bad angle), then ditch the jig..
Go freehand instead, it’s not as hard as it sounds.
There’s TONS of good info on YouTube, and I’ve found some really good advice from a guy named Paul Sellers:
https://www.youtube.com/watch?v=Ki8tt-VjwqI&list=PLU8vx0BjSWwWwraDjXjHjE-h0_CgEKWh_
Also, get yourself some chromium oxide buffing compound to finish off the polish. I prefer to have my tools so sharp you can shave with them. Not necessarily the best for chisels (unless you’re doing delicate work) because the edge tends to be more fragile, but it really really REALLY helps reduce tearout when using a hand-plane.
Try a microbevel.
Start by sharpening at 15 degrees or so, then tilt up to about 30 (or even 45) degrees and make a secondary bevel right at the edge whose flat is maybe 0.005″ long. It gives the edge more strength right at the point of contact, but doesn’t have any noticeable effect on the overall wedge angle.
The main trick is to put it on the face opposite the one that starts the cut. If you generally shave with the flat against the work, put the microbevel on the ground face. If you gouge with the flat away from the work, put the microbevel on the flat.
Angle plays a much bigger role in the likelyhood of your tool chipping than whether you can shave with it or not.
When done right, an axe sharpened to 35* should easily take hairs off your arm, but has no chance of chipping out since there’s so much metal behind the edge. Until you get below 15* most modern steels should not chip, though you wouldn’t want to chop a mortise through ironwood using a 15* paring chisel.
The guy who does this blog is into woodworking with hand tools, http://www.closegrain.com/ He explains the mysteries of ‘how to’ do it with wood.
There is a l lot of education at his site if you’re interested.
This is known as the “Scary Sharp” method and I first learned of it on Usenet back in the day. I’ve had pretty good luck only going up to 2000 grit automotive paper. That stuff is commonly available near the spraypaint at Wally-world. At this grit, I can easily shave the hair on my forearm. For a plate, I use a single 12×12 tile from a Big Box store.
https://groups.google.com/forum/#!searchin/rec.woodworking/sandpaper$20sharpening$20LaMantia%7Csort:relevance/rec.woodworking/rGAGAPR-6ks/o-ajwPtph3kJ
From way back in 1995.
No school like the Old School.
I also use the Scary Sharp method with a floor tile. I’ve found floor tiles to be cheaper and easier to find then a thick piece of plate glass, but there are two things I’ve discovered:
1. Get a very smooth tile so that it’s easy to stick the sandpaper to it. As close to glass smooth as possible.
2. Use a straight edge (temporarily borrow a metal ruler from the Tool section) to check that the tile is absolutely flat. I picked up a few tiles that looked very flat to my eye but weren’t when checked against a straight edge.
‘Flat’ not being flat has burned my many times, great recommendation.
Go to a recycling center. Pick up any junked printer/scanner combo, remove the scanner bed glass.
There’s an extremely flat surface for you.
also for added safety, you may buy a cork backed bulleting board and spray-glue your piece of glass on that if you’re worried that it might shatter. Or glue some sticky back book covering on the back side. That way if you break the glass the shards stay on the glue.
I’ve got a nice chunk of granite from a kitchen remodel that works great for sanding and sharpening.
*any* glass made by the float glass process will have the same level of flatness (>95% of today’s colorless glass). However, thicker is better and I would see 5mm as the absolute minimum. When glass slabs get bigger/heavier their shards pose a real risk in case they crack. Therefore, 5 or 8mm tempered glass is what you should be looking for. If you can’t find tempered glass, cover the back with UV-stabilized (all weather) tape: this will hold the shards together and you don’t get any exposed edges.
Actually, tempered glass is a *bad* idea, as the manufacturing process typically introduces some distortion. Plain float glass is the way to go, it will generally be flatter.
@jayemel: tempered glass works perfectly, as the (theoretical) fluctuations in flatness as a result of inner stress are several orders of magnitude smaller than the significant variations of thickness of your sandpaper. Unless you want to reflect the light of distant galaxies off the bevel of your chisel and measure their red-shift, you will be fine (and safer) to use tempered glass.
I think many people have been spoiled (or bought the hype) by Japanese water stones and DMT diamond plates, both of which are amazing if you sharpen tools a lot but far from a requirement to get a good edge. These things weren’t available 100 years ago in the west & carpenters got along just fine.
You can get adequate edges on your tools without buying expensive stones or fancy sharpening systems (I’m looking at you Lansky, though this is also frequently on sale on Amazon for <$40).
All you need to get an edge on your hand tools and pocket knives is a 100/300 grit combo stone from your local hardware, even horrible fright. This shouldn't cost more than $10. Then go to the natural slate section of the home center or flooring store & find 3-4" natural slate tile that you can barely see the grains in. This should cost another $1 or so. This tile is roughly 800 grit. If you can't find natural tile in your area, you should be able to find an 'Arkansas' stone for <$5. If you can scare up some Chrome Oxide and a piece of leather (piece of cardboard or block of MDF also work) all the better. These three things will cost you $15 and get your edged tools sharp enough to take hair off your arm and chips of your lumber.
Once you feel comfortable, a 1200 grit diamond stone is all the higher you need to go for hand tools and costs about $25. Leave the 80k water stones to the chefs & barbers they don't help here..
I totally agree on the Chromium Oxide! The cheapest way to get some, is to find an artist’s oil color that contains 100% chromium oxide as a (green) pigment. I use Grumbacher’s MAX as this type can be removed with just soap and water.
On the 100/300 grit combo stone: absolutely, positively NO – and I’m a woodworker by training who sees sharpening of tools as a means to an end and not as a religion. DMT bench stones are soooo cheap in the US (they cost as much as 3 times as much in ROW) that you should not waste (expensive) time with Chinese carborundum stones or EZ-Lap …err … junk.
I use a 9″ x 12″ Chinese grade B surface plate and wet the back of the carborundum “sandpaper” to hold it in place. Obviously not the “budget” version, but I have the surface plate for other purposes. At about $17 from ENCO it wasn’t very expensive. And it *really* is flat to better than 0.001″. So the thickness of the paper is the biggest error. I also have a good assortment of Arkansas and other types of stones, though none of the Japanese waterstones. I generally don’t use the surface plate unless the edge is really bad e.g. an abused tool picked up at a yard sale.
I ONLY use water as a lubricant on all my stones. When they get clogged I take a nail brush and hand dish detergent to them to clean them. When a carborundum stone gets worn I do figure 8s on a flat piece of concrete with lots of water to reflatten it. I don’t like oil because it gums up over time and is then harder to clean. I keep a carborundum and a Quachita stone by the kitchen sink for knives. I probably haven’t used the carborundum stone in several years. I scrub the Quachita stone at roughly 18-24 month intervals. It’s white, so it’s easy to see the steel accumulating. I can feel a noticeable difference after scrubbing the stone. This has been my standard practice for almost 50 years, so I’m not inclined to change it.
You can get a decent 3 stone set from Harbor Freight for really cheap. They’re small for kitchen knives but just fine for tools or pocket knives.
Even the backside grinding shown in the single frame of the video shows the effects of hand held sharpening. There is a curve on the flat side of the blade! Starting to look like a spoon. It’s impossible to get a flat surface when using bones and tendons. This effect was exploited to make the first lens when done in glass. Telescope mirror grinders do it too using two different hardness of glass, if machine done it would be flat. If those “slate” tiles are flat they must be ground flat not baked. No need to check.
Plate glass, even a broken piece is flat. The table on any cast iron machined flat table like a drill press will work. With sandpaper of course, there are many types to chose from. The edges of leftover paper from hand work still have full grit on them to take sideways grinding. No waste.
To get a single angle on a plane blade I use a jig of a hunk of 4 X 4 with a slop free hinge at the end. A little C-clamp holds the plane blade on the free end of the hinge to contact angled down on paper on glass on a Formica desk. Slide the paper and glass under the blade while keeping pressure on the hinged blade.
Without a jig you will add a curve to anything you think you are holding flat. It’s just physics and physiology.
>>Even the backside grinding shown in the single frame of the video shows the effects of hand held sharpening. There is a curve on the flat side of the blade!
Incorrect.
If you had bothered to watch the video this would have been explained. The cupping you see is a result of mass manufacture. Few tool makers will take the time to lap the back of a chisel to degree a craftsman will (much less the bargain brand he’s using). It’s simply not practical for them to do so and still make their price point. Some higher end (Lee Nielsen, Lee Vally, Veritas) chisels will be closer but even these will require some degree of hand honing/lapping. Using a flat stone, with at most couple hours of practice, you will reliably create razor sharp straight edges.
>> It’s impossible to get a flat surface when using bones and tendons.
This assertion is simply not true!
Razors and wood working tools have been sharpened to appropriate keenness for millennia using nothing but river stones and ‘bone and tendons’. Furthermore, chisel need only be truly flat for an inch or so behind the cutting edge & that’s simply to make life easier when cutting straight lines or decorative features.
A flat stone is far more important to sharpening than whether you use a guide or not. Stones need to be trued regularly but this again is a simply process that can be done by hand. Using the a fore mentioned plate glass, cinder block, or section of concrete.
How do you think surface plates are made & maintained? Hand scraping is often the most cost effective way to do it as shipping a 50lb stone to a surface grinder costs a lot of money just to get there.
I said flat not just sharp, this applies to wood planes in particular. As to razors or pocket knives I wouldn’t know, theyr’e barbaric.
I can see perpendicularity to 30 minutes or better, but I doubt anyone could hold anything within that kind of tolerance while moving it back and forth. We have a stone in the shop which I never use, it’s so saddled from all the Boy Scout pocket knives worn into the middle. It’s a joke.
I only am saying there are some simple ways to get very effective results by leaving out the cabochon factor, I have seen it way to too often.
People will tend to round off anything they try to make flat. I am not talking 3 flats and Prussian blue and scraping. Just a file or a sanding block and the end of a piece of stock. There is a place for the drill press when it just needs to be done right, not with a hand drill.
Centuries of craftsmen got by just fine without jigs or precision surface plates. Maybe a person can’t hold to your 30 moa but clearly, you don’t need to to do even the finest carpentry.
And whomever let your surface plate get abused to such disrepair needs it tied to their ankle to remind them of their crimes.
I hand filed many CPU heatsinks real flat back in the days of the 80486 and Pentium. Worked at it until I’d get a perfect transfer of a very thin coat of heatsink compound. All but the most $$$ heat sinks back then were pretty horrible on the contact surface.
I like my $10 set of diamond hones from HF. They are on thin backs so you will need to back them up with something stiff and flat behind them. There are 3 of them, 180, 260, and 360.
As far as sharp goes, I subscribe to the school of thought that you need to hone an edge to hold up to what is is going to be cutting. The more you hone an edge, the thinner it becomes. This makes it sharp, but it also erodes it’s physical strength. If you want to slice paper or shave the hairs off your arm, go happy with a 2000 grit polish. If you are going to be hogging through wood, that edge will round over very quickly. IMHO you are better with a 500 grit finish at the most, and usually I am totally happy with the result of the 360 diamond hone.
As with most things YMMV but this works well for me.
Not entirely.
Whether an edge rounds over or chips out doesn’t have any bearing on how fine you honed the edge or whether it’s mirror polished. That’s controlled by what angle you choose.
For many tasks you may not gain much benefit from going above 4-500 grit but polishing your axe to 0.33 micron certainly won’t affect edge retention. For finishing work, you certainly do want as well polished of an edge as possible since that means less scraping or sanding. A well honed plane can leave a surface that’s actually too smooth for painting.
Another example is lathe tooling or metal gravers which are routinely polished on fine agate stones and these don’t chip or roll an edge unless abused. These are one of the times where a jig is a requirement for reproducible results and a couple degrees off the recommended angle can make a difference. For a wood work, a couple degrees either way won’t really be noticed.
I’m not doing it. I would like to read the article but I hate Indestructables’s website so much. I’m just not going there. Please find another web designer. I just can’t doing it any more : (
Great article Thanks for the info
I was searching resources up to woodworking tool. I found this article quite helpful as I am trying to learn woodworking. Thanks a lot.