We’ve seen a variety of home-made laptops using the Raspberry Pi and other single board computers over the years. Usually, they combine off-the-shelf USB keyboards and trackpads with HDMI monitor panels, and cases made from layered laser cut sheet, or 3D printed plastic.
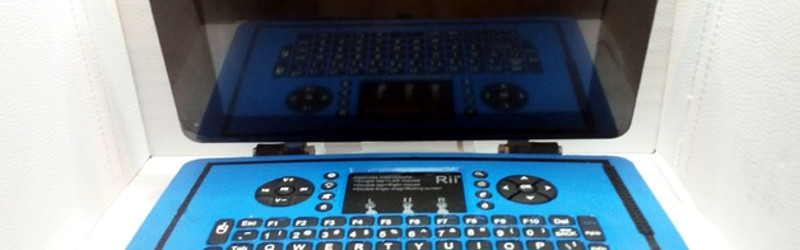
[Surferboy]’s Raspberry Pi laptop is the latest effort to come before us, and its claim to fame is the use of the official Raspberry Pi 7″ touchscreen as a display. Full instructions and 3D printer files are available on Thingiverse so you can have a go at replicating it if a portable Pi is your thing.
He’s taken the bold step of not attempting to place all the Pi’s interfaces next to the outside of the case. Instead, he’s desoldered the Ethernet and USB ports. The USB connections were wired directly to the keyboard, display, and a couple of external ports on the right-hand side of his case. This leaves the finished laptop with no Ethernet. However, losing ethernet is a worthy tradeoff for the thinner package.
[Surferboy] also brought the GPIO header to a female socket on the rear of the unit. It’s unclear exactly what battery he uses except for a reference to the battery from his keyboard. Since a keyboard battery will be too small for Pi and display we are guessing a larger pack will be necessary.
Though the Ethernet port and battery issue would probably be a dealbreaker here this has the makings of a useful and compact laptop, it will be interesting to see if it is picked up and refined by the community.
Quite a few early Pi laptops used the Motorola Lapdock, a mobile-phone-into-netbook peripheral. Some others we’ve featured have been a bit chunky, but sometimes they can be objects of beauty.
Via Recantha.co.uk.


“This leaves the finished laptop with no Ethernet. However, losing ethernet is a worthy tradeoff for the thinner package.”
Ethernet is one of those interfaces that’s hard to do small.
3.5mm TRRS jack
\s
They’ve had thin ethernet jacks since at least 1992, take a look at pcmcia lan cards that used xjack. Finding a supply of the connectors themselves could be a problem, however, for a one off project, harvesting a $5 ebay card isn’t too bad.
Yep. Ethernet is effortless to pull off small. someone clever with a 3d printer and scavenging the spring pins out of an ethernet jack will do just fine.
Yah I had a Intel PCMCIA Ethernet card that used a dongle and a 3COM one that had a clever jack that popped out the side that were both single height cards.
Right. Xircom ‘real port’ cards are what I remember. Laptops didn’t always have Ethernet to begin with anyway.
I still have my Dell Latitude CPx, and the only built in networking it had was a dial-up modem. I’ve got CardBus Ethernet and Wi-Fi cards for it, and they can be stacked so that both can be in use at the same time. Of course, that also means the USB 2.0 CardBus card gets left out, but depending on what I’m using the laptop for that day, it’s not much of an issue.
Pi 3 has WiFi anyway.
I would be rather curious to see if it’s possible to retrofit a Raspberry Pi (or similar, preferably with a battery manager built-in) inside the casing of an old Thinkpad 701c. There really isn’t enough love for the butterfly keyboard.
I would think you could for sure get a raspberry compute module or the sopine from pine64 to fit, just break out the wires from a sodimm connector to wherever the ports or other boards will fit. probably need a new display and alot of time and effort..
Thinking too small, you want a line of angled sockets on a backplane so you can get a 10 Pi cluster in there :-P
Well if you wanted to go the route of a custom backplane, then maybe a better look at those C.H.I.P gr8’s are in order for a cluster, tho I’m not as impressed by the first chip as I thought I would be. Then his keyboard love will really be tested..
Later Thinkpad keyboards have a fully functional Trackpoint module (with PS/2 interface) while the older ones only have the stick and pressure sensors. Either you somehow transplant the Trackpoint module to the older keyboard, or try interfacing the raw Trackpoint sensor directly into the RPi (or maybe through a Teensy).
What I really want to see is the specifications of that stupid MIPI DSI port of the Pi… Everyone’s got a ton of displays that use this protocol and the only one that’s useful with Pi is the one they sell?
I’m surprised nobody’s reverse-engineered it yet. There’s board that converts HDMI to an Apple iPhone DSI with a single FPGA, designed for use with the Pi.
I would do it myself, if I had a suitable logic analyzer and enough experience to know what I was looking for.
If you look carefully at the official DSI screen you will realize its not really MIPI screen, its a MIPI to parallel converter (TC358762XBG) and cheap crap tablet screen. They announced those screens in 2012!?! and still didnt manage to secure supply of proper MIPI screens to this day …
I’d like to see a lot of things. But it’s kinda funny. Once the Raspberry Pi became a success their following hardware releases became essentially closed source.
Yah I’d like to use the display from a Nokia Lumia with one as they’re really good displays and you can find them cheap now.
You will never see that. Just as you will never see the abortion laughingly referred to as the “original” Raspberry Pi 7″ Touchscreen.
Now, if you’d like to see how much work is still required on your part, to make it work, two years after the original design has been ‘cleaned up’, simply go to Adafruit’s web site and type in
Pi Foundation Display – 7″ Touchscreen Display for Raspberry Pi
PRODUCT ID: 2718
You could, at one time, buy the 7″ Official Display bag of parts from Raspberry Pi Foundation. No longer. You are now directed to buy this seamless RPi peripheral from one of the Raspberry Pi Foundation’s “distributors” to whom, obviously, full responsibility for its proper operation accrues.
This tactic of distancing themselves from much-hyped initial product and capability seems to be a hallmark, and a successful–so far–business model.
This might be a fallout from bad management at PEE foundation – they rely too heavily on pitiful % from PEE sales at RS/farnell/element whatever they are called these days. This in turn makes play stupid favors like telling people to buy ZERO at RS where it was only sold in $25 bundle of garbage for a year, or letting RS design garbage peripherals for them from shenzhen waste basket parts.