Wood And Rubber Band Pinball

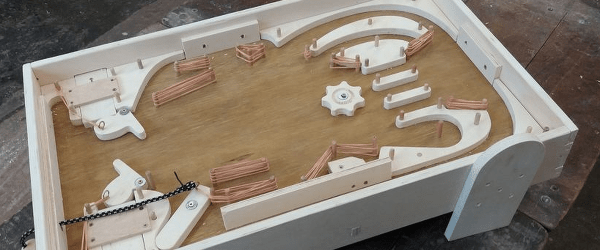
As pinball has evolved, it has gone from a simple gravity based game to an electromechanical one.  As the 20th century came to a close, pinball games added digital elements as well, matrix displays replaced electromechanical scoreboards, and LEDs replaced incandescent bulbs. While the game got more creative as new technologies became available, the basics of the pinball never changed – keep the ball alive using your skill with the flippers (and the occasional nudge.) [Garagem Fab Lab] has taken the basics of the pinball machine and, with some wood and elastic bands, has created a very nice desktop pinball machine.

The plans for the game require getting the wood cut by a CNC mill, but they could probably be easily created using a jigsaw. Instead of electrical buttons and solenoids, pieces of wood push the flippers out and elastics reset them when released. The bumpers, too, are simple dowels with rubber bands wrapped around them. The launching mechanism is a bit of bungee cord tied onto a piece of wood and used like a flipper to speed the ball into the play area.

The build is a throwback to the earliest pinball machines. Sure, there’s no reaction from the bumpers when they’re hit, they’re just passive, but the game looks fun. It would be a great base to add in some sensors, a microcontroller, and a display to keep track of scores if one was so inclined. Other DIY pinball machines we’ve seen are this pinball game built with Meccano and lasers, as well as this completely 3D-printed machine.

Tying Knots With Industrial Robots

We’re not ashamed to admit that we desperately want a pair of high-end industrial robot arms to play around with. We don’t know where we’d put them — maybe the living room? — but we know that we’d figure something out.
This demo aims to get Boy Scouts interested in robotics by applying the beastly arms to something that all kids love, learning to tie knots. (If you ask us, they’ve got it backwards.) Anyway, there are two videos embedded below for you to peek at.

Continue reading “Tying Knots With Industrial Robots”

Hackaday Links Column Banner

Hackaday Links: February 12, 2017

Taking small LCD screens, a tiny computer running Linux, and a 3D printed enclosure to build miniature versions of old computers is a thing now. Here’s [Cupcakus]’s tiny little Apple II, complete with Oregon Trail. This Apple II is running on a C.H.I.P., uses a 3s lithium battery from a drone, and works with a Bluetooth keyboard and joystick. Yes, the power button on the monitor works.

At Hackaday, we get a lot of emails from people asking the most important question ever: “how do you become a hardware hacker?” [Tex Projects] lays it all out on the line. All you need to do is to buy five of something every time you need one. Need some header pins? Buy five. A sensor? five. Come to the realization that anything you build could be bought for less money.

Are we still doing low-poly Pokemon? [davedarko] has an idea for the Sci-Fi contest we’re running. He’s going to give children seizures. He’s refreshing a project of mine by putting lights, blinkies, and noisy things in a 3D printed Porygon, the original 3D printed Pokemon. Porygon was the subject of that one episode of the Pokemon cartoon that sent 635 Japanese children to the hospital. The episode was banned in America, but it was actually Pikachu that caused the flashing lights.

‘Member Clickspring? He’s the guy who made a fantastic mechanical clock using nothing except a few bits of brass, a blowtorch, a tiny mill and lathe, and a lot of patience. Now he’s building the Antikythera mechanism. The Antikythera mechanism is a 2000-year-old device designed to calculate the phases of the moon, the motion of the planets, and other local astronomical phenomena. This is going to be a masterpiece, and will eventually end up in a museum, so be sure to subscribe to his YouTube channel.

Raspberry Pi Laptop Uses The Official Touchscreen

We’ve seen a variety of home-made laptops using the Raspberry Pi and other single board computers over the years. Usually, they combine off-the-shelf USB keyboards and trackpads with HDMI monitor panels, and cases made from layered laser cut sheet, or 3D printed plastic.

[Surferboy]’s Raspberry Pi laptop is the latest effort to come before us, and its claim to fame is the use of the official Raspberry Pi 7″ touchscreen as a display. Full instructions and 3D printer files are available on Thingiverse so you can have a go at replicating it if a portable Pi is your thing.

He’s taken the bold step of not attempting to place all the Pi’s interfaces next to the outside of the case. Instead, he’s desoldered the Ethernet and USB ports. The USB connections were wired directly to the keyboard, display, and a couple of external ports on the right-hand side of his case. This leaves the finished laptop with no Ethernet. However, losing ethernet is a worthy tradeoff for the thinner package.

[Surferboy] also brought the GPIO header to a female socket on the rear of the unit. It’s unclear exactly what battery he uses except for a reference to the battery from his keyboard. Since a keyboard battery will be too small for Pi and display we are guessing a larger pack will be necessary.

Though the Ethernet port and battery issue would probably be a dealbreaker here this has the makings of a useful and compact laptop, it will be interesting to see if it is picked up and refined by the community.

Quite a few early Pi laptops used the Motorola Lapdock, a mobile-phone-into-netbook peripheral. Some others we’ve featured have been a bit chunky, but sometimes they can be objects of beauty.

Via Recantha.co.uk.

Tiny LED Earrings Are A Miniaturization Tour De Force

Light up jewelry is nothing new – we see wearables all the time here. But home brew, self-contained, programmable LED earrings that are barely larger than the watch batteries which power them? That’s something worth looking into.

assembly5Settle back and watch [mitxela]’s miniature wizardry in the video below, but be forewarned: it runs 36 minutes. Most of the video is necessarily shot through a microscope where giant fingers come perilously close to soldering iron and razor blade.

The heart of the project is an ATtiny9, a six-legged flea of a chip. The flexible PCB is fabricated from Pyralux, which is essentially copper-clad Kapton tape. [Mitxela] etched the board after removing spray-paint resist with a laser engraver – an interesting process in its own right.

After some ridiculously tedious soldering, the whole circuit wraps around a CR927 battery and goes into a custom aluminum and polypropylene case, which required some delicate turning. Hung from off-the-shelf ear hooks, the 12 multiplexed LEDs flash fetchingly and are sure to attract attention, especially of those who know Morse.

This isn’t exactly [mitxela]’s first tiny rodeo, of course. We’ve featured his work many times, including a Morse code USB keyboardthe world’s smallest MIDI synthesizer, and the world’s smallest MIDI synthesizer again.

Continue reading “Tiny LED Earrings Are A Miniaturization Tour De Force”

Treadmill Motor Belt Grinder

Turn Your New Years Resolution Into A Belt Grinder

We’re just over a month into the new year, and some people’s resolve on those exercise plans are already dwindling. There’s some good news though. That treadmill can be hacked into a nice belt grinder for your shop.

[Bob]’s treadmill belt grinder is based on a 2.5 horsepower motor he salvaged from a broken, donated treadmill. This motor needs 130 VDC to run, which is a bit of a challenge to generate. Fortunately, lots of treadmills seem to use the same MC-60 motor controller, which is compatible with this motor. Due to the widespread use of this controller, they can be found on eBay for about $30.

With the motor spinning, [Bob] built up a frame for the grinder, added rollers to hold the belt, and a spring based belt tensioner. The motor’s speed set point is controlled by a potentiometer, and the controller varies the power to keep a constant speed. Since the motor is capable of some serious RPM, a tachometer was added for feedback to prevent high-speed belt shredding.

The final result is a very professional looking tool for under $200. What would a grinder like this be used for? Knives of course! 2″ belt grinders are perfect for shaping and grinding knives and swords. In fact, you can see one in use in this sword hack.

Check out a video of the build after the break.

Continue reading “Turn Your New Years Resolution Into A Belt Grinder”

3D Printed Rockets Are A Gas

We’ve probably all made matchstick rockets as kids. And around here anything that even vaguely looks like a rocket will get some imaginary flight time. But [austiwawa] is making some really cool 3D printed rockets that use common CO2 cartridges as a propellant. You can see them in action in the video below.

You might think just sticking a CO2 cylinder in a 3D printed jacket isn’t such a big deal, but [austiwawa] really went the extra mile. He read up on how to make the rocket stable (by manipulating the center of gravity versus the center of pressure) and explains what he had to do to get the rockets flying like you’d expect.

In addition, the launch tube is pretty interesting. A 3D printed part holds a sharp point and a spring. You lock the spring and when released it punches a clean hole in the propellant casing. The actual tube is a long piece of PVC pipe. From the video, it looks like these little rockets fly pretty high.

Judging from the video, the rocket body and launcher came from TinkerCAD. The way [austiwawa] put the fins on was both simple and clever.

Of course, you could also use Coke and propane, if you like. We’ve also seen some pretty cool setups with compressed air. Check out the rockets in action after the break,

Continue reading “3D Printed Rockets Are A Gas”