Every time we look at the little short Z axis of our CNC mill, we think about converting a drill press to a mill. In theory, it seems like it ought to be easy, but we never quite get around to it. [AvE] did get around to it and made his usual entertaining video about it that you can see below. If you haven’t seen any of [AvE’s] videos before, be warned: there is a little colorful language in a spot or two.
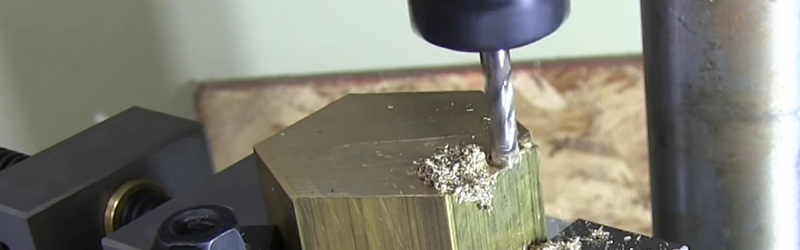
This isn’t a CNC mill, by the way, although we suspect you could convert it. Essentially, he adds a spindle and an XY table to a Ryobi drill press. It sounds simple, but getting everything to work did take a few tricks, including a blow torch.
Actually, turns out the blow torch didn’t really do it, but we won’t spoil the final resolution to the problem. Once it was resolved, though, he did manage to do some actual milling, accompanied by some music we wouldn’t associate with [AvE].
Although billed as a “poor man’s” build, the XY table alone was about $200. So add in the cost of the drill press, the spindle, and the mill and this is still a fair chunk of cash. We’d love to see it compared to a Harbor Freight milling vise. We suspect the Harbor Freight vise might not be as good, but is the difference worth the $130 difference in price?
We’ve seen this kind of conversion done before without the colorful language. If you do this conversion and want some practice, why not build a magnetic carabiner?


Are there not issues with lateral forces on a drill press?
Many many issues…
The bearings aren’t meant for major lateral forces. Won’t last very long.
They’re also not meant to be heated with a torch, and yet…
The bearings on every drill press I’ve taken apart are deep groove ball bearings ,made more for lateral (radial) forces than the plunging (axial) forces that they experience in a drill press. Most of those bearings can handle more than 2-3 times as much “side load” as axial load.
I’ve tried something similar in the past and, whilst it worked reasonably well with very soft materials (like PTFE), I gave up with metals fairly quickly, for the reasons you mention. In the end you go back to taking away all the material by making multiple vertical passes with the drill and just moving the object horizontally with the xy table between drills. I like to mess around with things like this, but at some point you also have to know when to knock it on the head and actually wait until you can afford something that actually works.
My comment exactly. He is going to take a marginally accurate drill press and turn it into a very sloppy or even a non functional drill press. A drill press is not designed for lateral loads. If you have a sacrificial drill press it might be something to try but I would not do it with a machine that I like.
You didn’t pay for the Damn thing so why do you give a shit what he does or what he ruins? If your feelings are hurt go elsewhere it’s very simple!!
As long as a mill bit is mounted into it and not a drill bit…I dont see any problem
Bearings. Drill presses are designed to apply downward force only. Side to side loads will wear it out very quickly and you will have a lot of slop, at best.
The bearings in a drill press are deep groove ball bearings, those kinds of bearings can typically handle 2-3 times as much radial load (side load) as they can axial load (downward force). That being said it isn’t a bad idea, nor is it difficult, to simply replace with a same sized angular contact or tapered roller bearings set like I did on mine.
Tapered roller bearings do require more energy to turn. The angular contact bearings are probably the better ones
Wow. Stay class there, precious.
It is made very clear in the video that this is not high quality. The intent is to get a home gamer some more access to equipment that can make cool stuff. This ticks that check mark.
Can you send me a link to something you have done that is better and suits the same purpose? I would love to take a look.
I didn’t say anything about it being high quality. What it is is an (expensive) assembly of parts that doesn’t achieve anything that couldn’t be done with other tools, without the outlay of several hundred dollars for a compound table.
The problem with your assertion that it gives the ‘home gamer’ any more capability, is that you could get the same or more capability with an equivalent value of much more versatile tools. In the video itself, he doesn’t demonstrate any capability that is the hallmark of an actual ‘milling machine’. He makes a couple of facing cuts, and a partial depth through slot, and calls it done. Doesn’t attempt to work a feature to a precision dimension either, which is kinda the point of an actual milling machine.
A cheap trim router and a little ingenuity would offer just as much capability in non-ferrous materials, at a fraction of the cost. Add in a cheap jigsaw, a variety of hand files, and the layout tools you probably already have in your shop if you’re working metal, and you can do almost anything this can do, if you put your mind to it.
It’s only the ingenue that doesn’t understand that there’s more than one way to skin a cat, that would think this particular kludge (because in no way is bolting a handful of factory components together in their intended manner a hack) offers anything more than a cringe.
The point wasn’t so much usability. The point was that people kept saying that you couldn’t turn a drill press into a mill. He set out to prove that you can. Of course the end result is a piece of junk for almost the price of a second hand bench mill, but we had a good laugh in the process. Telling AvE that something can’t be done is the easiest way to get him to do it. Plus, it’s not like he needs another mill. He already has 2, a clapped out bridgeport and that new one he got a year ago and still hasn’t set up for use.
Clinton Westwood’s channel on YouTube demonstrates many techniques where ‘precision machining’ in non-ferrous alloys, similar to the work one might hope to achieve with the kludge in this video, is done with unconventional tools.
https://www.youtube.com/channel/UC0VCN0pkJ-k6dVhdG9bbC1g/videos
Please delete this video.
This guy is so wrong here. As mentioned before: he destroyed the collect by removing the extractor ring. This Ring is used to remove the nut (see this link: http://www.precisebits.com/tutorials/er_collet_system.asp)
Next he mounted the vise only on side. You need at last two points to apply the pressure. With only one pressure point that is not in the center of the vise the vise will tilt at tiny bit.
Than he used a drill press to mill. As already mentioned by other: This isn’t a good idea. The result was shown in the video: The collect felt off! This type of milling collect has to be secured with a „draw-in screw thread“/“threaded shank“ (I don’t know the correct technical for it, on German it is „Anzugsgewinde“)
Next he glued the collect into the drill press. And preventing so the change of the collect. Maybe it is possible to separate those parts with heat and excessive force but I don’t think this is a good way to handle the machine.
Next he used a far to big milling bit. Do not get me wrong: The cross sliding table „KT 150“ he showed in this clip is a good one. But this table is intended for „light duty “
Please delete this video! Or show at least a big warning. This is clearly ia video about how not to work!
swoooshh….did you even watch the video? it is a bit of fun in the shop doing something stupid while having a laugh at how stupid it is
Well given the writeup, the HaD staff don’t seem to think it’s stupid…
I’d rather you would remove yourself and with your petty snarky entitled whining which is of no consequence at all.
So when he says “Ya know, it’s not a milling machine- obviously! It’s not a Bridgeport”, we should disregard that?
Should we also disregard the great big ‘DRILL PRESS MILLING MACHINE’ written on the title card?
The end of the chuck is a Morse taper #1 i think. Lateral force will cause the chuck to become loose and fall out, Get the speed and feed off a little and the tool starts to chatter, it will happen every time.You might be able to hold +/- 1/64.
Save your money get a HF mill.
He solved that problem by super glueing the taper (he says #2) into the drill spindle.
A low end manual mill is usually well under $700 locally
Note, anything made from unknown-alloy aluminum usually never gambles above an ER16 chuck.
(almost all Sherline/Taig hobby mills will use ER16 as they are inexpensive)
Climb milling on old equipment is just silly… and should be avoided if possible.
Even real used mills with worn bearings are recommended to avoid doing this rookie mistake.
Good students are taught how not to break equipment first, and the other folks will likely post a bearing/mill replacement video in their future.
The video is a work of art as a troll piece, and certainly needs the disclaimer the guy makes.
It would have been funnier with a Dremel, and less cursing (Tourette syndrome?).
Sometimes you do need to take an ugly cut rough though an uglier project, but we just use a water-jet cutter.
=)
“A low end manual mill is usually well under $700 locally”
Generally I agree with the sentiment, but where I live at least they aren’t that cheap, and even if they were my drill press conversion including bearings, x-y table, and more cost less than a third of that and easily handles the small projects I throw at it.
Yep. Given his knowledge on many other topics, I thought he’d know how an ER collect chuck works. I was checking the date to see if I was watching an April 1 video.
“be warned: there is a little colorful language in a spot or two.” AKA manspeak. AvE’s videos are always a great mix of entertainment and pragmatic knowledge. The tips on dealing with the reality of doing things on a budget like that will save you a lot of time, and moments of your own manspeak.
AKA manspeak.
AKA AvE-speak. He’s got a language all his own and he was on a roll this video! Quite entertaining.
He is like a Geoffrey Chaucer of the machine shop, a different sort of miller’s tale.
There’s an entire website dedicated to translating his ave-speak.
Aaaand here is a video of why modifying a drill press to a mill is not a good idea.
AvE has done a good job showing the obvious compromises you must make.
He shows brain-farts on his self edited videos, and again that is gold for the green hand.novice.
Really? A cross slide vice makes HAD? What next, hu-man invents new form of toilet paper using old newspaper?
I dont think AVE would argue with you one that. Its just a bit of fun even he admits hes not a expert machinist.
Wise men learn more from fools than fools do of the wise.
The collet nut is suppose to have that offset. Your suppose to set that collet in there, then screw it in. I went to school for machining. All collet holding nuts have that offset ring you took off on the lathe.
I just dont get all the hate, its for fun and low level machining. The guy basically admits this, granted he’d be better off just making a hybrid adapter with a bigger bearing ring, or even a just getting one of those cheap press adapter for your power drill and using a rotary tool but still, someone probably can find a cheap drill press at a flea market and do something like this. Why not? Holy shit you guys are way too serious and arrogant and have 0 sense of humor KYS
I’ve had 3 of 4 Chinese er collets that were machined incorrectly and I couldn’t even get the first thread started to use them and had to do exactly what he did and they work fine after that. So blasting a guy because he modifies something or calls it the incorrect name is plainly rude. He is learning like the rest of the world and not afraid to put himself out there. I’ve had 7 builds myself and not documented any of them. Kudos to him.
No need to make excuses I thought you did a great job! As long as you take it really slow and easy you’ll get your money’s worth out of it. Your cross slide mount needs some work. :)