If you ever go to a computer history museum, you’ll be struck by how bland most modern computers look. Prior to 1980 computers had lights and switches, and sometimes dials and meters. Some had switchboard-like wiring panels and some even had oscilloscope-like displays. There’s something about a machine with all those switches and lights and displays that gets your hacker juices flowing. Have you ever wanted to get started in retrocomputing? Is it difficult? Do you need a lot of money? That depends on what your goals are.
There are at least three ways you can go about participating in retrocomputing: You can pony up the money to buy actual antique computers, you can build or buy old computers recreated with anywhere from zero to one hundred percent of period-authentic components, or you can experiment with emulators that run on a modern computer. As a hybrid of the second and third option there are also emulations in FPGAs.
You can see that the first option can be very expensive and you will probably have to develop a lot of repair and restoration skills. Watching [Mattis Lind] twiddle the bits on an actual PDP-8 in the clip above is great, but you’ll need to work up to it. The two techniques which get you going without the original hardware don’t have to break the bank or even cost anything presuming you already have a PC.
Although some sneer at emulation, for some machines it is almost the only way to go. You couldn’t buy the original EDSAC, for example. It is also a good way to get started without a lot of expense or risk. But regardless of how you do it, there’s one thing in common: you have to know how to operate the thing.
Simh and BlinkenBone
One common way to emulate an old computer is to use the SimH suite. It has emulations for a large number of old computers. Normally, the emulation has a console and you appear to be entering data into some sort of terminal. Technically, that’s fine but it doesn’t give you that feel of handling the old hardware.
However, SimH does support an interface that can drive a real or simulated front panel for some machines. For example, earlier we covered the PiDP-8 kit, which uses SimH on a Raspberry Pi driving a fairly authentic-looking PDP-8 front panel. With BlinkenBone, though, you can run a Java front panel for many classic machines and thanks to SimH, they aren’t just mock ups. They work.
So let’s look at what it takes to operate a PDP-8 through the front panel. The PDP-8 — from DEC or Digital Equipment Corporation — started life in 1965. A base model cost about $18,500 — a whole lot of money in those days. The “straight 8” was full of discrete components and was the size of a refrigerator. We’ll look at a PDP-8/I, a machine made with ICs around 1968. While it was large by today’s standards, it wasn’t the size of a fridge.
Why the PDP-8? Well, there are several reasons. First, the PDP-8 is very simple, yet fairly representative of early computers. Second, thanks to BlinkenBone, you can play along with no hardware at all. If you have a PiDP-8, that will work too. If you are lucky enough to have access to a real working PDP-8, then you are all set.
If you don’t want to read the blow-by-blow, you might prefer watching the video, below.
A Tour of the PDP-8/I Front Panel
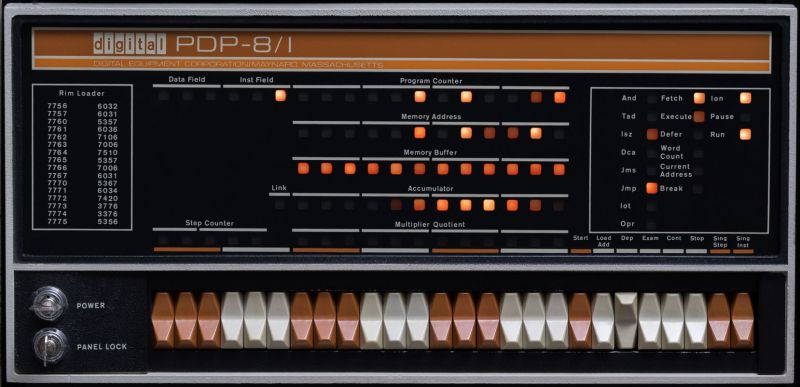
The PDP-8/I has 26 switches. There are also two obvious key switches: one for on/off, and another to lock the panel (both of these are missing on the PiDP-8). Starting at the left, you’ll see the following switches: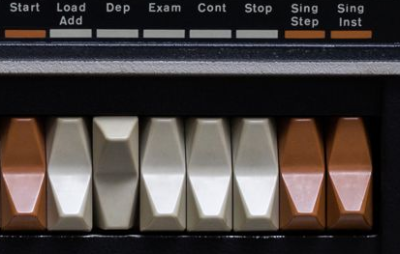
- Data field (3) – Sets the data field (which has 4K page of memory used for data)
- Instruction field (3) – Sets the instruction field
- Address/Data switches (12) – Sets the 12-bit address or 12-bit data word. Up position is zero and the leftmost switch is bit 0. Color groups correspond to octal digits.
- Start – Press down to run program
- Load Add – Press down to load address on switches to be current address
- Dep – Press up to transfer data switches to current memory location and increment the current location
- Exam – Press down to load the lights with the memory contents at the current location and increment current location
- Cont – Continue after a stop (as opposed to Start, which starts over)
- Stop – Stop execution
- Sing Step -A toggle switch that lets you step a machine cycle at a time; SimH doesn’t support this and the PiDP-8 uses this switch to do things like reboot the underlying Raspberry Pi
- Sing Inst – Another toggle switch that causes the machine to handle Start and Cont by executing one instruction and halting
Your PC probably has gigabytes of RAM memory organized as 8-bit bytes. The PDP-8 has the ability to address 4K or RAM organized as 12-bit words. Even in those days, 4,096 words of memory wasn’t very much, so the data and instruction fields let you have multiple 4K fields if you could afford the extra memory.
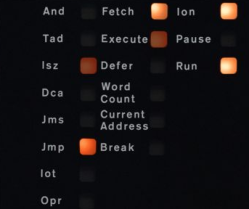 On a real PDP-8 Dep is reversed — you push it up instead of down. This is to prevent you from accidentally writing over memory if you get the switches mixed up. The PiDP-8, by default, doesn’t reverse the switch, although you can do it with a simple modification.
The lights — and remember, on a real system these are not LEDs — show the address and data, as I mentioned earlier. It also shows registers. The lights in the panel’s right-hand box show the current instruction (first column), the current machine cycle (middle column), and the machine state (right column).
Simple Instructions
If you are wondering how the PDP-8 uses 8 lights to show what instruction is executing, it is simple. There are only 8 instructions. That may sound incredible if you are used to modern computers, but it is true. A machine that could compile Fortran programs, run Basic, and do lots of other tasks only had 8 instructions. So much for the invention of the reduced instruction set computer (RISC) many years later.
Honestly, 8 instructions is a bit of a half-truth. There are 8 opcodes. One of those op codes has a few sub codes (but only a few). Later enhancements used the I/O instruction to do things, further increasing the instruction set.
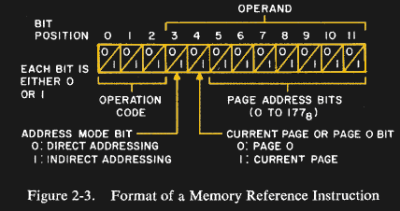 Each 12-bit instruction starts with a 3-bit opcode. You can do a logical and, a signed add, an increment and skip-if-zero operation. You can store the accumulator (and clear it in the process), or jump to a location or a subroutine. Each of those instructions allows for a 7-bit address. You can set another bit to indicate the memory address is indirect and another bit to indicate the 7-bit address is relative to the current page of memory or page zero. Obviously, with only 7 bits, instructions could not operate on any memory location, so page 0 was a way to communicate between disparate areas of your program.
One op code contains two groups of “microcode” instructions. These can do things like clear the accumulator, invert the accumulator or increment the accumulator. Not only can the instruction (the OPR instruction) do those things, it can do any or all of them in one instruction. There’s also a defined order of operation, so you do things like clear the accumulator and increment it to put a 1 in the register.
There’s no subtract (negate and add will work). There’s no logical or instruction (hint: remember DeMorgan’s law). But there is enough that you can do significant programming. It just takes a lot of instructions.
There are even more subtitles. Self-modifying code was common and some memory addresses magically increment when you use them as indirect addresses. A tutorial on programming the PDP-8 could be a whole post by itself, but I wanted to give you a flavor for what programming on a machine like this looks like. Different machines had different indirection and memory addressing schemes, but these general principles were very common in this era. If you really want to dig in, you could do worse than read [Douglas W. Jones’] reference manual.
Test Program
Consider this program in octal:
7301     ; load accumulator with 1 and clear link (carry)

7001     ; increment accumulator

7430     ; skip if link=0

7402    ; halt

5001    ; jump to location 1
In operation, this will zero the accumulator and the link bit (the carry) and then add one to the accumulator repeatedly until the carry bit sets. Then the program will halt. If you restart it, it will stop on each loop since the carry won’t get cleared when you resume. You could also single step it using the rightmost switch.
How can you enter a program like this using the front panel?
Using the Front Panel
If you are using Blinkenbone, go to this page and download the package for your operating system. You’ll also find instructions on how to launch the emulator (a batch or script file).
By default, the script file will load an operating system and run, but that’s way more advanced than we want. We want to flip switches. So press the Stop button after the front panel appears (remember, depress down). Now you are ready to start flipping switches.
- Press all 12 data/address switches up. Press Load Addr. Note the Program Counter lights all turn off.
- Set the data/address switches to 7301 (DDD UDD UUU UUD where U is up and D is down).
- Press Dep (remember, press this switch up). Note that the Program Counter is now 1, the Memory Address display is now 0, and the memory buffer shows the code you entered.
- Repeat steps 2 and 3 for the other instructions (7001, 7430, 7402, and 5001).
- Put the data/address switches back to zero (all up). Press Load Addr. Then press Start.
That’s it. You’ll see the accumulator flash and the link light will turn on. Then the processor will stop. If you want to examine your program, repeat step 1, but press Exam repeatedly and watch the Memory Buffer lights. You might also want to repeat step 1, press the Sing Inst button down and then press Cont repeatedly to watch the program execute one instruction at a time.
Getting Loaded
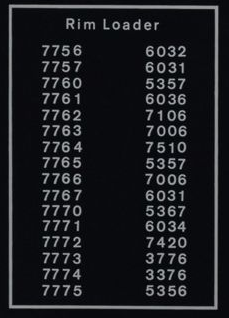 In practice, most people never did what you just did. Do you notice the box on the left of the panel marked “Rim Loader” with some numbers within? That was the stage one loader. You would toggle those codes in (starting at address 7756) and run it. Then a more advanced loader would read from some other device (probably paper tape, but maybe something more magnetic). That loader could then read what you wanted to run (like a compiler or — if you had a big system with disks or tape — an operating system).
Realistically, though, if you really want to do that, you can just restart the SimH and let it do all the work. The default for the PDP-8 plays Adventure, and if you start it, you’ll see that the data display on the front panel makes a very nice show while you play (I assume that’s deliberate).
Next Steps
It can be fun to learn about old computers and finding ways around these old machine’s limitations. If nothing else, coding for a PDP-8 will make PIC or AVR assembly language seem luxurious. SimH can simulate lots of machines, some with front panels. There are also many replica kits for blinking light machines ranging from fake Altair 8800s, to COSMAC Elf replacements, and more. Of course, every front panel was different, but they do tend to share common ideas.
You could argue that these old machines don’t have practical value anymore. That’s probably true. But then again, it isn’t much different from someone wanting to restore an old motorcycle, or build a model ship and people do that all the time.

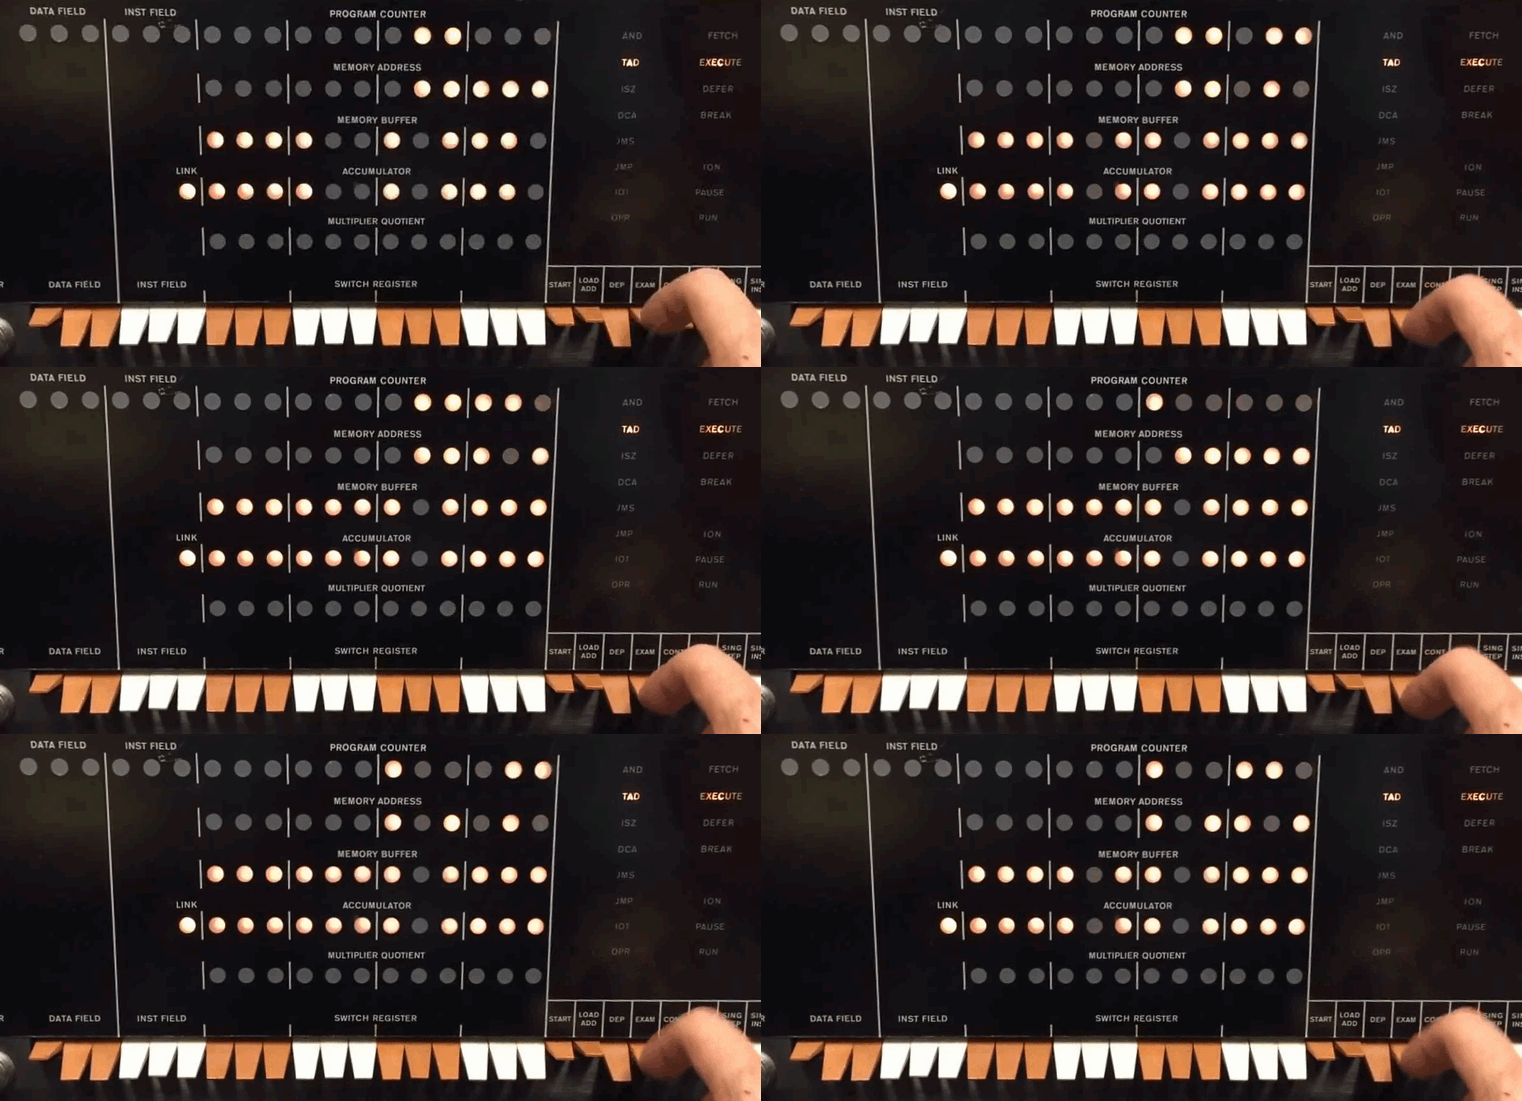


“If you ever go to a computer history museum, you’ll be struck by how bland most modern computers look. Prior to 1980 computers had lights and switches, and sometimes dials and meters. Some had switchboard-like wiring panels and some even had oscilloscope-like displays. There’s something about a machine with all those switches and lights and displays that gets your hacker juices flowing.”
Windows 10: Punch card edition.
Well, a punched tape can hold about 4 bytes of data per 10mm, that’s about 2500km per GB… well, that would be a LOT of tape… I’d enjoy seeing that!
Like the Worlds Largest Ball of String for the non-nerd types…
https://pbs.twimg.com/media/BXG7IyGIQAAsgqQ.jpg
win8 install, the hard way
https://pbs.twimg.com/media/BXG7IyGIQAAsgqQ.jpg
have not seen paper tape version.
I almost want to believe that is not a prank, and that 8.1 could be installed that way. I also dread being asked to ever do so; at least without an automated disk exchange system. Or at least 10 SCSI 3.5 drives so the only work would be changing the disks.
In the 80s, Digital Equipment Corporation sold several models of MicroVAX computers configured with only a 5-1/4 floppy drive for software install.s VMS for them was distributed on a set of approx 50 floppies, and about the same number for a language compiler or two. It took a while….
I kinda miss floppys. Modern storage is too tiny to label whats on it. Before anyone says modern storage holds too much to label, you could at least name the usb flash drives or sd cards so it’d be easier to pick out the right one. Give me something the same form factor as an old 3.5″ floppy disk that can hold 16-512GB and I’ll be happy, even if it’s just a SD card inside. Hell, call it macro-sd or something.
They have some practical value in so much as the low levels at which this machine operates is not terribly different from many other common lineage microprocessors. Making a model ship can be a fun hobby but it isn’t really analogous in the same way though.
Not that anybody considers a PDP-8 to be *practicable* to actually use but the fundamental WAY in which is works is still very much relevant, if you need to get down to such a low level.
This reminds me a bit of Chris Sawyer, the guy who literally wrote RollerCoaster Tycoon. That guy made a lot of money from his “hobby” and knowledge of these kind of things.
https://en.wikipedia.org/wiki/Chris_Sawyer
“An out of court settlement has brought to a close the legal battle Sawyer (pictured) initiated in 2005 claiming that Atari had not paid some $4.8m in royalties.
Previously, Sawyer alleged Atari had breached a licensing agreement by not allowing his auditors access to accounts from 1999 to 2001. Atari’s revenue from Sawyer’s games, including Transport Tycoon and three versions of RollerCoaster Tycoon, was at the time estimated at around $180 million of which Sawyer received about $30m – but he said the figure fell short of what was due. He said forensic accountants had discovered 13 instances of payments which were wrongly withheld.”
I was blown away to learn that Chris Sawyer coded RCT in x86 assembler.
Back in the days when people weren’t scared of assembly.
The first Unix system I worked on was on a PDP11/32, and when it crashed, you had to go to the front panel and enter a few things on the front panel switches to tell it where to find its boot commands. If you messed them up, there was a paper tape you ended up having to load, labeled “OMG”
Maybe you mean a PDP-11/34….
There is a homebrew PiDP-8 kit where you can build a 75% scale version, plus a PiDP11 version in development. Runs off of, you guessed it, a Raspberry Pi.
There was no heap/stack collisions on the PDP-8! No stack, hee…
The PDP-8 I used had core memory which retained its contents when powered off; loading from switches was rarely required.
I remember playing a ascii matrix based star trek game on my pdp8
And I think I still have an os on mag tape in the basement…that might be for pdp 11
*This* *one* *time* I won’t complain about the use of yet another freakin’ GIF the size of my living room television, mostly because in this case it’s (a) actually rather pretty and (b) serves a useful purpose to the article. I like blinking lights and I cannot lie :P
…just don’t think I’ve given up the call. I promise that I haven’t. And for the record, my living room TV is a 26″ Insignia. It’s not even “HD ready” AFAIK… yes you can laugh. I rarely use it anyways — the last time it was on, television signals were still analog. There’s simply nothing decent to watch any more… and I can play DVDs on my laptop.
You ass :P
I remember learning to program a PDP8/L back in ’69. Anyone besides me remember what SNA SPA CLA means? :)
It skips the following instruction if ACC isn’t 0 and isn’t negative and then clears A anyway. So, it’s really a skip if >0.
When I first started looking into PDP-8 I was really confused by the “microcoded” instructions. The terminology is confusing. What they mean is that there are multiple instructions covered by a single opcode (so each sub-instruction is “micro” sized) – not that they are instructions “implemented as microcode” in the modern sense.
The idea of microcode was first published by Maurice Wilkes in the 1950s (Cambridge UK). So, it was already well known by the time the pdp-8 was built.
So, actually, they probably do mean ‘microcode’. In a microcoded architecture, at a simple level, machine code instructions index a microcode ROM (possibly RAM if it’s alterable) and then the outputs from the microcode ROM literally enable gates on the CPU so that data flows through the appropriate section of the CPU, causing part of an instruction to be executed (so subsequent microcode instructions enable other gates and finally complete the instruction).
A pdp-8 microcoded instruction is doing a lot of what a microcode ROM instruction would: enabling a rudimentary set of gates, with a little bit of sequencing.
My first exposure to computing was in 1972. I was an Electronics Technician in the Navy and I served on Nuclear Submarines. I maintained and operated a Ships Inertial Navigation System (SINS) which told us where we were at any given moment. It was basically a big Gyroscope controlled by a computer. The computer was a 3rd generation computing device. Discrete component, NOR Flip-Flops, 8-bit registers, 1k Core and 1k Magnetic drum memory. Paper punch tape or front panel switches where used for input and an IBM Selectric typewriter was our output device. A 1 second Automatic Jump Out (AJO) was used for system synchronization. I think clock speed was in milliseconds. One of our tasks in the school was to program the computer to type out our initials. This was accomplished by painstakingly entering each instruction of the program using machine language on the front panel switches one at a time. We where given a week to accomplish it successfully. Only one of us did it on the first attempt and it was not me. Now a days my pocket calculator has more processing power than that early computer had. But it controlled a stable gimbaled gyroscope platform that compensated for the earths rotation so that accelerometers could measure ships speed and direction for the calculation of latitude and longitude. It used an application program using a Kalman filtering technique to reduce the errors of the system all in FORTRAN.
I have in my library a pocket guide to Hewlett-Packard computers. It has specifications and descriptions of the hardware and basic operation. An Assembler Reference Manual. An FORTRAN and BASIC language reference Manual. And a program library reference manual. I am reverse engineering the computer structure from the block diagrams to create schematic diagrams so I can reproduce a working model.
To this day I use PDP-8 assembly language when someone asks me, “Hey, you know everything. So tell me, how do computers work, on the inside?” I present the machine and the instruction set, all from my own memory. Difficult? Of course not. There are only eight instructions! A ten-minute “chalkboard” lecture satisfies even the utmost amount of non-geek curiosity. Most people tune out after about three minutes, when I’ve not gotten to subroutines (JMS) and the hideous difficulty of trying to write re-entrant code on the 8.
The 1972 TSS-8 OS (later Edusystem 50) had some code that was re-entrant to ONE level. The variables in use were not pushed onto the stack. There was no stack. They were just DCA’ed into a temporary array. Oops! Frequency of failure on our system? Roughly crashaday.
The technology of today is build on the building blocks of the past. When I was in the Navy we transitioned from replacing individual burned out components on the board level to replacing the entire boards. It saved the Navy millions of dollars in training time by training technicians what made the black box worked rather than how the black box did it. This philosophy made a lot of sense. We where not engineers, we where operators.
The same type of trade off is true when you start miniaturizing electronic components today. Not every technician needs to be an engineer. All the tinkerer needs to know is what can I use or do to make the something do what to do something work. I remember having to peek and poke my Apple II+ to make my printer work. and the nightmare of keeping IRQ’s straight so as not to have your desktop have a nervous breakdown when adding new peripherals.
Yes I was a pioneer. Yes I was there when. But unless you are engineer or the apocalypse has just happened you do not need to how it works to use it. You don’t need to know how a washing machine works to use it.
In the future when someone asks you how was it done in the olden days don’t make it sound like magic. Keep it simple. It was simple solutions then and its still simple solutions now. But make it a Barnum and Bailey production as it was then.
Learned computing on a PDP-8/S that a high school math teacher was kind enough (and wealthy enough, apparently) to donate to my high school in 1969, George Washington High in Philadelphia.
If you want to play with switches, go to my website. It has an emulator written in Java that has most interfaces implemented with visual interface. ( Panel, Terminal, Lineprinter, dectape, Papertape)