It may be hard for some of the younger readers to believe, but there was a time when hardware was full of little rubber belts. Tape decks, VCRs, even some computers: they all had rotating parts that needed to transfer power to other components, and belts were a cheap and quiet way to do it. Unfortunately, now decades later we realize that these little belts are often the Achilles heel of classic hardware, getting brittle and breaking long before the rest of the components are ready to give up the fight.
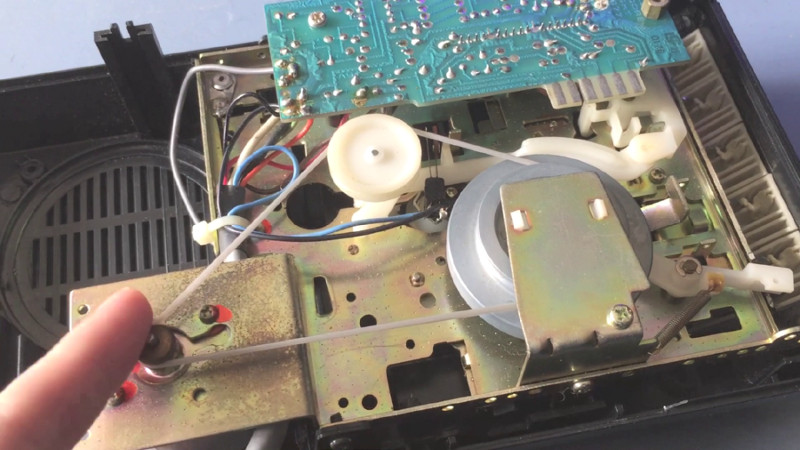
Which is exactly what [FozzTexx] found when trying to revive his newly purchased Commodore PET 2001. The belt inside of the cassette drive had become hard and fallen to pieces, and rather than hunt around for a replacement, [FozzTexx] reasoned he might be able to print one out of a flexible 3D printer filament like NinjaFlex. Besides, this wasn’t the only piece of vintage tech in his house that needed a belt replacement, so he figured it would be a worthwhile experiment.
As the original belt was little more than dust, [FozzTexx] had to design his replacement from scratch. He started by cleverly replicating the path the belt would need to take with string, and then measuring the inside diameter of the string circle with his calipers. [FozzTexx] then reduced the diameter by 5% to take into account the stretching of the new belt.
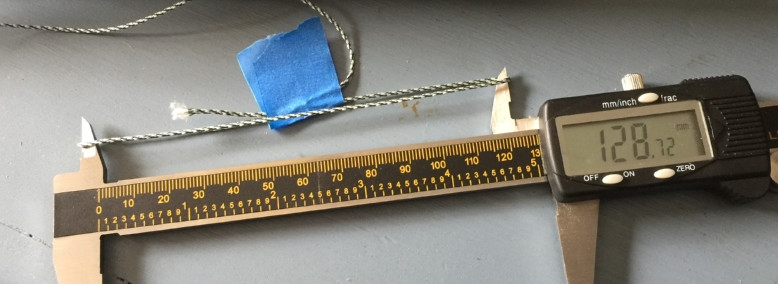
The profile of the belt was square, which made modeling and 3D printing much easier. [FozzTexx] just subtracted a smaller circle from a larger one in 2D, and then extruded that circle into the third dimension by 1.18 mm to match the height of the original part. Careful measurement paid off, and the newly printed NinjaFlex belt had his Commodore loading and saving programs on the first try.
We’ve covered the difficulty in sourcing replacement belts for old hardware previously, so it will be interesting to see if others are able to make use of the research [FozzTexx] has done here. Of course, longevity concerns are always brought up when NinjaFlex is used, so hopefully [FozzTexx] keeps us updated.


“cleverly replicating the path the belt would need to take with string”
I think string was rather the obvious choice here, cleverly replicating the path with chocolate pudding would have counted though.
String is pretty much the standard choice here, if you refer to the old (long ago absorbed by Newark) MCM catalogs. I make up these belts on occasion using urethane stock and a hot knife to make the joint.
I do them too, I heat up a plate of aluminum on the stove and then use that to melt the ends and squish them together. You can use a v-block to get them aligned, though I am pretty good at getting them by eye. Let them cool and grind off the flash. If it is a low load use you can use them immediately but higher strain stuff you should let the belt sit for a couple hours to regain full strength at the joint.
Chris, aka /u/FozzTexx, mod of the /r/retrobattlestations subreddit and giver of awesome handcut stickers. About half of all old computer posts on HaD originate on his sub.
“It may be hard for some of the younger readers to believe, but there was a time when hardware was full of little rubber belts.”
Not really as the family fixit-person, just about anything that moved, and some that didn’t…after I got through with it.
Any belt I would print would come out of a 3d printer that is itself driven by little rubber belts.
Beltception
Massively underrated post. Hire this guy for a hackaday writer or something.
For absolutely no good reason, I misunderstood “The profile of the belt was square” to mean anything other than the intended “the cross-section of the belt was square”.
Just in case this catches anyone else before they read the article.
What? People read the comments, (and comment!) before reading the article?
!!!!!
The temperature sensitivity and hygroscopic nature of chocolate pudding. Maybe fishing line or cat gut? Anyhow, more seriously… this is an interesting topic when thinking from the mechanical electromagnetic/electronics ways and means to design systems. We don’t see the mechanical dynamics so much common now days as was in days past. String is less noisier also than gears or sprockets. I even wonder if there is or was a gap in the electromagnetic-mechanical or really mechanical-electromagnetic sciences and engineering for a period until the hybrid vehicles came out and MEMS.. or at least that is what comes to mind. I have a project like this coming up in the future and so far used some Code Blue EliminX triple strength-enzyme with silver blind spray to kill off the germs. The product is impressive for health uses too. Interesting how the oligiodynamic effect works for electronic components too… though anything that oxidizes or a microorganism can eat on or dust they eat on… can get nasty in moist environments over time. https://drive.google.com/open?id=0B3kLL6AnKjj5YnpJUTVyNWJoaGM
Thanks for the ideas!
Cool. Considering I was looking up belts for high-end 1980s CD players a couple of weeks ago, and seeing “unavailable”, this should be a profitable concept. How durable would these be?
PS: the advantage of thick string over fishing-line is that it better filled the pulleys and gives a more accurate measurement.
Right, I was meaning kinda of facetious with the remark. Great call though. I was thinking like slippery and less surface tension issues too like pudding and not real relevant to the topic. I’ve only found fishing line to be practical for antenna launchers/throwing device for dipole antennas. I’ve consider copper fishing line for an antenna too. Seems like can work. For components operations; string materials, latex maybe, synthetic rubbers seems more likely and this method is new to me in the article and good call though wonder life cycle of material.
that’s it, i’m out…and thanks for the fish
As a kid I would just replace the belt in my VCR with a rubber band. If it’s too loose, loop it around twice.
Wow!
I know, incredible hack, right? :D
Actually, I discovered in those huge bags of assorted rubber bands, you’d get maybe half a dozen that were suitable as drive belts.
Yeah, but the elasticity of the rubber bands can make them unsuitable for drive belts.
DAMHIKT!
There never was a better time bomb killing the function of stuff than rubber belts and tires. Many VCR’s would use gearing from the loading motor except for the first drive element. They thought if all gears were used instead of a belt that an undesirable noise was made so the belt was used. It sounded nicer, even though every movie would add a sound effect for that scene. The horror of having your VCR not cough up the horror movie rented last week! The same for CD player slide out loaders, and perhaps that DVD burner in your computer still.
When it won’t open, bang on the tray at the right time. The belt is groovy!
Years ago I had a set of motor-slide-pots in a Yamaha organ that were belt driven and slipped causing the computer to mess the presets up again. The belts were soft and grease creep covered and smaller than anything in that MCM catalog. I found “o” rings the right length and thin enough. Round vs.square cross section was not a problem.
By just using an all gear train these things work, but with the belt in there it’s got a short time to work. Of course this does not apply to a tape deck or turntable where the belt does not transmit the small flutter of the motor which would happen with gears. I wonder how well this stuff would pass the wow and flutter test on a good cassette deck replacement? I think that Commodore drive was digital not AFSK, so it can tolerate a lot of jitter.
Projector Recorder Belt company seems to come up still.
A fix for tray loading optical drives that won’t eject is first to get them open, then disconnect power. With a pair of bent nose tweezers you can usually get at the drive belt to remove it.
Bring a small pan of water to a rolling boil on a stove or in a microwave. Remove from heat then drop the belt in for a minute. Remove the belt from the water, dry off and reinstall.
The heating slightly shrinks the belt, increasing its tension and grip. Rubbing it dry with a towel cleans it, also improving grip. The belts are usually square cross section, running in V grooves. If you can install the belt rotated so one formerly unused face is running in the groove, that will also improve grip.
I’ve fixed several game consoles and computer drives doing this.
thanks for the tip, it might come in handy some day.
Props for the tip!
I’ve got an all gear driven VCR… it’s loud, like a blender on low loud.
Speaking of O-rings, someone found they make good replacements for the feed wheels in old HP printing calculators.
(Which also entropy to goo over time).
See the Museum of HP Calculators for more info.
wow and flutter will tank using a rubber band instead of a dedicated drive belt. These drive belts barely stretch over the pulleys in a cassette deck and are suprisingly tight for what they need to do. Rubber bands are fine for FFWD/REW and counters but main drives really need to be almost no stretch rubber belts.
Interesting, although I have a box of o and square section rubber cord in the shed along with a splicing jig.
When I need a belt or seal that I don’t have in the assortment box, I whip out the cutting jig to make sure the ends are square properly, razor some cord to length and glue it up with the special adhesive that comes with the o ring kits.
Works great and I only use the off the shelf box because its quicker than splicing up a new belt to suit. Even commercial belts delivered to length are bonded occasionally.
Maybe its a business model for someone, buy x hundred yard of spool of rubber cord, splice into common antique tape deck lengths, sell on ebay, $$$ profit.
The other thing what if you need cord in a profile that’s not available? well then if your buying a few hundred yard, a rubber extrusion specialist will extrude you cord in whatever cross section you can supply a die, or pay for a die to be made. My wire edm belonged to a specialist rubber profile extrusion company before letting all its magic smoke out one day and being declared completely dead by sodick’s local engineering consultants (which is why a bum like me could afford to buy it then skipdive enough components to get it working for under a thousand bucks), and its previous job was to wire out new dies for custom profile orders.
Did the same for a GT2 timing belt. Printed with SainSmart’s flexible TPU (that is a PUR if I am correct) – and it works just fine. That stuff is pretty indestructible anyway – also making any support structure hard to remove – but you obviously won’t have any with an extruded belt…
Don’t GT2 belts usually have a fiberglass core?
Can you print flat belts? Many high end (and also lots of not-so-high-end-but-still…) tape decks used these. I have one or two that need replacement belts but I have none and especially flat belts are very hard to obtain.
May depend how wide they are, as to whether the print starts falling over.
I don’t see why not. It would basically be exactly what he’s done here, just higher in the Z dimension.
rubber bands work too
rubber bands usually don’t last long, they dry out and crack. I have used O rings in the past, and they hold up well if you can get one in the right size.
Clever. I hate it when i didn’t think of doing that:)