If you’ve built a 3D printer, CNC, laser cutter, or basically any piece of electrical equipment that moves around, then you’ve run into the problem of securing the bundle of wires that such machines always require. The easy way out is to zip tie them all up into a tight harness or put them in commercially available wraps or sleeves, but these don’t really impart any mechanical strength on the wires. With repetitive motion it’s not unheard of to break a conductor or two, causing intermittent failures and generally leading to a painful diagnostic session trying to isolate the broken wire.
 An alternative are what are generally referred to as “cable chains”. These are rigid enclosures for your wiring that not only keep things tidy, but give the wires the mechanical support necessary to prevent fatigue. Unfortunately, they are often many times more expensive than a simple wire wrap or pack of zip ties. But [Brad Parcels] has written into our tip line to share with us a sort of hybrid approach to wire management that has many of the same advantages as a traditional cable chain, but at a greatly reduced cost.
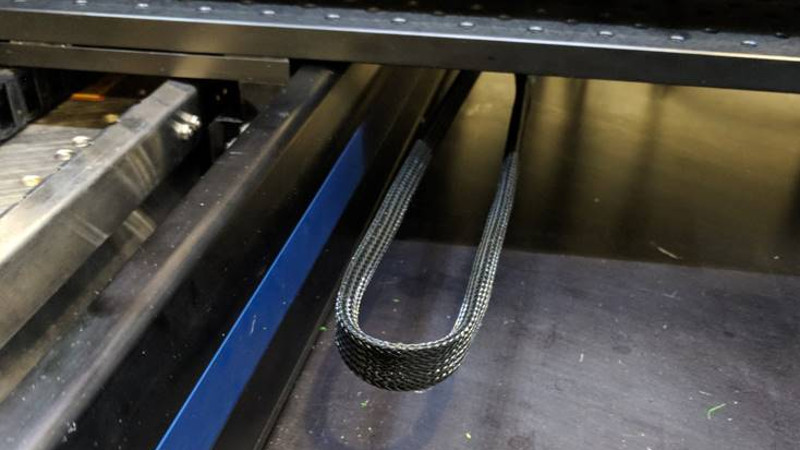
The key to the design is using the metallic tape from a cheap tape measure to give the bundle of wires some mechanical strength. As anyone who’s ever played around with a tape measure knows, if you bend the tape over into a U shape it will hold the bend even if you extend and retract it. Thanks to this principle, [Brad] realized that all he need to do was add some wire sleeves and he would have a cheap and effective way to keep his wiring neat and sag-free.
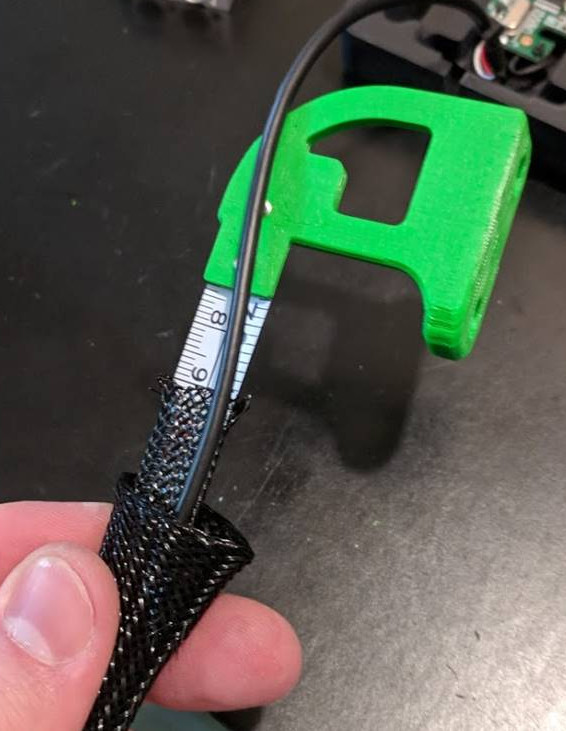
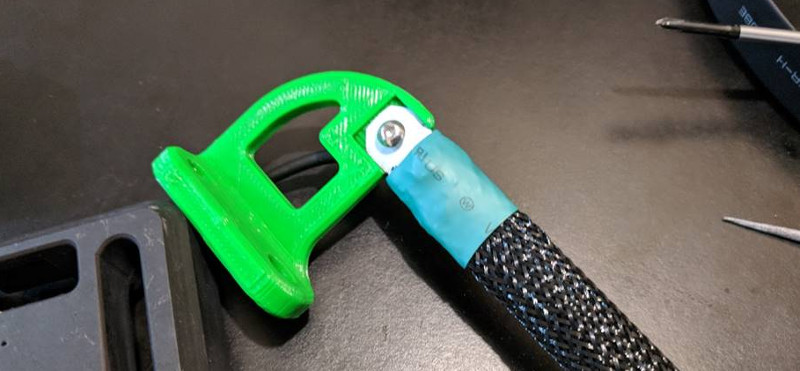
[Brad] punches holes in the tape to secure it to his 3D printed mounting arms, but really any method of securing the tape to the frame of your machine will work just as well. He then slides a cable sleeve over the tape itself to protect from any possibility of the edge of the tape nicking a wire, and then finally a larger wire sleeve over the entire assembly.
After running the wires between the two sleeves, heatshrink can be used on the ends to neatly close everything up. Just make sure you remember all your wires before you seal it, [Brad] learned that one the hard way. But overall, he reports this DIY cable chain arrangement has been working wonderfully in his machine, providing smooth and silent movement for only a few bucks.
Cable management for projects that move is one of those things that doesn’t always get the attention it deserves. Not only can it keep your project looking professional, but it just might save you some time down the road by preventing failures.


First.
Cool, going to the dollar store tm.
“First”
Nobody cares. Ever.
“First” matters (somewhat) if the first comment kicks off a relevant discussion.
…such as this one. Point made.
You forgot the “relevant” qualifier.
Being the actual first post starting a relevant conversation, yes. But declaring first detracts from that.
THAT “first” is what this means?
I’ve deleted my own rant about just how… … …
Cool stuff. I wonder if there will be issues with the metal fatiguing and cracking. Perhaps at the interface with the bracket?
Simple, effective, awesome.
Sometimes the most genius ideas are the simple ones (:
Impressive hack. Quite functional. (I’m jealous, have same parts but no glimmer of this idea.)
You worried steel tape would cut wires so covered steel tape alone, then wires run loose in outer sleeve along side sleeved tape. Did you also try the opposite with wires protected alone, then steel tape run loose in outer sleeve? Minor upgrade to wire protection and if steel tape does start to cut through it will be exterior sleeve so exposed and visible.
So umm… is there a link for a more detailed description? I feel like there should be a link.
I feel like there should be one too, but I can’t find one. I’ll get on Tom about that.
You are funny! :)
Not for this one, Brad sent the build info and pictures directly into the tip line.
Ingenious!
This, right here, is why I come to Hackaday. Brilliant, useful, and something I’d have never thought of; yet I’ll be damned if I don’t use it in every project I do going forward that needs cable chains
Exactly.
+1
The Prusa MK2S is using a 50cm long, 3mm PLA filament for the same purpose.
Until the PLA gets brittle and snaps into little pieces on you
Thought it was nylon, not PLA.
Even were it nylon, over time the same problem will happen. Nylon dries out and gets brittle.
“Actually…” it’s the other way, nylon sucks up moisture from air, hydrolizes and gets brittle, so it’s beacuse of moisture, not drying.
“Actually” you are wrong. Hydrolysis of nylon by atmospheric water under normal conditions will take an eternity and a half, you should try an actual acid instead. Another possibility to induce hydrolysis is to try to melt down Nylon while it’s wet.
I stored a bunch of zipties in a very warm, very dry spot for 11 years accidentally. When i retrieved them, they were stiff and brittle. I put them into a ziploc bag with a puddle of water, and after a few days they became perfectly flexible again. Try that too if you find abandoned zipties. Also you will find accounts of many people online who revitalised zipties by watering them. If they degraded by hydrolysis, no amount of watering would help.
The NEMA standards organisation writes:
“There are mechanical advantages with water molecules (moisture) present in cable ties made from these types of materials. The act of inserting a cable tie strap into the head locking mechanism requires some flexibility in the locking mechanism. The moisture conditioning process helps to keep the locking mechanism flexible during installation and provides moreimpact resistance.”
Just google this wording to read more.
There are thousands of documents on the Internet issued by material and product manufacturers saying this.
Absolutely brilliant.
Nice hack! I would add some kind of channel or supports where chain can run without fear of it snagging or bending in wrong place. Sharp bend or bending it wrong way gould possibly cause fatigue and breakage. Tape measure should last a while, I have never seen one that has broken tape, usually the reel system breaks first.
I must say that real cable chain isn’t that expensive either, 1 meter costs 3$ to 10$ from China, depending size of the channel. They are bit bulkier and not that flexible so this hack could be great alternative for tight spots.
great hack, now if i need something similar i’ll know what to do, thanks :)
One word: Ge-Ni-Us.
Love the idea!
So, noone had yet made a 3D printable cable chain?
That would be my goto answer for the issue.
lots of people have, but they are noisy and likely not as flexible as this is. I havnt tried op’s method but when I dust off my 3d printer over the xmas break I’m going to…
Those have been around for over five years. I think this is a nicer and faster solution though.
An unexpected thing… You can’t really solder those tape measures. I used one as a self straightening antenna on a rocket (after choot deployment), when soldering the tape cracks.
Pop-rivet a crimp terminal instead?
Otherwise, after soldering, use some heatshrink as a strain relief over the area.
Some kind of clamp is probably best, as far as soldering is concerned, you misunderstood, during soldering the tape breaks up like broken crockery, just shatters. Probably due to the high stiffness thermal expansion and low thermal conductivity.
Bolt a flat piece of metal over it so it clamps it in place
So, where did he get the loom?
https://www.princessauto.com/en/detail/1-2-in-x-16-ft-expandable-braided-sleeve/A-p8489221e
that is the first place I looked, and, as there is one just down the road, where I’ll be getting mine
using this idea, just got my anet a8 in the mail
Nice price, thanks! I’m bookmarking that.
Now that’s fantastic. I’m building a printer soon and I will be shamelessly stealing this idea.
The problem here is that the minimum bending radius needs to be bigger than it is or there is little benefit in preventing the fatigue.
Anyone who’s taken apart a cheap vinyl cutter has seen this trick in action. I didn’t realize it wasn’t more widespread!
Funny thing is they don’t even use blank steel tape. The tape inside my MH-721 has the inch markings printed on it and everything.
Blank tape would be a special order and cost more.
The Mendel90 tackles this problem using 0.5mm thick strips of Polypropylene.
I couldn’t find that. Well.. at least I couldn’t find that in the lengths required short of buying a huge expensive sheet from McMaster Karr or something like that. People online were stapling shorter strips together but I just wasn’t thrilled about that idea.
Then my mother-in-law bought my daughter a plastic mat to place under papers when she is coloring with markers or painting, etc… It looked like it would do. I checked the packaging, it even turned out to be Polypropylene! It was thicker however, 1mm or maybe even 1.5mm, I forget.
Nope. I didn’t steal my daughters mat to finish my printer! I asked my mother-in-law where she got it. It was at Hobby Lobby. I forget the price but it wasn’t bad. I’m not a huge fan of giving money to that company but… when nobody else wants to sell me what I need…
So far it seems to work pretty good!
This one from IKEA: https://m.ikea.com/us/en/catalog/products/art/66703500/
Also, slighly related, here’s how to cut plastic bottles into narrow strips: https://hackaday.com/2014/06/20/super-simple-way-to-re-use-plastic-bottles/
Great tips! I’m a big IKEA fan, and my husband will love this. Much appreciated.
Why not use Plastic wire loom. You won’t need the measuring tape.
I’ve previously used plastic cable snakes, like this one, only cheaper…
http://www.altronics.com.au/p/t4636-4m-glow-in-the-dark-cable-running-wall-snake/
Is there at “Top 10 Hacks of the Year”? If not, should be. This is one of them.
+1 on the “Top 10 hacks of the year”!
Sophi, Mike? This would make a great January article.
I like the idea but I dread the work involved when you have to change out a cable (and you will).