It might surprise you, Dear Reader, that not every project featured on Hackaday needs to pulsate with LEDs, or update the world about its goings-on over Twitter. They don’t even, contrary to what you may have heard, need to have an Arduino inside. No, sometimes you can pull off a pretty neat hack with nothing more than some wood, a couple of tools, and a unique idea which repurposes something that would otherwise be in a landfill.
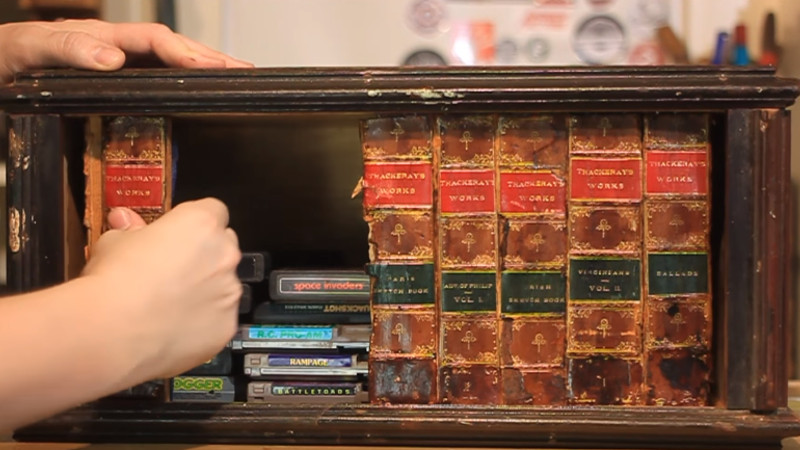
Such is the case with the latest project from [Keith Decent], which uses plywood and the spines of old books to create a secret compartment “bookshelf”. The concept is probably best described as a roll-top desk on its side, and while the action does appear a little stiff, it scores extra points for how easy it looks to replicate.
Using a router, [Keith] cuts a channel into the top and bottom sheets of plywood, which the “books” will eventually ride in. This channel goes around the entire perimeter of the shelf, and it’s important to make it as straight as possible so nothing binds up. To make sure things move through as smoothly as possible, some sandpaper is used to clean-up the inside edges.
 The next step is to rip some books apart and salvage their spines. Used books can be purchased for next to nothing at flea markets, so even if you don’t have a home library filled with vintage tomes to eviscerate, it should be easy enough to get your hands on some if you want to build your own version. For sanity’s sake it would seem that books with the same size spines are ideal, so keep an eye out for old sets of encyclopedias and the like.
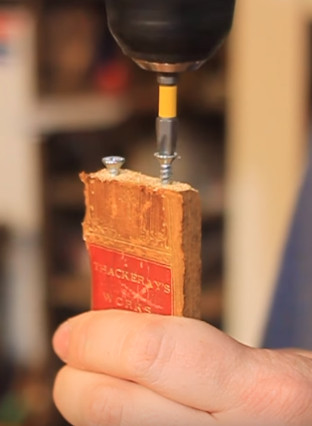
When the spines are removed from the books, they get glued to individual wooden slats. These slats then have holes drilled in the top and bottom, and standard wood screws driven in to act as “rollers”. Real rollers would undoubtedly make for smoother action, but you can’t beat his method if you’re trying to get it done cheaply and quickly.
The slats are then glued onto a piece of fabric, creating what is referred to as a tambour. The fabric backing links all the slats together and makes it so that pushing and pulling one slat will move them all together as one. The book spine tambour is then inserted in the routed channel, and the back panel of the shelf can be installed to lock it all together.
At this point the project is essentially done, but [Keith] does take it the extra mile by sealing all the book spines and doing some finish work on the shelf to make it look more like a real vintage piece of furniture instead of some scrap plywood screwed together.
If this exercise in woodworking has gotten you interested in the wonderful world of dead trees, you’re in luck. We’ve covered several woodworking projects from the hacker perspective, so you won’t be completely lost.


Cool..old encyclopedias Are a good candidate For scraped books.
aren’t all encyclopedias old encyclopedias?
Shd look that up in an encyclopedia to find out. E is that shredded pile in that trash bag over there.
Enjoy the memories because the only thing we’ll be able to show our kids is a Kindle.
You maybe lucky if anything is left on it, since Amazon has no problems mass deleting books that you have paid for.
Just be sure you check eBay or Amazon before slicing the spine off, you may regret ruining a rare $500 book.
+1
“The next step is to rip some books apart and salvage their spines. Used books can be purchased for next to nothing at flea markets, so even if you don’t have a home library filled with vintage tomes to eviscerate, it should be easy enough to get your hands on some if you want to build your own version.”
Some used book stores sell this by the box since they get so much stuff.
I’m thinking that screws without a sharp edge around their head, like sheet metal screws, might slide easier in the groove than wood screws with sharp edges.
I know it would have taken longer, but I wonder if he couldn’t have even used small wooden dowels driven into holes drilled in the slats. Then just put some kind of wax in the track so the wood-on-wood doesn’t bind.
i likely could have used dowels, but a big reason i used the screws was because I could adjust them later more easily. I had originally started with wood tenons on the end of the slats, but i found that i was cutting away at them to make the fit better, but when I needed to elongate one I was out of luck. Getting the screws to sit flat against the bottom of the track for every slat was much much simpler. Added bonus that it was faster and simpler as well. The track was actually waxed, the footage just ended up int he lost realm of “the memory card was full and i didn’t realize.”
The flat top of the wood screws was ideal for setting the slats into the track well. I felt that a more rounded top would have caused the slats to rock laterally and bind up more. As it stands the edges of these cheap screws are pretty round anyway. Thanks for watching!
Nicely done :)
I cringed at 2 minutes 3 seconds.
https://youtu.be/bMsZ9YtE1j0?t=123
why?
Electric drill in one hand and the other hand holding a piece of wood (even though it is in a vice) that they are drilling into. It is one of those automatic mindless safety things that you should always do without thinking. It is a bit like always keeping both hands behind the cutting edge of a knife blade, even though 99.99% of the time nothing bad will ever happen.
yeah its certainly not the safest way to do it. The depth of field on the camera does make it look like my hands are a bit close to the drill than they were, but you’re not wrong, it’s one of those small shop risks we find ourselves taking in the middle of a large batch process without thinking. I’m extremely capable and comfortable with the drill, and i forget that isn’t the case with everyone and take risks on camera that i shouldn’t every once in a while. my bad.
Holding the lumber while you drill into its narrow end is a great way to drill into your hand.
“this guy who has no idea what he’s doing” designed, built, filmed, and wrote a guide for this in the span of two days between client work, using found materials, and had to make up the design as he went along. It’s a fun project that i had the idea for and thought i’d share the build. So lighten up, buttercup, before you become “that guy.”
The old video game carts in the secret compartment made my day! (Colecovision?) I think it is plenty nifty; sort of like an extended take on the old hollow book thing.
This^
Quite clever and yeah so digging the game carts. :)
I think this site is about sharing ideas, not perfection.
That said, how would you have done it differently?
No screws at all. Standard tambour doors or roll-top desk and organ keyboard covers simply have a thin remainder on the ends of the slats which fit in the groove loosely. If using fat tomes make the ends have a max width that can make it around the curves. This could be glued up from flat stock with nothing to mill off. You still have the groove to make but build up from laser cut flat stock would work.
The “sloppy” construction critique of of this project appears to be well done aged appearance, though there are molding mistakes perhaps all in the look.. Unfortunately the antique spines will shred with handling. Maybe 2 tabs of leather or something sticking out that looks like it was accidentally left there to pull on.
To start with he was leaving some tenons on the ends of the slats.
Yeah the case construction was made to look old/worn, so i didn’t bother doing the tightest job. Also i didn’t really feel the need to spend days on that aspect when it would look fine otherwise, so the trim is not coped or anything, just butted in some places. I was doing wood tenons at first, but it just wasn’t working out, so i swapped to the screw idea, which i was surprised worked as well as it did, and seeing how easy it was, i felt it was appropriate for this project. But yeah you’re pretty much spot on.
I like the way it looks. It would really camouflage well into an old bookshelf. If it were too polished looking it would stick out as weird and give itself away.
This project is ingenious. Clever way to use old books that get discarded. You can find old books at library book sales.
You’ll find even more in their dumpster the day after the sale!
DAMHIKT