Imagine A Cluster Of ESP32s

When the ESP32 microcontroller first appeared on the market it’s a fair certainty that somewhere in a long-forgotten corner of the Internet a person said: “Imagine a Beowulf cluster of those things!”.

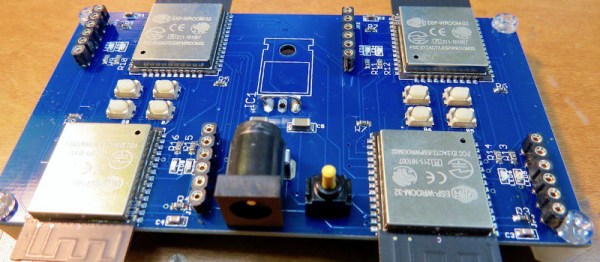
Someone had to do it, and it seems that the someone in question was [Kodera2t], who has made a mini-cluster of 4 ESP32 modules on a custom PCB. They might not be the boxed computers that would come to mind from a traditional cluster, but an ESP32 module is a little standalone computer with processing power that wouldn’t have looked too bad on your desktop only in the last decade. The WiFi on an ESP32 would impose an unacceptable overhead for communication between processors, and ESP32s are not blessed with wired Ethernet, so instead the board has a parallel bus formed by linking together a group of GPIO lines. There is also a shared SPI SRAM chip with a bus switchable between the four units by one of the ESp32s acting as the controller.

You might ask what the point is of such an exercise, and indeed as it is made clear, there is no point beyond interest and edification. It’s unclear what software will run upon this mini-cluster as it has so far only just reached the point of a first hardware implementation, but since ESP32 clusters aren’t exactly mainstream it will have to be something written especially for the platform.

This cluster may be somewhat unusual, but in the past we’ve brought you more conventional Beowulf clusters such as this one using the ever-popular Raspberry Pi.

Weather matrix lamp

Pi Weather Lamp Puts Lava Lamps To Shame

Representing the weather on an LED lamp in a manner that’s easy to interpret can be difficult, but [Gosse Adema]’s weather/matrix lamp makes it not only obvious what the weather is but also offers a very attractive display. For rain, drops of light move downward, and for wind, sideways. The temperature is shown using a range of colors from red to blue, and since he is situated in the Netherlands he needed snow, which he shows as white. A rainy, windy day has lights moving both down and sideways with temperature information as the background.

Weather matrix lamp

To implement it he mounted LED strips inside a 3D printed cylinder with reflectors for each LED, all of which fitted into a glass cylinder taken from another lamp purchased online. The brains of it is a Raspberry Pi Zero W housed in the bottom along with a fan. Both the LEDs and the fan are controlled by the Pi. He took a lot of care with power management, first calculating the current that the LEDs would draw, and then writing Python code to limit that draw. However upon measurement, the current draw was much lower than expected and so he resized the power supply appropriately. He also took care to correctly size the wires and properly distribute the power with a specially made power distribution board. Overall, we really like the thorough job he’s done.

But then again, what’s not to like about [Gosse]’s projects. In the area of lighting, he’s dazzled us with WiFi controlled Christmas tree ornaments, but he’s also delighted us with a Prusa i3 based LEGO 3D printer on which he printed LEGO parts and then made a special extruder for printing chocolate.

Hackaday Links Column Banner

Hackaday Links: The ‘S’ In ‘CES’ Stands For Snake Oil

Remember IRDA? Before we had Bluetooth and WiFi, the cool kids connected their computers and printers together over fancy Infrared connections. Yes, your computer probably still has the drivers, but the hardware is nowhere to be found. For good reason, too: we now have Bluetooth and WiFi. This year, at CES, IRDA is making a comeback. MyLiFi is a product from OLEDCOMM that puts infrared connectivity in a lamp. All you need to do is plug an Ethernet cable into a desk lamp, a proprietary dongle into your computer, and you too can reap the benefits of a wireless connection with a range measured in meters. One of the selling points of this product is that this gives you wireless Internet ‘without radio waves’, marketing to the idiots who think RF causes cancer or whatever. It’s a stupid product that’s a highlight of the entire trade show.

During this year’s CES, Intel tweeted, “With each person on earth soon to be producing ~1.5 GB of #data each day, it is a resource without limits“. Two criticisms: First, ‘Earth’ should be capitalized. Second, data mined from individuals — which includes personal data and metadata including where you were, and who you talked to — is a resource to be extracted by capitalism. Welcome to the post-privacy society, brought to you by #CES2018.

Oh, crap, we’re getting into cryptocurrency…

Kodak has announced their own blockchain. Is Kodak going to the moon? Yes, but hold on: this might be a good idea. Kodak wants to use a blockchain for ‘image rights management’, where photographers can register, archive, and license their work. It’s a blockchain, and also a solution to a problem: something you don’t see much of these days. Shares of KODK shot up from $3.15 on Monday to somewhere north of $10 this week. Is it a good idea? Who knows, but someone put the word ‘blockchain’ in a press release and made a buttload of cash.

The guy behind the Maker Movement wants to create a blockchain platform for Makers. Who’s this guy behind the Maker Movement? Mark Hatch, former CEO of TechShop and someone who is purportedly on the board of Maker Media (Oh, that’s how Make got the scoop on the TechShop closure -ED). He’s creating a Blockchain for Makers. This blockchain will take two forms. The first is to allow ‘easy confirmation of skills’? Is little Bobby certified to use the table saw? Check the Blockchain. The second barb in our paw is a ‘currency token’ that provides an easy way to pay for related goods or services. There’s no mention if these services are makerspace dues, or some sort of payment system where creators can collect money from people who really really want Raspberry Pis stuffed into 3D printed Nintendos.

In drone news, I am reporting there are no fixed-wing drones on display at CES. Last year, Underwater ROVs outnumbered autonomous fixed-wing aircraft, and this year the scales tipped even further towards submersibles. The laws of physics don’t change for 1/10th scale aircraft, and fixed-wing drones will be more efficient than their multicopter counterparts at nearly every task.

We all know (or should) that safes in Las Vegas hotel rooms aren’t secure. CES 2018 has finally innovated on the hotel safe and come up with something you really don’t want to put your money, wallet, or passport in. It’s an Internet of Things safe. What are the features? Well, it’s small and lightweight and provides little in the way to mount anything. That’s great if you just want to steal the entire safe. But what about breaking into the safe? Don’t worry, the entire thing is made out of plastic. A quick whack to the top of the safe will open it right up.

Cable Cutting Machine Makes Fast Work Of A Tedious Job

We’ve all been there: faced with a tedious job that could be knocked out manually with a modest investment of time, we choose instead to overcomplicate the task and build something to do it for us. Such was the impetus behind this automated wire cutter, but in this case the ends justify the means.

That [Edward Carlson] managed to stretch a twenty-minute session with wire cutters and a tape measure into four days of building and tweaking this machine is pretty impressive. The build process was jump-started by modifying an off-the-shelf wire measuring machine, of the kind one finds in the electrical aisle of The Big Orange Store. Stripped of the original mechanical totalizer and with a stepper added to drive the friction wheels, the machine can now measure cable by counting steps. A high-torque servo drives a stout pair of cable shears through a nifty linkage, or the machine can just measure the length of cable without cutting. [Edward]’s solution in search of a problem ends up bringing extra value, so maybe the time spent was worth it after all.

If the overall design looks familiar, you may be thinking of a similar of another cable-cutting bot we featured a while back. That one used a filament extruder and was for lighter gauge wires than this machine. Continue reading “Cable Cutting Machine Makes Fast Work Of A Tedious Job”

Aluminum No Match For 3D Printed Press Brake Dies

If you’re looking for a get-rich-quick scheme, you can scratch “Doing small-scale manufacturing of ultralight aircraft” off your list right now. Turns out there’s no money in it. At least, not enough money that you can outsource production of all the parts. Not even enough to setup a huge shop full of customized machining tools when you realize you have to make the stuff yourself. No, this sounds like one of those “labors of love” we always hear so much about.

So how does one do in-house manufacturing of aircraft with a bare minimum of tools? Well, since you’re reading this on Hackaday you can probably guess that you’ve got to come up with something a bit unorthodox. When [Brian Carpenter] of Rainbow Aviation needed a very specific die to bend a component for their aircraft, he decided to try designing and 3D printing one himself.

Printing a die on the Zortrax M200

He reasoned that since he had made quick and dirty dies out of wood in the past, that a 3D printed one should work for at least a few bends before falling apart. He even planned to use JB Weld to fill in the parts of the printed die which he assumed would start cracking and breaking off after he put it through a few cycles. But even after bending hundreds of parts, wear on the dies appears to be nearly non-existent. As an added bonus, the printed plastic dies don’t mar the aluminum pieces they are bending like the steel dies do.

So what’s the secret to printing a die that can bend hundreds of pieces of aluminum on a 20 ton brake without wearing down? As it turns out…not a whole lot. [Brian] attributes the success of this experiment to designing the die with sufficiently accurate tolerances and having so high of an infill that it may as well be solid plastic.

In fact, the 3D printed die worked out so well that they’ve now expanded the idea to a cheap Harbor Freight brake. Before this tool was going more or less unused as it didn’t have features they needed for the production of their parts, namely a radius die or backstop. But by 3D printing these components [Brian] was able to put the tool back to work.

We’ve previously covered the art and science of bending sheet metal, as well as a homebuilt brake that let’s you do it on a budget even Rainbow Aviation would scoff at. So what are you waiting for? Go build an airplane.

Thanks to [Oahupilot] for the tip.

Continue reading “Aluminum No Match For 3D Printed Press Brake Dies”

Not So Simple LED Upgrade For Microscope

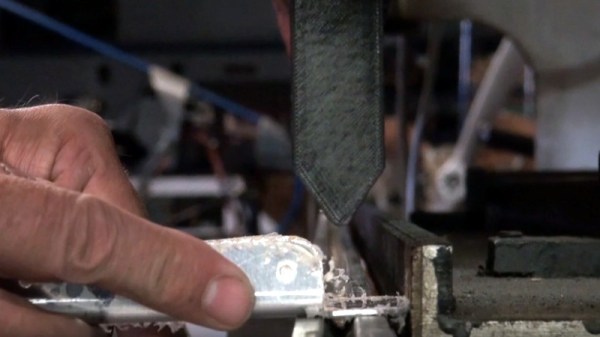
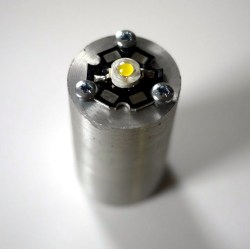
[Amen] obtained a microscope whose light source was an incandescent bulb, but the light from it seemed awfully dim even at its brightest setting. Rather than hunt down a replacement, he decided to replace the bulb with a 1W LED mounted on a metal cylinder. The retrofit was successful, but there were numerous constraints on his work that complicated things. The original bulb and the LED replacement differed not just in shape and size, but also in electrical requirements. The bulb was also part of an assembly that used a two-pronged plug off to the side for power. In the end, [Amen] used 3D printing, a bit of metal work, and a bridge rectifier on some stripboard to successfully replace his microscope’s incandescent bulb assembly with an LED. He even used a lathe to make connector pins that mated properly with the microscope’s proprietary power connector, so that the LED unit could be a drop-in module.

Working on existing equipment always puts constraints on one’s work, usually due to space limitations, but sometimes also proprietary signals. For example, a common issue when refitting a projector with an LED is to discover that the projector expects a stock bulb, and refuses to boot up without one. Happily, the microscope didn’t care much about the bulb itself, and with the LED positioned in roughly the same position as the original bulb’s filament [Amen] obtained smooth and even lighting across the field of view with no changes made to the microscope itself.

DIY Bookshelf Is More Than Meets The Eye

It might surprise you, Dear Reader, that not every project featured on Hackaday needs to pulsate with LEDs, or update the world about its goings-on over Twitter. They don’t even, contrary to what you may have heard, need to have an Arduino inside. No, sometimes you can pull off a pretty neat hack with nothing more than some wood, a couple of tools, and a unique idea which repurposes something that would otherwise be in a landfill.

Such is the case with the latest project from [Keith Decent], which uses plywood and the spines of old books to create a secret compartment “bookshelf”. The concept is probably best described as a roll-top desk on its side, and while the action does appear a little stiff, it scores extra points for how easy it looks to replicate.

Using a router, [Keith] cuts a channel into the top and bottom sheets of plywood, which the “books” will eventually ride in. This channel goes around the entire perimeter of the shelf, and it’s important to make it as straight as possible so nothing binds up. To make sure things move through as smoothly as possible, some sandpaper is used to clean-up the inside edges.

The next step is to rip some books apart and salvage their spines. Used books can be purchased for next to nothing at flea markets, so even if you don’t have a home library filled with vintage tomes to eviscerate, it should be easy enough to get your hands on some if you want to build your own version. For sanity’s sake it would seem that books with the same size spines are ideal, so keep an eye out for old sets of encyclopedias and the like.

When the spines are removed from the books, they get glued to individual wooden slats. These slats then have holes drilled in the top and bottom, and standard wood screws driven in to act as “rollers”. Real rollers would undoubtedly make for smoother action, but you can’t beat his method if you’re trying to get it done cheaply and quickly.

The slats are then glued onto a piece of fabric, creating what is referred to as a tambour. The fabric backing links all the slats together and makes it so that pushing and pulling one slat will move them all together as one. The book spine tambour is then inserted in the routed channel, and the back panel of the shelf can be installed to lock it all together.

At this point the project is essentially done, but [Keith] does take it the extra mile by sealing all the book spines and doing some finish work on the shelf to make it look more like a real vintage piece of furniture instead of some scrap plywood screwed together.

If this exercise in woodworking has gotten you interested in the wonderful world of dead trees, you’re in luck. We’ve covered several woodworking projects from the hacker perspective, so you won’t be completely lost.

Continue reading “DIY Bookshelf Is More Than Meets The Eye”