
If you were building a recreation of the James Watt micrometer, where would you start? If you’re [rasp], the answer would be: “Spend a year trying to find the best way to make etched brass discs.” Luckily for us, he’s ready to share that information with the rest of the world. While it’s rather unlikely anyone else is working on this specific project, the methods he details for getting museum-quality results on brass are absolutely fascinating.
 The process starts with sanding down the bare brass and applying a layer of clear packing tape to the metal. [rasp] then covers the piece with LaserTape, which is a special tape designed to make laser-cut masks for sandblasting. But the masking principle works just as well for painting or chemical etching.
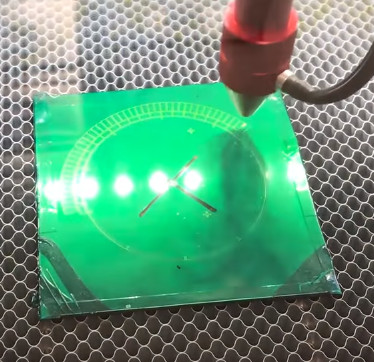
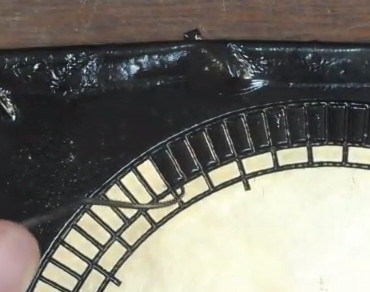
With the LaserTape in place, the piece is then put into the laser and the mask is cut out. Once cut, there’s the tedious task of peeling off all the cut pieces of tape, which [rasp] does with a dental pick. Once the pieces are pulled off, the brass is ready for its acid bath.
Anyone who’s etched their own PCB with ferric chloride will recognize these next steps. The piece is put into the acid bath and agitated every 10 minutes or so. It’s interesting to note that [rasp] places the piece in the bath upside-down, using little 3D printed “feet” to suspend the brass sheet off the bottom of the container. This allows the debris from the etching process to fall down and away from the piece. After about an hour out in the sun, the piece is pulled out of the bath and carefully washed off.
 Once clean off, the piece is sprayed with black spray paint to darken up the etched areas. The moment of truth comes when the paint has dried and the layers of tape are carefully peeled back to reveal the etching. [rasp] then wet sands the piece with 1000 and 2000 grit paper, and a final pass with polishing compound brighten up the surface to a mirror-like shine. It’s quite a bit of manual labor, but the end result really is spectacular.
In the video after the break, [rasp] breaks down the entire process, including the additional machine work required to turn these brass plates into functional components of the final machine. As an added bonus, he even includes a lot of his failed attempts in an effort to keep others from making the same mistakes. Something we love to see here at Hackaday.
The process used here is similar to the snazzy brass name plates we showed earlier in the year, and has even been done without a laser using photoresist.
[via /r/DIY]


Here’s another way many people here might relate to:
Clickspring does some truly gorgeous work.
https://www.youtube.com/watch?v=qpy5O0b7cL8
Great project and presentation!
When using the lacquer wouldn’t it be easier to use lacquer remover than sanding it down.
I the army we had to remove the lquer w Brasso… which is so fine, it polishes sunglasses right up! Mean to try it on my oxidized headlights.
try sanding then using acitone vapour to polish ;)
This seems a like a very complicated and expensive process compared to just using photo resist.
I think it’s good to know more than one way to do most things…because sometimes you want to get it done with things you have in-hand, today, and that won’t always be the very best possible unless you’re either luckier or better organized than I am – and I’m pretty lucky as a rule…
I am totally disorganized but one solution requires a laser cutter and special tape and the other requires stuff I could get (admittedly at inflated prices) at the electronics store in town. I wonder if the iron on laser printed toner transfer thing people used to make boards with would work here. I recall that needing not much more than some common household supplies and an iron. https://hackaday.com/2016/09/12/take-your-pcbs-from-good-to-great-toner-transfer/
Don’t know from first hand experience, but people say they get worse resolution from toner transfer than I always got from photoresist – which did 8 mil tracks and spacings for me easily. YMMV? Again, more than one way to do it. Sometimes you just gotta run whatcha brung.
I’ve found that toner transfer resist and etching techniques for copper-clad PCBs work exactly the same for brass (and stainless steel, for that matter). One small potential difference might be that brass sheet stock has more thermal mass than PCB cladding, so e.g. using a laminating press might be more difficult. I use a clothes iron, with no change in technique.
After hearing “thanks for watching” I immediately continued in my head … “and keep your dick in a vice” :p
every time I have tried etching a PCB face down I end up trapping gas bubbles which in turn leaves defects. I have tried floating them, and as soon as you agitate it sinks face down to the bottom of the container, and I have tried stand off’s, which are fine if they are attached to the material, otherwise it falls off
suspended face down does speed up the process a bunch but I have since stopped bothering cause a fast etch is no good when there is a 2mm bubble right in the middle of a group of pads for a SOIC or something similar
Disclaimer: I’ve never etched anything in my life.
Why don’t you try putting some sort of agitator in the liquid while etching face-down, to keep the gas bubbles moving (and coming out from under the piece)? Use some cheap $3 electric motor with a piece of plastic glued on to the shaft just flopping around in the solution? :)
I drill a 2mm hole in the pcb, a mounting hole for example, and put a long (say 70cm/27″) insulated wire (single core) through it, the twist the bit near the PCB. That way I can agitate the PCB instead of the acid. You can also regularly check and get it out easily.
What are the pros and cons of this method versus CNC engraver-paint-polish? This laser method can get sharper corners, which is nice. Anything else? It also masks for paint. Sanding off paint is too much work, too hard to do evenly without ruining the flatness?
How about engraving through packing tape? I had a 140lb drum of ferric chloride powder ages ago. It was about $60 at the time. It is a common industrial chemical and a couple bottles of hobby stuff will pay for a drum. Anhydrous Ferric Chloride is 54 US cents a kg in India I see. I think I’ll check US chemical suppliers, just for the halibut.
A friend of mine used to etch stuff onto steel knifes (this was years ago). I don’t remember if the etches were deep, but to looked really nice. His method was using electrical tape and a laser cutter to create a mask, then etching it away with electrolysis. He used saltwater and used an electrode to rub in the general area where he wanted to etch. The result looked really good.
I’ve made large brass plate using etching and vinyl cutter, just cutted out shapes and glued that on brass plate, removed insides and just etched this.
The Mantinia font is fairly close to old 18th century instrument engraving.
https://fonts.adobe.com/fonts/mantinia