When I got my first 3D printer I was excited, but now that I’m contemplating adding a forth to my collection, I have to come to the terms with the fact that these machines have all the novelty of a screwdriver at this point. Which is fine; getting the cost down and availability up is the key to turning a niche piece of technology into a mainstream tool, and the more people with 3D printers at home or in their workshop the better, as far as I’m concerned. But still, there’s a certain thrill in exploring the cutting edge, and I’ve been looking for something new to get excited about as of late.
Lasers seem like an interesting next step in my quest towards complete in-house fabrication capability, so I started researching cheap setups to get my feet wet. In the course of looking up diode-powered laser cutters, I came across the NEJE DK-8-KZ. At only 1W, there’s no question this device isn’t going to be cutting a whole lot. In fact, it’s specifically sold as an engraver. But given the fact that you can get one of these little guys for around $70 USD shipped, it’s hard to complain.
Now I wasn’t 100% sure what I would do with a laser engraver, but I thought it would be a good way to test the waters before putting serious money (and time) into something more powerful. Plus, if I’m being totally honest, I wanted to start on something on the lower end of the power spectrum because I’m terrified of blinding myself.
So what kind of laser do you get for $70? Let’s find out…
Hardware
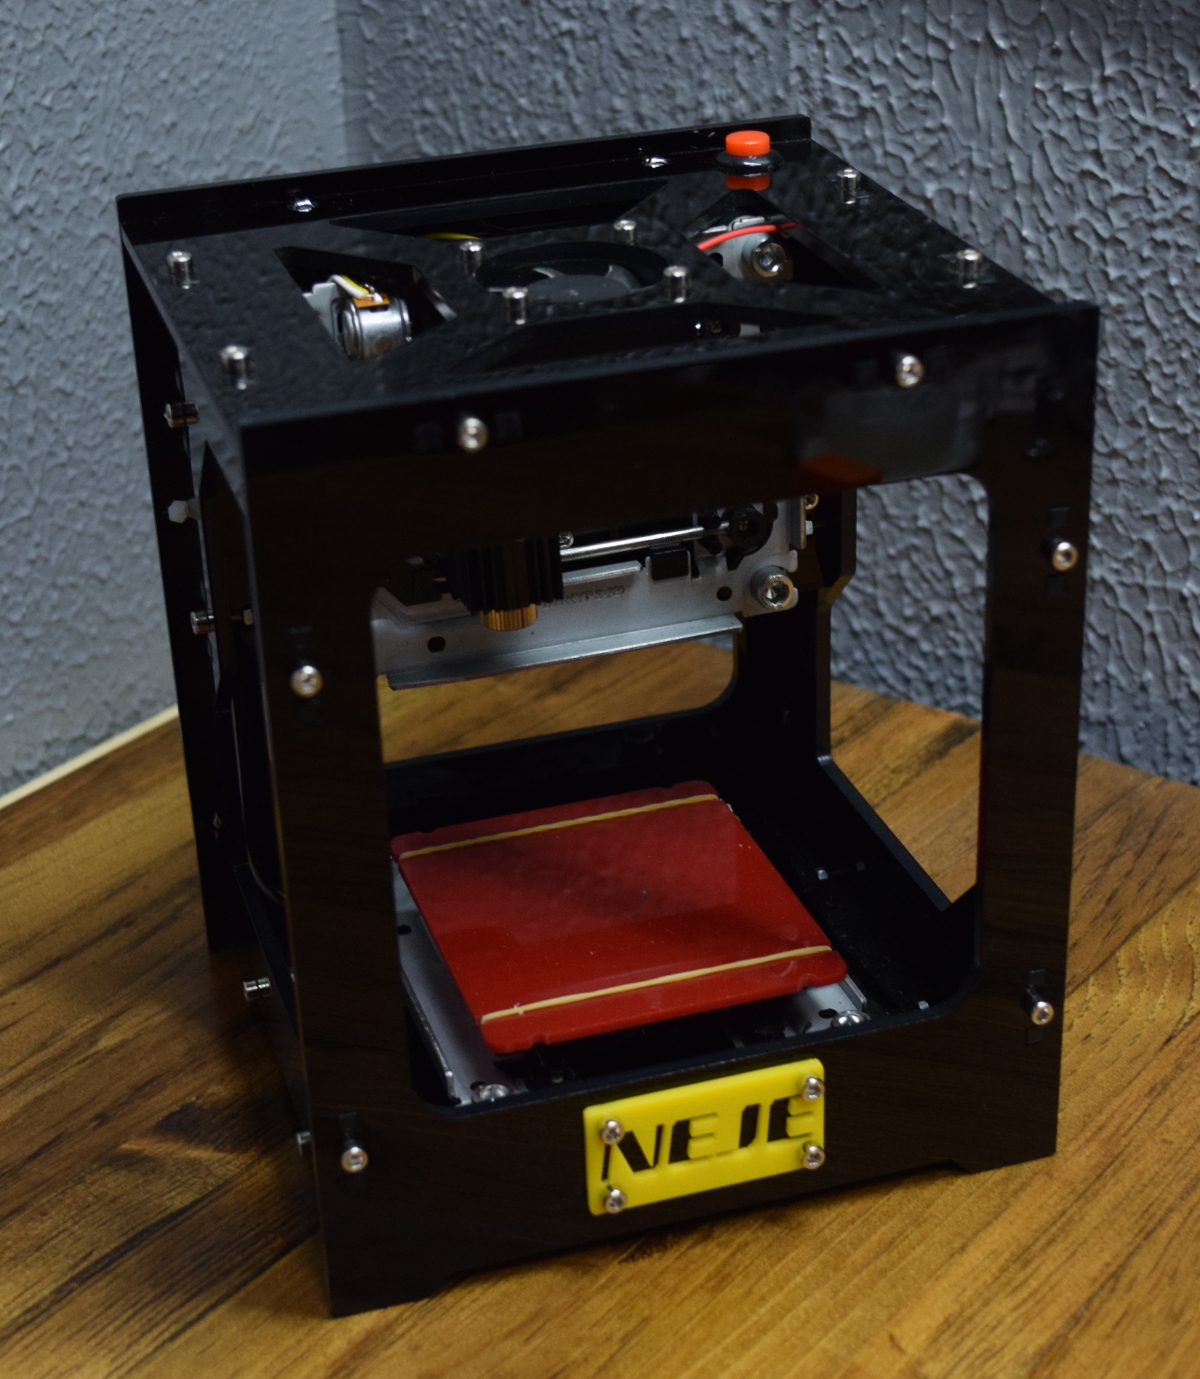
Made of black laser-cut acrylic and held together with stainless steel cap screws, the DK-8-KZ has the look of something that was built from a kit but with good enough fit and finish that it doesn’t feel cheap. Not to say it could be called substantial by any stretch of the imagination, as it stands just under 8 inches tall. On one hand that means it’s convenient to toss up on the shelf when you aren’t using it, but the reality of the DK-8-KZ’s diminutive size is that it has an extremely small working area of approximately 40 mm x 40 mm.
There’s an excellent reason the DK-8-KZ is limited to such a small and specific range of motion: both the X and Y axis of the device are riding on hardware reused from optical drives. I get the impression that a warehouse full of largely-obsolete optical drives was found in China, and somebody had the brilliant idea of using their accurate motion as the basis for a whole line of tiny laser engravers. (Editor’s Note: we tried to find the earliest occurrence of such a device on Hackaday, and came up with this machine. See if you can find something older!)


Software
The NEJE DK-8-KZ does come with a disc that has drivers and software for the device, but I promptly threw that in the trash. For one, I wouldn’t trust the pack-in software with this device any farther than I could throw it. But more practically speaking, I don’t have a Windows computer anymore so it wouldn’t have done me any good. Luckily, the NEJE DK-8-KZ has a relatively simple control protocol and there are a few projects out there to get it up and running.
Personally, I’ve been using EZGraver and have had excellent luck with it. It’s open source and works on Linux, Windows, and OSX. It even has a command line interface if you don’t want to use the Qt front-end.
The workflow is pretty simple with EZGraver. After connecting to the hardware, you load up a 512 x 512 black and white image and adjust the scale and rotation controls as necessary. There’s also a setting for how long you want the laser to burn for, which becomes important when dealing with different materials. Once the preview looks good and your burn time is set, you upload the job to the NEJE DK-8-KZ and click “Start”.
One thing I found interesting with the NEJE DK-8-KZ is that the computer doesn’t directly control it. The image and the selected settings are uploaded into the machine, and after that you can disconnect the computer and use it un-tethered by simply hitting the red button on the top of the machine to start the burn.
Annoyances
I don’t want to beat up the NEJE DK-8-KZ too bad, as it’s very cheap, and you can assume that the experience isn’t going to be perfect when you’re buying a product made of DVD drive carcasses. But there’s still a few things that need mentioning if you decide to walk down this path.
First, powering the thing. There’s a 5 V power barrel-type power connector on the side of the device, for which you need to provide your own AC adapter. But even if you’ve got that connected, the board needs its own 5 V over the USB connection. Long story short, even if you aren’t using the NEJE DK-8-KZ connected to your computer, you need to have both ports powered. This isn’t a huge deal with how common 5 V USB power adapters are (I’ve got a whole box of them), but seems pretty sloppy.
Probably the biggest issue I found with the NEJE DK-8-KZ is the quality of the optics. You need to manually focus the laser onto the object you’re working on, as the focal point needs to be as tight as possible to get a good burn. The only problem is that the focusing lens dances all over the place when you turn it. There’s no way to bring the laser into focus without the focal point drifting around, which means doing something as simple as pausing a burn to adjust the focus becomes effectively impossible.
Lastly, while it isn’t a huge deal, I have to bring up how they handled homing the laser. There’s no end-stop switches as you might expect, and instead the firmware simply runs the motors backwards for 20 seconds or so; making a terrible grinding noise every time you turn it on.
Practical Results
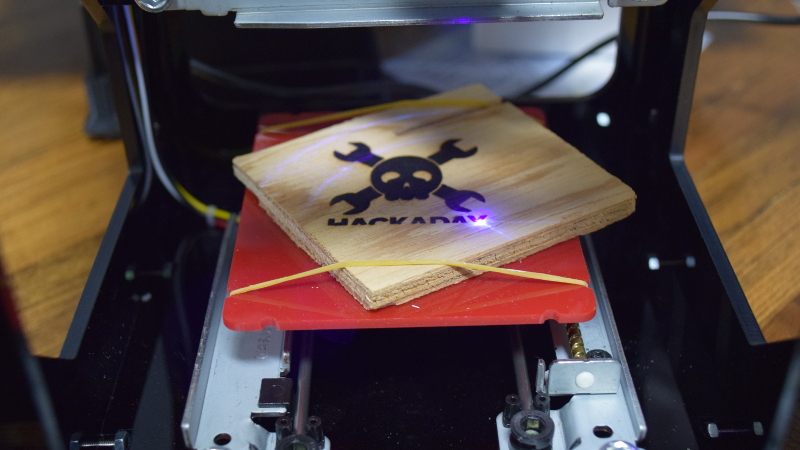
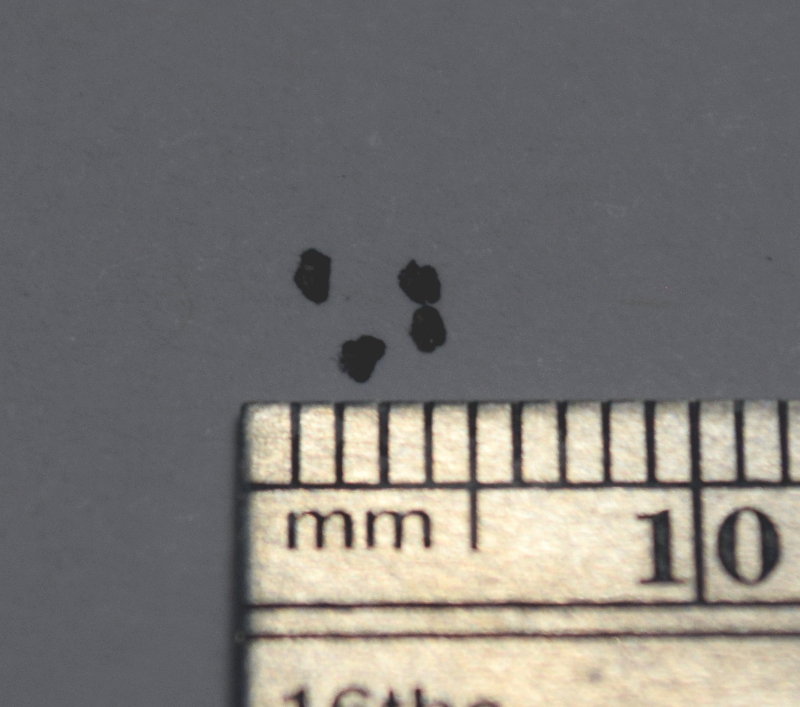
Of course, the real question with something like is how well does it actually burn. As it turns out, quite well. I’ve burned paper, cardboard, wood, and plastic with excellent results. It can easily cut through paper and 3M painter’s tape, which holds some interesting possibilities in terms of making stencils for painting and etching.


But what about…
If you’re reading Hackaday you probably want to know if you can use the NEJE DK-8-KZ to make PCBs. In the past we’ve shown somebody using a very similar device with pre-sensitized photoresist PCBs, so that should work well enough.
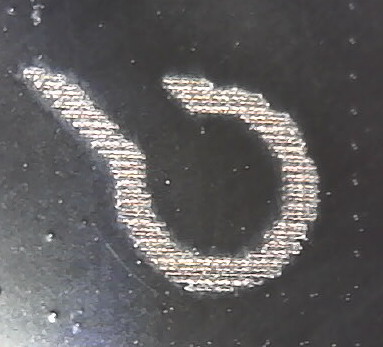
But what if you just have some regular copper clad board? I tried spraying a scrap of board with black paint, but the laser doesn’t seem strong enough to ablate it away fully. I had much better results using black nail polish, but still haven’t quite found the proper settings to get a clean burn all the way through. When viewed under a microscope you can see that the laser isn’t completely removing the nail polish, which has hindered my attempts at etching so far.
I haven’t given up yet. The trick might be multiple passes with the laser, or even some kind of abrasive or brushing after burning the board to knock off the last little bits of nail polish. I plan on keeping at this, and will post an update if I manage to get some good boards out of the NEJE DK-8-KZ.
Final Thoughts
The NEJE DK-8-KZ is such an old hack that if somebody sent it into the tip line as their own project, we’d ask ourselves if we wanted to run yet another CD-sled CNC machine. (Sure, we would!) That’s not meant to knock it — honestly I’m impressed at what NEJE managed to do with what is essentially e-waste. Turning a dirty hack like that into a product is worth at least a hat-tip, if not a few Jolly Wrenchers. It isn’t perfect, but once you get used to the quirks the results speak for themselves.
This thing isn’t nearly as good as other “cheap” lasers out there, and it doesn’t hold a candle to something like the K40. But for $70, I think it’s a pretty great buy. It’s unlikely to be your last laser, but it’s a great choice for your first one.


I wonder if combining chemical etching with the laser would work. Like, cover plain copper clad with a thin dark-colored layer of weak etchant that works very slowly at room temperatures, but speeds up when heated.
Done with this machine to engrave metal, with a matte black spray paint on aluminium sheet.
After burning the matte paint, a little brushing with dish scrubber sponge to remove still attached paint flakes on the burned area, then some drops of 35% hydrochloric acid on the surface. 30s after, I had around 0.1mm on aluminium removed.
Then a water cleaning, and after an acetone bath removed the remaining paint to have a nicely engraved aluminium plate.
This matte paint trick may work on PCB.
Wouldn’t simply spending a bit more for a solid state laser to mount on one of your numerous 3d printers have been a better plan?
i saw a kit from jtechphotonics for this that is compatible with various 3d printers. for example it would connect to my printrbot by using the fan header to control the laser. there are several diode options form 1w to 3.8w. prices ranging in the $260 – $475 range. it looks like a nice kit but the price kills it. i think id just get me a diode off ebay, or better yet, the scrapheap, and make my own. id have to wire up a mosfet to toggle the laser on and off using the fan signal and then its just a matter of generating the right gcode.
That’s my plan. I assume there’s a hitch somewhere. Anyone have some advice?
this is the project I folllowed..http://lokspace.eu/anet-a8-3d-printer-laser-engraver-mod/
“Lasers seem like an interesting next step in my quest towards complete in-house fabrication capability, so I started researching cheap setups to get my feet wet.”
I’m kind of reminded of a kitchen full of various specialized cooking appliances.
Some “specialized cooking appliances” or gadgets are great. Others just get in the way…
(sigh!)
https://www.youtube.com/watch?v=FgFeVlw2Ywg
Adding a forth to the collection.
: HELLO ( — ) CR .” Hello, world!” ;
Made me laugh crying too. Then i read he´s terrified of getting blinded by lasers, so he buys a cheapo 1W engraver WITHOUT ENCLOSURE.
Meatbags are SO approximate illogical beings…
This right here.
I just found this same model on Ebay for $35 and free shipping. There are 10 left.
I just searched eBay and didn’t find any under $69.99
https://www.ebay.com/sch/i.html?_from=R40&_nkw=NEJE+DK-8-KZ&_sacat=0&_pgn=2
https://www.ebay.com/itm/172805846521
That listing is for a replacement laser for that machine, not the entire assembly.
do you want a $30 picture and $30 box too?
https://www.ebay.com/itm/NEJE-DK-BL1500mw-3D-Laser-Engraver-/272835753604?_trksid=p2385738.m4383.l4275.c10
$32 actually.
Thats a spool of filament. The engraver in this listing is 150$
That is “Type2:3D” which is “filament”, if you select “Type1:3D”, it shows “laser” and a price of $149.99
(sigh!)
The $69.99 has $22+ for shipping, while one for around $73 has free shipping…
I found it for $17, at that price it’s worth the potential scam, only 3 left though
Looks like that is just for the laser, not the whole unit.
No, you and the other guy got it wrong.
You found a head only auction, but saw the picture for the whole machine and made an assumption.
He found the cheap price from the “list of options with something cheap to get up in the results scam”,
The actual printer was $149.99
Damn! You guys are right. All I did was copy and paste the model number from the article and ebay showed up in a search and it said $32 BUT, when you actually choose that model shown in the photo, it is $150. Sorry I missed that you guys. What a scumbag way of listing something. I would have been very disappointed had I ordered it.
No worries mate!
I make similar mistakes too!
Yeah, this actually caught me a couple times as well. They way the make the listing it seems like you’re getting the whole machine, but it’s just the replacement laser.
Page break please.
The defuse reflection from a 1W laser can already damage your eyes. So, safety first on these things!
1W is in the put-it-in-a-box category. That’s why we have webcams. Because you don’t care if the webcam goes blind.
“Won’t someone think of the webcams?” :-)
B^)
RIP Photonicinduction’s old camera
Warning: Do not view laser beam with remaining webcam!
yeah, disappointing to not see that called out at all in the article.
Question: Obviously for certain materials, certain metals for example, I imagine this simply wouldn’t apply– The thermal dissipation of the material would simply be too high. But, otherwise, with a ‘low power’ laser such as this, if you just let the beam ‘sit’ in one area, might it, eventually, possibly cut through the material ? Or it just does not work that way… ?
Doubt it, you need enough power density to vaporize the metal. You need to be able to quickly blast the top surface off, which rapidly increases the absorptivity, yielding higher energy transfer and the hole gets deeper. Metals have higher boiling points, so it’s hard to get that initial ablation of the surface. I dunno a whole lot about it however, it might work with a very thin foil, like much thinner than tin foil kinda thin.
I have a general question about laser cutters. Do they have a lower power setting that allows them to act as engravers? I assume so, but thought I should ask.
yes, power and movement speed can be adjusted.
Depends on your controller. Some have PWM control, some have TTL to constant current control. Some do not. So you simply run it at faster speed across the item.
Working on my own laser PCB maker as well. Have decided to go the dry film photo resist route. Expose it with the laser and etch away. Seems like it will honestly be the most reliable as well.
If you can get the beam right, UV laser + UV cure resist is a great technique for the quick and dirty.
That’s the plan! Strapping a Suka-K3 style uv laser on my heavily modified XYZ davinci 3d printer if it all works out ~7″x7″ pcb fabrication space :D Joy of using it on my printer is I get z axis adjustment so I can dial in my focal height nicely if needed with out playing with the lens!
I have an Anet A8 laying around after getting my CR-10S. I was wondering if I could do this with the Anet. I found this link http://lokspace.eu/anet-a8-3d-printer-laser-engraver-mod/ where they used an Anet A8 as laser engraver.
When I used laser / paint PCB etching methods, I’d rub the surface with a little bit of toothpaste to get the excess powder and material out of the grooves.
Good tip, I’ll have to give that a shot.
using k40 + paint, just need some time to get it right
@macegr: Meh! What do _you_ know about laser etching?!
Have you seen the way this guy does it, way back in 2008?
(Which brings up the obvious question: what are you doing now?)
Do, how much it cost this engraver??
I’ve been looking at the PCB making process, and the consensus seems to be that ablating pure copper is not going to work because the copper acts as a giant heat sink and also has a tendency to reflect back into the laser which is bad. I have built a X-Y-Z Grbl capable frame with a view to adding multiple heads – etching or drilling PCBs, lasering PCBs and also spot placement of solder paste (which is really easy to do automatically with a simple bit of OpenCV on the board layout to get the pads identified — whether it’ll actually work satisfactorily remains to be seen!). Like Tom, I think there is scope for multiple passes with copper clad board, and also for combining several small lasers into a more powerful one using e.g. hexagonal quartz rod (not my idea, stolen from a post on a physics board on the net).
Thats why you use a cover layer of paint. You are burning the paint away, leaving a negative you can etch, much like toner transfer methods. No one is trying to burn copper with a diode laser.
I’ve talked to a few people who own laser engraving businesses that have picked up a few of these for small, simple jobs, and are quite pleased with them. For example, they are great to take to trade shows/etc. to make small ornaments/pendants/etc.
It is so simple to get a photosensitized board and print the traces on transparencies with a laser printer, why go to all this trouble? My guess is the quality is superior to anything you will get with this technique.
Fun? To see what would happen? To find another use for equipment you own?
Or maybe Tom wanted to check if your guess was right. ;)
I picked up one of these last year and agree with all points in the article. For the price it is a neat little gadget. Successfully cut tape templates that were later used with a bead blaster to etch a pattern onto glass mugs. Made some interesting coasters. Etched contact details into the fake leather of a phone case (warning: toxic and corrosive gas, use an extractor). I would really like the work area to be twice the size but as stated in the article it’s not possible using this cheap re-purposed hardware.
Man, that’s a tiny heat sink. My 0.5W has one thats almost 1.5×1.5×3 inches big, not that tiny 0.4 inch mess.
I bought one and did some research.
There is my page with (RAW) data gathered.
It’s really rougth, and I may never update it, but maybe the serial data will interest someone :
(Warning, French page)
http://www.tdms.fr/diy/DK-8/
“I tried spraying a scrap of board with black paint, but the laser doesn’t seem strong enough to ablate it away fully. I had much better results using black nail polish, but still haven’t quite found the proper settings to get a clean burn all the way through.”
Although it could be said that this is more than half-way to the toner transfer method anyway, make some all-black pages on a photocopier to avoid the need to have your own laser printer and use an iron to transfer the toner over to the PCB.
This is the best paper by far for toner transfer I’ve ever used. There’s also an A4 size.
https://www.amazon.com/HP-Premium-Presentation-Glossy-8-5×11/dp/B003KU4DSW
Another idea – a thin, well-cured coat of black nitrocellulose lacquer:
http://www.stewmac.com/Materials_and_Supplies/Finishing_Supplies/Finishes_and_Solvents/Mix_and_Save_on_All_ColorTone_Aerosol_Lacquer/ColorTone_Black_Aerosol_Guitar_Lacquer.html
Has anyone used it for cutting fabric?
(If that works, it’ll be an easier sell with SWMBO -She Who Must Be Obeyed)
B^)
It does work.
No burning of the edges?
Generally, no. Works best with synthetics, but lasers generally vaporize the material, rather than actually burning them. On white and light fabrication, there may be slightly coloring but peroxide bleach (non chlorine) works in laundry to remove. If you are really concerned, masking tape prevents most discoloration. Just make sure cutting rate is high enough.
Built my current engraver for under $100.. $3 for Arduino Nano clone running GRBL, LaserGRBL software on PC, geekcycled rails (THK) for around 8×10″ workspace, EasyStepper drivers at $3 each, and $59 for 2.5w 450nm Blu-ray including goggles off eBay.
With 2.5w cutting up to 1/4″ basswood is possible with multiple passes, as is engraving glass (matte paint on backside, engrave through glass, paint ablation performs engraving) using TTL grayscale engraving is tricky but possible. Dithered image works better, as rails are leadscrew type, resolution of greater than 20 lines per mm is possible.
HIGHLY recommend you get goggles, they are cheap and will save your eyes!
https://youtu.be/CCtP9dCdvpc
Greyscale engraving with my rig
https://youtu.be/sjdiudcQz0s
Glass engraving
https://youtu.be/gyOC83Mewq4
“Magnified 250X” needs a scale to be meaningful unless you know how big the image is when it is displayed on my screen.
Mine arrived today, B^)
but I’ll be shoveling snow tonight…
B^(
I installed ExGraver on the Linux laptop last night.
For some reason “Brave” would not download the .zip file from GitHub, but FireFox did.
One step at a time…
I also bought a 1.25 inch (3.175 cm -Jenny) wooden dowel.
I intend to slice it into disks, and make them into “wooden nickels” for an upcoming event.
EzGraverUi (I mis-wrote ExGraver above) needs to be run under sudo, otherwise it didn’t give me permission to use the USB ports of the laptop to control the engraver.
On Linux, a permission to access USB device is required. It’s possible to run EzGraver as root, like “sudo EzGraver”, but it’s safer to enable access for users. Create a file /etc/udev/rules.d/99-engraver.rules with the following contents (substitute the actual vendor ID for XXXX & actual product ID for YYYY):
SUBSYSTEM==”usb”, ATTRS{idVendor}==”XXXX”, ATTRS{idProduct}==”YYYY”, MODE=”666″
To activate it, run:
sudo udevadm control –reload-rules
Then re-attach the USB cable to the engraver.
Unfortunately I am a Windows user and I tried using the drivers with Win10 to no avail so I dedicated a Win7 PC no AV or internet access just this box to the task and still nothing on the latest drivers from the web site. I am at a loss, I have tried many things and right now it’s a brick. I am looking for some 2015 or 2016 drivers that support this OS but not much luck there. You can’t contact the vendor , surprise there. Otherwise it looks cool for 70 bucks..
Is it Prolific usb-serial? Pl2303?
They are kinda junk. There’s a procedure and program (Google pl2303 fix) that works, but the pl2303 chip just generally seems crap.
I’d recommend swapping it with a ch340g or other usb-serial, or pull the Atmega from a spare Arduino and use the comm lines.
The cheap 2303 chips are just that..cheap. not reliable.
Ya I am not sure what that is. but I do appreciate the info this gives me something to read up on and an education on these USB controllers. Thank you for the info and your time
Probably the prolific then. Google pl2303 fix
Actually while reading this stuff, I wanted to note that I don’t even get this far. I am getting the USB not installed correctly and at the device manager it shows the yellow triangle that it didn’t like the device I am suspecting. If you have any input for this part to I would appreciate any info you may have.
Just got one of these. Supplied software appears to work fine. ezGraver didn’t work. It engraved the first few mm of the image and then just stuck on a line…
Anyway, my model has a single USB socket, no 5v barrel.
It has a battery inside but no on/off switch and it stops engraving if you disconnect the usb. So any idea why there’s a battery in there? (just a power reserve?)
Wow, yours sounds a lot different than mine!
Not sure about the battery you mentioned, (not even sure if mine has one) but I wonder if it would have enough power to run both the laser and motors alone.
Turns out, mine is the DK-8-FKZ, which uses the battery to provide high current for the laser, without needing the external 5v power supply.
I have the DK-8-FKZ also. Unfortunately ezgraver didn’t work for me either. Which is a shame because the mfg software is horrible. If anyone finds an alternative, please let me know.
Damn, it worked like a “charm” for me, except for a few problems with burn time, some steps will just reset it, some others just work.
Oh i got the -kz not -fkz,
nevermind
How long do you need to replace the laser?
In my experience the software provided for the device would have been optimized for it. The focusing issue may have easily been solved by the software. Could be wrong but it would be interesting to see if there is any improvement in the machine’s function.
Can it cut 2mm paperboard? If so, is the edges get burning marks? Thanks
I am working on a Web app to control the Neje DK-8-KZ.
Here is the guide for installation:
http://electronics.onebeartoe.org/3d-realization/laser/engraver/neje/engrave/
Please, could you send me the drivers and software to install the neje8?
Hi, so I bought one of these and they sent me metal dog tags with it and a black marker, but it hasn’t marked on the metal dogtags yet and I’m wondering if anyone has any idea how to get it to mark on them? I bought some LBT 100 metal marking spray, I adjusted the laser inside to different strengths and still don’t know what to do Anyone’s input would be greatly appreciated. Thank you. =)
It looks like the latest versions of the engraver have new firmware and a new protocol V4 which isn’t currently supported by the Linux EzGraver :-(
Hi! I can’t seem to make the EzGraver work on my Windows computer. Could you help me out? Which version to download?
I just purchased a 3000mW unit from eBay Australia for $59 Aud. – really cheap. Will the 3000mW laser do a better job with etching than 1000mW? For this price I thought it worth a try. Any thoughts on software in 2019?
I know I’m dated but I’m just getting into the laser engraving game, I started out with a NEJE DK-8-KZ 1000MW, then quickly purchased the kkmoon laser engraver 3000MW, both were impulse buys, I’m now looking at the co2 models but they seem too be a lot of mess, and extra stuff basically all I’m looking too do is engrave maybe try other thing but nothing really big.
I find myself leaning towards the desk top lasers but I’m not sure about the sizes they all look alike, I was going to purchase a neje 3500, but then I seen neje 7000 and a 20w neje master, and you have the 20w neje. I need to know what I’m buying, can you make it simple???
I’m surprised that “Keeb” heads haven’t picked this up for custom Cherry MX/Alps/Topre keycaps for keyboards. Blanks are cheap and fonts a plenty.
Hi,
I just bought the laser head on it’s own to play around with after reading a DX review about simply powering it directly with a USB power supply.
https://www.dx.com/p/adjustable-focal-laser-wood-kits-for-neje-dk-8-kz-bronze-2074700.html#.Xvt69yhKhhE
Plugged it into a usb battery and burn stuff.
Okay, I bought laser protection glasses later after reading the warnings.
Just a question, is there a replacement lens that would focus the laser to infinity ?
So I point it in the distance, say down the garden at a target ?
Maybe even mount it on a pan and tilt camera?
I’ll give you this link, not because I’m really a nice person, it’s for the optics..
https://openstax.org/books/university-physics-volume-3/pages/1-introduction
i have TWO ofthese now BOTH the plate wont moe up or down….. and no idea how to fix it
Can you modify it and turn it into rack laser rather box and moving plate? Just wanted to ask before taking it apart
Is there any software for the NEJE DK-8-KZ that is compatible with android smart phones? I have the Motorola Moto G Stylus 2022 running Android 13.