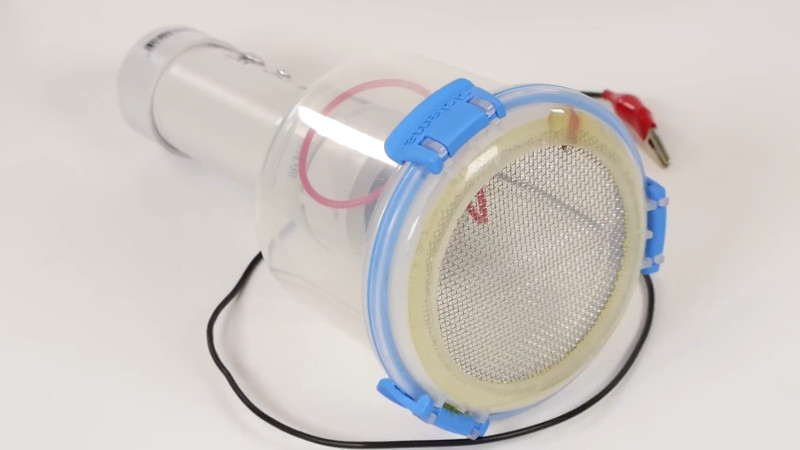
A “Static Grass Applicator” is very specialized tool used by model makers to create realistic grass. Don’t feel bad if you didn’t know that, neither did we. Anyway, the idea is that you distribute a fine filament over the surface, and then use static electricity to make the “blades” of grass stand up vertically. This is a huge improvement over the old school method of manually placing the grass on the model, but the tool itself is somewhat expensive, at least for a decent one.
 But thanks to avid modeler [Luke Towan], those looking to up their diorama game without breaking the bank now have a fantastically detailed guide on building their own grass applicator that is not only fairly cheap (as little as $20 USD depending on what your part bins look like), but is robust enough to last for years of service.
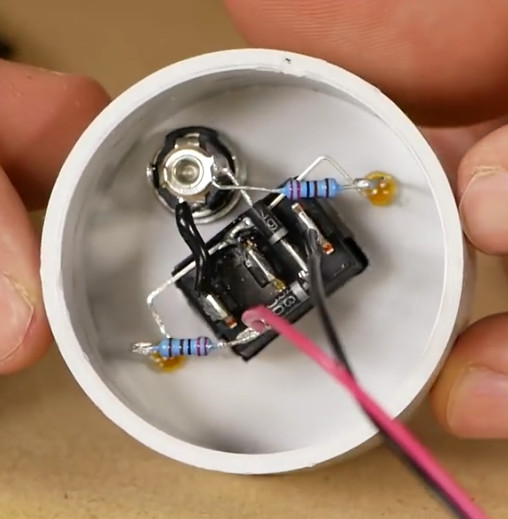
The heart of the device, and probably the only part you’d need to go out and buy especially for this project, is a small 12V negative ion generator. This is used to setup an electric charge between the grid of the applicator and a long wire that gets attached to the piece you’re working on. What little wiring there is simply provides a switch and some status LEDs. The design [Luke] has come up with lets the user switch between and internal 9V battery for portability, or an external 12V wall adapter for larger projects.
Building the chamber to hold the grass filament as well as the handle which houses the electronics will take longer than anything else, and even that seems pretty straightforward. Given the impressive results shown in the video after the break, it’s actually pretty surprising how simple the device is.
The setup used here reminds us of the DIY powder coating we covered a few years back.


I have been watching lukes videos for a long time. They are very well done, and interesting to those interested in models/model making, and dioramas. hes got a ton of stuff that is extremely photo realistic, and goes through the best practices. Yes his videos are on the longer side. However i feel you could pop kids in front of them and stimulate their imagination to create.
As a kid, I spent hours reading about model railroading. I never actually built a model railroad or any kind of diorama (maybe once I’ve had kids and they’re out of the house…) but at the same time, it is a fun hobby to enjoy vicariously through Youtube.
I too watch all his stuff, I never made one before, not interested in trains. But I still love dioramas and watching someone skilled in making them.
Headquake on YouTube is another one worth earmarking, his scratch built RC cars are amazing.
This looks like a fun project, and I’m actually interested in terrain modeling, but I don’t see how it’s a real money saver. The parts cost over $70, and a quick google shows good quality commercial units for that price. Still might build one though, because hey.
To me it looks like a high voltage circuit to induce the static charge. And the most expensive part seems to be the negative ion generator.
A few other videos on youtube show the same thing viable with one of the electric fly swatters because they already contain the high voltage circuit. Maybe this is worth a try.
Yep. You can do the same thing with one of those flyswatters and a strainer for $5.
I also use fly swatter, it cost me £4 and it does great job (and I use really short ‘blades’ of grass for my 1:72 models).
The problem i found with most of these build plans is the use of an “ion generator” aside from the added cost simply because its labelled “ion generator” is they come in a wide range of voltages (1kV – 10kV) and most are never actually labelled with the output voltage. The fly swatter circuits tend to be 4kV – 6kV, low but does an okay job and will still cost you less then these ion generators.
The best solution was to specifically look for high voltage generators, and get one at a specific voltage. $20.00 build cost for one of these using a 15kV generator is completely possible and reasonable.
Sometimes Horror Fright has them “Free with a purchase and coupon”
https://www.harborfreight.com/catalogsearch/result/index/?dir=asc&order=EAScore%2Cf%2CEAFeatured+Weight%2Cf%2CSale+Rank%2Cf&q=fly+swatter
https://www.google.com/search?q=Harbor+Freight+fly+swatter+coupon&client=firefox-b&tbm=isch&source=iu&ictx=1&fir=2Q___qpHOTi0jM%253A%252C6dvA1MFo8UgYLM%252C_&usg=__6S3uMAZvRnD9EKzPovukZat4oeA%3D&sa=X&ved=0ahUKEwiYs6Hl7P3ZAhUQCawKHaWsACEQ9QEIZzAL#imgrc=_
At 35 USD a complete unit on Ali, I dont see the point of making one.
Buying electronics from Aliexpress is a dumb way to die.
https://www.youtube.com/watch?v=IJNR2EpS0jw
okay… another cool trick learned. Thanks for posting!
That grass really looks great.
This reminds me of the ‘flocking’ guns that were used to apply flocking (fuzzy surface) to metal phonograph player disks, so as to protect & grip phonograph records.
The parts bin is always full. It doesn’t have what you want but it always has what you needed to use.
Posts obscure tool.
Must have obscure tool.
As you do @HaD :)
Is it 4:20 already? Ooooh, that kind of grass… Damn, i was hoping for a new idea on a dope grass applicator… better luck next time.