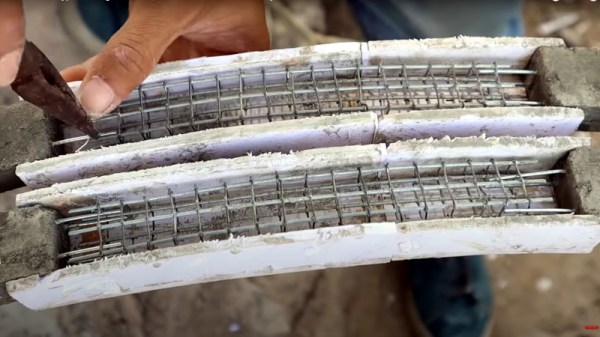
In our community we’re no strangers to making things, and there are plenty among us who devote their efforts to modelmaking. It’s uncommon, though, for a scale model of something to be made using the exact same techniques as whatever it’s copying. Instead a model might be made from card, foam, glassfibre, or resin. [tiny WORLD] takes an opposite tack, building scale model civil engineering projects just as they would have been for real. (Video, embedded below.)
Here, a scale model of the Hoover Dam bypass bridge is made as the original, from reinforced concrete. In place of rebar is a wire grid in place of wooden shuttering is what looks like foam board, the concrete is a much smoother mortar, but otherwise it’s the real thing. We see the various bridge parts being cast in situ, with the result being as strong as you’d expect from the original.
We can see that this is a great technique for modelling concrete buildings and structures, but it’s also a material that we think might have other applications at this scale. How would the rigidity, strength, and mass of small-scale reinforced cement compare to 20-20 extrusion, 3D-printed plastic, or wood, for example? Regardless, it’s interesting to watch, as you can see from the video below the break.
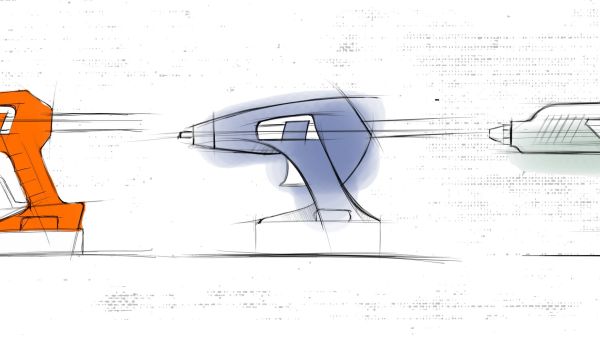
At Hackaday, we celebrate all kinds of hardware hacks, and we try not to judge based on appearance. After all, every product starts out on the breadboard, or as a prototype built with hot glue and tape. What’s important is getting it to work, at least at first. But there comes a time when you’ve got to think about how to make your project look like something people want to use, how to position controls and displays in a logical and attractive way, and how to make sure your thing can actually be built.
Turning a project into a product is the job of an industrial designer. Pretty much everything you use, from the toothbrush by your sink to the car you drive to work in bears the marks of industrial design, some more successfully than others. Eric Strebel has been doing industrial design for years, and he keeps feeding us a steady diet of design tips and tricks through his popular YouTube channel. He’ll stop by the Hack Chat to get a little more in-depth on industrial design principles, and how you can make your projects look as good as they work.
Siglent has been making pretty big inroads into the mid-range test equipment market, with the manufacturers instruments popping up on benches all over the place. Saulius Lukse, of Kurokesu fame, found himself in possession of a Siglent SPD3303X programmable power supply, which looks like a really nice unit, at least from the hardware side. The software it came with didn’t exactly light his fire, though, so Saulius came up with a Python library to control the power supply. The library lets him control pretty much every aspect of the power supply over its Ethernet port. There are still a few functions that don’t quite work, and he’s only tested it with his specific power supply so far, but chances are pretty good that there’s at least some crossover in the command sets for other Siglent instruments. We’re keen to see others pick this up and run with it.
From the “everyone needs a hobby” department, we found this ultra-detailed miniature of an IBM 1401 mainframe system to be completely enthralling. We may have written this up at an earlier point in its development, but it now appears that the model maker, 6502b, is done with the whole set, so it bears another look. The level of detail is eye-popping — the smallest features of every piece of equipment, from the operator’s console to the line printer, is reproduced . Even the three-ring binders with system documentation are there. And don’t get us started about those tape drives, or the wee chair in period-correct Harvest Gold.
Speaking of diversions, have you ever wondered how many people are in space right now? Or how many humans have had the privilege to hitch a ride upstairs? There’s a database for that: the Astronauts Database over on Supercluster. It lists pretty much everything — human and non-human — that has been intentionally launched into space, starting with Yuri Gagarin in 1961 and up to the newest member of the club, Sergey Kud-Sverchkov, who took off got the ISS just last week from his hometown of Baikonur. Everyone and everything is there, including “some tardigrades” that crashed into the Moon. They even included this guy, which makes us wonder why they didn’t include the infamous manhole cover.
And finally, for the machinists out there, if you’ve ever wondered what chatter looks like, wonder no more. Breaking Taps has done an interesting slow-motion analysis of endmill chatter, and the results are a bit unexpected. The footage is really cool — watching the four-flute endmill peel mild steel off and fling the tiny curlicues aside is very satisfying. The value of the high-speed shots is evident when he induces chatter; the spindle, workpiece, vise, and just about everything starts oscillating, resulting in a poor-quality cut and eventually, when pushed beyond its limits, the dramatic end of the endmill’s life. Interesting stuff — reminds us a bit of Ben Krasnow’s up close and personal look at chip formation in his electron microscope.
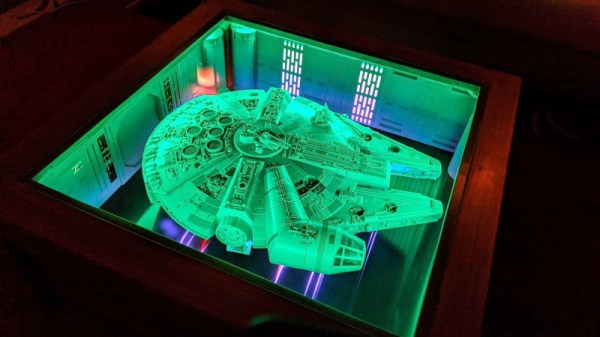
A glass table makes a perfect display case for showing off whatever’s important to you, but if you want keep the dust off of your treasures, closing up the sides is probably a wise move. It might not be a bad idea to put some lighting in there to make sure everything is easy to see. You might as well make the lights RGB and remote controlled, so you can fiddle with the look from across the room. Of course, you could go all in and just make the thing a diorama…
It’s not hard to imagine the line of thinking that convinced [Erv Plecter] he should turn a simple glass table into a docking bay for a model of the Millennium Falcon, and looking at the final results, we think it was the right move. With an incredible attention to detail, what started out a generic looking table and rather modest toy, have been combined into an interactive display that could woo even the staunchest of Trekkies.
If you’ve ever considered lighting a model, this project is an excellent example to follow. The Hasbro toy that [Erv] started with certainly wasn’t what you’d call studio quality; the little lighting it featured wasn’t even accurate to how the ship appears in the films. But with some reference material, fiber optic cables, and enough Arduinos to drive it all, the final lighting is truly a marvel. We’d say the engine is our favorite part, but those tiny lit panels in the cockpit are hard to beat.
While the Falcon is clearly the star of the show, the docking bay itself is certainly no afterthought. The back-lit panels, with their inscrutable Imperial design aesthetic, look fantastic. The addition of small details like crates and barrels, plus the glossy black PVC sheet used for the floor, really brings the whole scene to life. It’s almost a shame that the ship itself is so big, as a smaller model would have left more room to toss in a few Stormtroopers and droids out on patrol.
This isn’t the first time we’ve seen somebody augment a “toy” grade model with additional lighting effects. While the scale miniature aficionados in the audience might turn their nose up at some of the artistic liberties taken on these low fidelity models, we think any normal person would be blown away if they saw them in person.
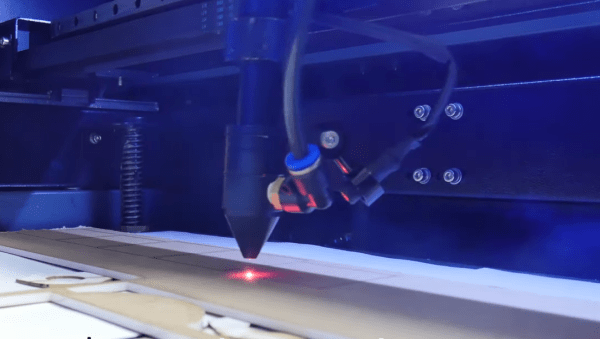
Good design starts with a good idea, and being able to flesh that idea out with a model. In the electronics world, we would build a model on a breadboard before soldering everything together. In much the same way that the industrial designer [Eric Strebel] makes models of his creations before creating the final version. In his latest video, he demonstrates the use of a CO2 laser for model making.
While this video could be considered a primer for using a laser cutter, watching some of the fine detail work that [Eric] employs is interesting in the way that watching any master craftsman is. He builds several cubes out of various materials, demonstrating the operation of the laser cutter and showing how best to assemble the “models”. [Eric] starts with acrylic before moving to wood, cardboard, and finally his preferred material: foam core. The final model has beveled edges and an interior cylinder, demonstrating many “tricks of the trade” of model building.
Of course, you may wish to build models of more complex objects than cubes. If you have never had the opportunity to use a laser cutter, you will quickly realize how much simpler the design process is with high-quality tools like this one. It doesn’t hurt to have [Eric]’s experience and mastery of industrial design to help out, either.
Did you have anything planned for the next hour or so? No? That’s good because if you’re anything like us, watching even one of the restorations performed on [Marty’s Matchbox Makeovers] is likely to send you down a deep dark rabbit hole that you never knew existed. Even if you can’t tell the difference between Hot Wheels and Matchbox (seriously, that’s a big deal in the community), there’s something absolutely fascinating about seeing all the little tips and tricks used to bring these decades-old toy cars back into like new condition.
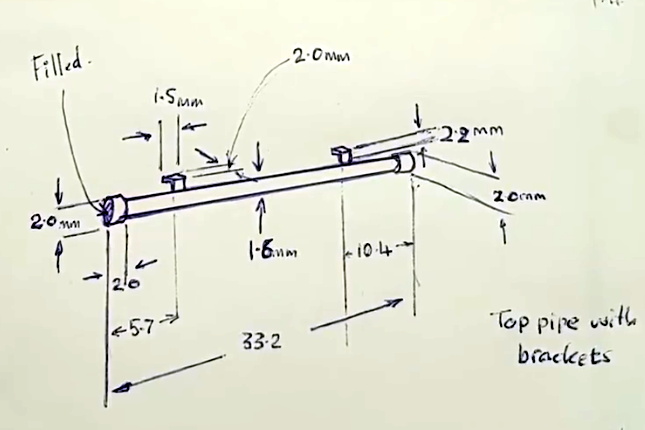
Sketching a replacement part to be 3D printed.
You might think that all it takes to restore a Matchbox car is striping the paint off, buffing up the windows, and respraying the thing; and indeed you wouldn’t be too far off the mark in some cases. But you’ve got to remember that these little cars have often been through decades of some of the worst operating conditions imaginable. That is, being the plaything of a human child. While some of the cars that [Marty] rebuilds are in fairly good condition to begin with, many of them look like they’ve just come back from a miniature demolition derby.
The ones which have had the hardest lives are invariably the most interesting. Some of the fixes, like heating up the interior and manually bending the steering wheel back into shape, are fairly simple. But what do you do when a big chunk of the vehicle is simply gone? In those cases, [Marty] will combine cyanoacrylate “super glue” with baking powder to fill in voids; and after filing, sanding, and painting, you’d never know it was ever damaged.
When a car needs more than just paint to finish it off, [Marty] will research the original toy and make new water slide decals to match what it would have looked like originally. If it’s missing accessories, such as the case with trucks which were meant to carry scale cargo, he’ll take careful measurements so he can design and print new parts. With some sanding and a touch of paint, you’d never know they weren’t original.
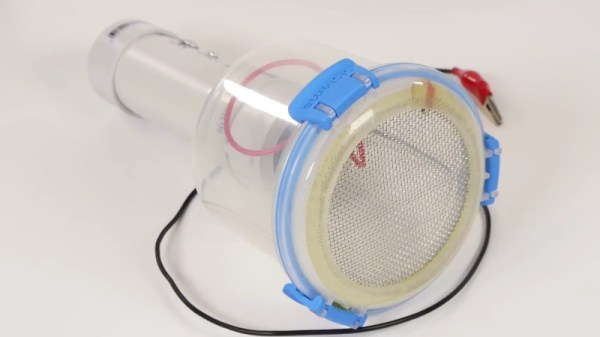
A “Static Grass Applicator” is very specialized tool used by model makers to create realistic grass. Don’t feel bad if you didn’t know that, neither did we. Anyway, the idea is that you distribute a fine filament over the surface, and then use static electricity to make the “blades” of grass stand up vertically. This is a huge improvement over the old school method of manually placing the grass on the model, but the tool itself is somewhat expensive, at least for a decent one.
But thanks to avid modeler [Luke Towan], those looking to up their diorama game without breaking the bank now have a fantastically detailed guide on building their own grass applicator that is not only fairly cheap (as little as $20 USD depending on what your part bins look like), but is robust enough to last for years of service.
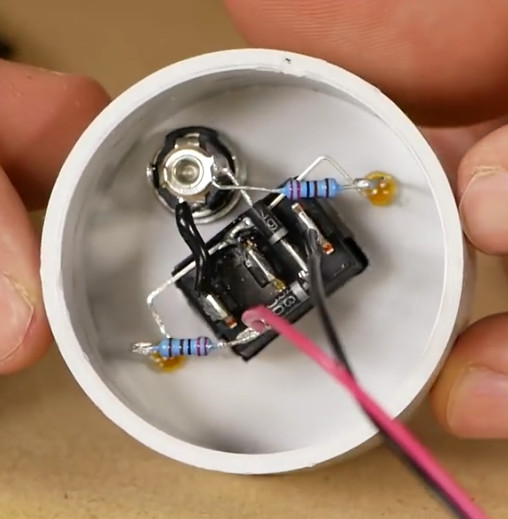
The heart of the device, and probably the only part you’d need to go out and buy especially for this project, is a small 12V negative ion generator. This is used to setup an electric charge between the grid of the applicator and a long wire that gets attached to the piece you’re working on. What little wiring there is simply provides a switch and some status LEDs. The design [Luke] has come up with lets the user switch between and internal 9V battery for portability, or an external 12V wall adapter for larger projects.
Building the chamber to hold the grass filament as well as the handle which houses the electronics will take longer than anything else, and even that seems pretty straightforward. Given the impressive results shown in the video after the break, it’s actually pretty surprising how simple the device is.