3D Printed Raspberry Pi NAS With Dual Drive Bays

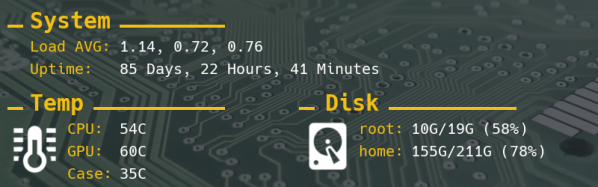
While it might not pack the computational punch you’d usually be looking for in a server platform, you can’t beat how cheap the Raspberry Pi is. As such, it’s at the heart of many a home LAN, serving up files as a network attached storage (NAS) device. But the biggest problem with using the Pi in a NAS is that it doesn’t have any onboard hard drive interface, forcing you to use USB. Not only is this much slower, but doesn’t leave you a lot of options for cleanly hooking up your drives.

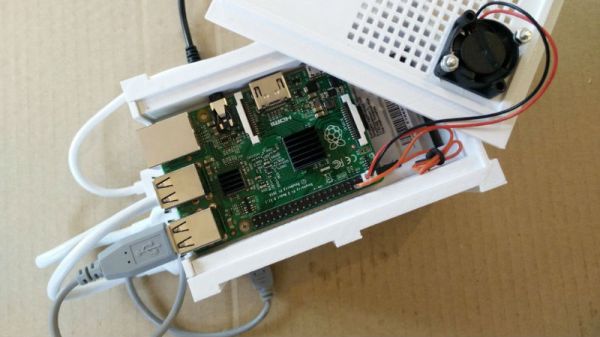
This 3D printable NAS enclosure designed by [Paul-Louis Ageneau] helps address the issue by integrating two drive bays which can accommodate 2.25 inch laptop hard disk drives and their associated IB-AC6033-U3 USB adapters. The drives simply slide into the “rails” designed into the case without the need for additional hardware. There’s even space in the bottom of the case for a USB hub to connect the drives, and a fan on the top of the case to help keep the whole stack cool. It still isn’t perfect, but it’s compact and doesn’t look half bad.

The design is especially impressive as it doesn’t require any supports, an admirable goal to shoot for whenever designing for 3D printing. As an added bonus, the entire case is designed in OpenSCAD and licensed under the GPL v3; making modification easy if you want to tweak it for your specific purposes.

This certainly isn’t the strongest Raspberry Pi enclosure we’ve ever seen, that title would have to go to the ammo case that does double duty as a media streamer, but looks like it would make a great home for that new 3 B+ you’ve got on order.

Bring Deep Learning Algorithms To Your Security Cameras

AI is quickly revolutionizing the security camera industry. Several manufacturers sell cameras which use deep learning to detect cars, people, and other events. These smart cameras are generally expensive though, compared to their “dumb” counterparts. [Martin] was able to bring these detection features to a standard camera with a Raspberry Pi, and a bit of ingenuity.

[Martin’s] goal was to capture events of interest, such as a person on screen, or a car in the driveway. The data for the events would then be published to an MQTT topic, along with some metadata such as confidence level. OpenCV is generally how these pipelines start, but [Martin’s] camera wouldn’t send RTSP images over TCP the way OpenCV requires, only RTSP over UDP. To solve this, Martin captures the video stream with FFmpeg. The deep learning AI magic is handled by the darkflow library, which is itself based upon Google’s Tensorflow.

Martin tested out his recognition system with some cheap Chinese PTZ cameras, and the processing running on a remote Raspberry Pi. So far the results have been good. The system is able to recognize people, animals, and cars pulling in the driveway.  His code is available on GitHub if you want to give it a spin yourself!

Look Upon Eyepot, And Weep For Mercy

Hope you weren’t looking forward to a night of sleep untroubled by nightmares. Doing his part to make sure Lovecraftian mechanized horrors have lease in your subconscious, [Paul-Louis Ageneau] has recently unleashed the horror that is Eyepot upon an unsuspecting world. This Cycloptic four legged robotic teapot takes inspiration from an enemy in the game Alice: Madness Returns, and seems to exist for no reason other than to creep people out.

Even if you aren’t physically manifesting nightmares, there’s plenty to learn from this project. [Paul-Louis Ageneau] has done a fantastic job of documenting the build, from the OpenSCAD-designed 3D printed components to the Raspberry Pi Zero and Arduino Pro Mini combo that control the eight servos in the legs. If you want to play along at home all the information and code is here, though feel free to skip the whole teapot with an eyeball thing.

A second post explains how the code is written for both the Arduino and Pi, making for some very illuminating reading. A Python script on the Pi breaks down the kinematics and passes on the appropriate servo angles to the Arduino over a serial link. Combined with a web interface for control and a stream from the teapot’s Raspberry Pi Camera module, and you’ve got the makings of the world’s creepiest telepresence robot. We’d love to see this one stomping up and down a boardroom table.

Seems we are on a roll recently with creepy robot pals. Seeing a collaboration between Eyepot and JARVIS might be too much for us to handle. Though we have a pretty good idea how we’d want to control them.

Neon Lamps Make For The Coolest Of Nixie Clocks

Revisiting old projects is always fun and this Nixie Clock by [pa3fwm] is just a classic. Instead of using transistors or microcontrollers, it uses neon lamps to clock and drive the Nixie Displays. The neon lamps themselves are the logic elements. Seriously, this masterpiece just oozes geekiness.

Inspired by the book “Electronic Counting Circuits” by J.B. Dance(ZIP), published in 1967, we covered the initial build a few years back. The fundamental concept of operation is similar to that of Neon Ring Counters. [Luc Small] has a write-up explaining the construction of such a device and some math associated with it. In this project, [pa3fwm] uses modern day neons that you find in indicators, so his circuit is also updated to compensate for the smaller difference in striking and maintaining voltages.

The original project was done in 2007 and has since undergone a few upgrades. [Pa3fwm] has modified the construction to make it wall mounted. Even though it’s not a precise timekeeper, the project itself is a keeper from its time. Check out the video below for a demonstration.

Feel inspired yet? Take a peek at the White Rabbit Nixie Clock and you are looking for a low voltage solution to powering Nixies then check out the 5-volt Nixie Power supply.

Continue reading “Neon Lamps Make For The Coolest Of Nixie Clocks”

Everyone Needs A Personal Supercomputer

When you think of supercomputers, visions of big boxes and blinkenlights filling server rooms immediately appear. Since the 90s or thereabouts, these supercomputers have been clusters of computers, all working together on a single problem. For the last twenty years, people have been building their own ‘supercomputers’ in their homes, and now we have cheap ARM single board computers to play with. What does this mean? Personal supercomputers. That’s what [Jason Gullickson] is building for his entry to the Hackaday Prize.

The goal of [Jason]’s project isn’t to break into the Top 500, and it’s doubtful it’ll be more powerful than a sufficiently modern desktop workstation. The goal for this project is to give anyone a system that has the same architecture as a large-scale cluster to facilitate learning about high-performance applications. It also has a front panel covered in LEDs.

The design of this system is built around a the PINE64 SOPINE module, or basically a 64-bit quad-core CPU stuck onto a board that fits in an SODIMM socket. If that sounds like the Raspberry Pi Computer Module, you get a cookie. Unlike the Pi Compute Module, the people behind the SOPINE have created something called a ‘Clusterboard’, or eight vertical SODIMM sockets tied together with a single controller, power supply, and an Ethernet jack. Yes, it’s a board meant for cluster computing.

To this, [Jason] is adding his own twist on a standard, off-the-shelf breakout board. This Clusterboard is mounted to a beautiful aluminum enclosure, and the front panel is loaded up with a whole bunch of almost vintage-looking red LEDs. These LEDs indicate the current load on each bit of the cluster, providing immediate visual feedback on how those computations are going. With the right art — perhaps something in harvest gold, brown, and avocado — this supercomputer would look like it’s right out of the era of beautiful computers. At any rate, it’s a great entry for the Hackaday Prize.

Making Pictures Worth 1000 Words In Python

In a previous post, I showed how you could upload images into a Discord server from Python; leveraging the popular chat platform to simplify things like remote monitoring and push notifications on mobile devices. As an example, I showed an automatically generated image containing the statistics for my Battlefield 1 platoon which gets pushed to member’s devices on a weekly basis.

Automatically generated stats posted to Discord

The generation of that image was outside the scope of the original post, but I think it’s a technique worth discussing on its own. After all, they say that a picture is worth 1000 words. So that means a picture that actually contains words must be worth way more. Like, at least 2000, easy.

Being able to create images from your textual data can lend a bit of flair to your projects without the need to create an entire graphical user interface. By putting a text overlay on a pre-rendered image, you can pull off some very slick visuals with a minimum amount of system resources. So long as you have a way of displaying an image file, you’re good to go.

In this post I’ll quickly demonstrate how to load an image, overlay it with text, and then save the resulting image to a new file. This technique is ideal in situations where a display doesn’t need to be updated in real-time; visuals can be generated at regular intervals and simply displayed as static images. Possible uses include weather displays, “magic” mirrors, public signage, etc. Continue reading “Making Pictures Worth 1000 Words In Python”

Friday Hack Chat: All About The Hackaday Prize

For this week’s Hack Chat, we’re talking all about the Hackaday Prize. Our guests for this week’s Hack Chat are Alberto Molina and Elecia White.

Elecia White was a Hackaday Prize judge in 2015 and 2016, and she’ll be discussing what makes a standout entry from a judging perspective. Elecia is an embedded software engineer at Logical Elegance, Inc., author of Making Embedded Systems, and host of the Embedded.fm podcast.

Alberto Molina won the Grand Prize of the 2016 Hackaday Prize with Dtto, an Open Source, self-reconfiguring rescue robot that Alberto is continuing to develop.  Alberto is an Electronic engineer who wants to design the next generation of robots and he will share his insights on putting together a fantastic entry for your project.

The Hackaday Prize is the greatest hardware competition ever. It’s the Academy Awards of Open Hardware (and will remain so until we get a cease and desist). The Hackaday Prize is a competition where thousands of hardware hackers, makers, and artists compete to build a better future.

The Hackaday Prize is in its fifth year in 2018, and the theme this year is Build Hope. We’re challenging everyone to put your ideas and creativity to use and Build Something That Matters. Do this, and you’ll be in the running for the Grand Prize of $50,000. In total we’re giving away $200,000 in total cash prizes to build hardware, something no other hardware competition can match.

Also on board for this Hack Chat, like all Hack Chats, will be Stephen Tranovich, Technical Community Leader at Hackaday.io. Steven has been working hard on the logistics for the Prize this year, and will field any and all questions about entering the 2018 Hackaday Prize.

In this Hack Chat, we’ll be discussing how the Prize is judged, the new challenges for the 2018 Hackaday Prize, the achievements the winners of the Hackaday Prize have already seen, and of course, your questions. We know there’s a lot of interest in the Hackaday Prize, and we want you to ask what’s on your mind. If you have a question, just add it to the Hack Chat event page as a comment, and we’ll answer it.

join-hack-chat

Our Hack Chats are live community events on the Hackaday.io Hack Chat group messaging. This week it’s going down at the usual time, on noon, Pacific, Friday, March 23rd  Want to know what time this is happening in your neck of the woods? Have a countdown timer!

Click that speech bubble to the right, and you’ll be taken directly to the Hack Chat group on Hackaday.io.

You don’t have to wait until Friday; join whenever you want and you can see what the community is talking about.