3D printers can be hacked into a multitude of useful machines, simply by replacing the filament extruder with a new attachment such as a laser engraver or plotter.
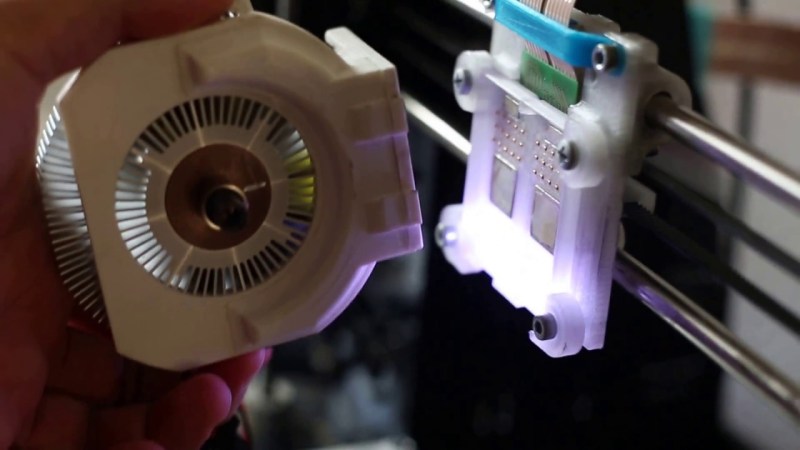
However, [geggo] was fed up with re-wiring and mounting the printhead/tool every time he wanted to try something new, and set out to design a modular printhead system for next-level convenience. The result? A magnetic base-plate, allowing a 3D printer to become a laser engraver within a matter of seconds. This new base-plate mounts onto the existing ball bearings and provides a sturdy place for attachments to snap to – with room for two at once.
Using neodymium magnets to mount the printhead to the base-plate provides enough force to keep the attachment in place and compress 30 pogo pins, which make the electrical connections. These carry the lines which are common to all attachments (heater, thermistor and fan), as well as custom connections for certain attachments – for example the extruder stepper motors. A Flexible Flat Cable (FFC) is used to connect the pogo pin PCB to the main controller.
So far, the list of tools available for fitting includes an MK8 extruder, a E3D v6 hotend (for Bowden extrusion), a laser, a micrometer dial indicator, and a pen plotter (used for writing a batch of wedding invitations!). There was even some success milling wood.
For some automated extruder switching action we’ve shown you in the past, check out the 3d-printer tool changer.


Is that really just a pure magnet mount? Or is it snapping in too? I just can’t see a magnet of any reasonable size being enough to hold a hotend as it is pulling filament or to drag a pen when it is plotting.
I am interested in this though. I have a Mendel90. It’s extruder/hotend removes/attaches with a couple of wing nuts and a D-Sub connector. It’s not as convenient as this project but it is more convenient than most. I just wish the D-Sub had additional conductors for a servo and maybe even a second hotend.
the heads will snap into the baseplate’s frame by magnetic force.
forces along Z and X directions, which i expected to be the worst ones, will get directly transferred to the baseplate.
one of the large neodymium magnets has ~30N, the smaller one ~10N when you manage to keep the distance between them close to zero.
yeah, zero distance is unlikely. but the opposite side is not just a ferromagnetic plate but also a neodymium magnet.
so i hoped that additional strength and my ~0.1mm distance wil compensate each other.
working against these 80 (2 x 40N) are the 30 pogo pins with 30N in total.
so we are left with ~50N force along Y direction.
i didnt measure the forces, but you can only remove the head properly if you tilt the head out of the base plate.
even strong enough for a proxxon flex shaft milling wood :)
Magnets are nice when you want to replace one or more springs, but you still need a positive reference to clamp to.
That’s how you get precise and repeatable locking.
Look how the tool changers are made on a lathe turret for example, mostly cam lock mechanism with dovetails (or assimilate) references.
So as long as your baseplate+hotend assembly give only one (true) degree of freedom, it’s ok.
I think it would snap of then if you try this with a bowden tube setup. I know the material feeder of UM3 can deliver 60N of force with no problems at the head.
these 60N are the force between filament and the tube, not along any axis.
bowden setups are (close to) force-free along any axis.
try to pull the head of the UM3 with 60N while printing and you will see what i mean.
this print head swap mechanism works for a year now, successfully using:
Geeetech MK8, E3D v6, Kraken dual-bowden, Proxxon milling tool, ball pen, …
believe me, the head is stronger than you want to put forces on your axis on these printers ;)
many neodymium magnets are quite strong despite their small sizes :)
Dang, how much current is that flat cable rated for? Cool setup, seems really well-designed and flexible.
Got the STLs? I see there’s a link to some kind of online CAD software with the models all assembled.
no specs, also cannot remember exactly.
but after measuring the copper dimensions and calculating the probable current rating, i used two traces which promised to give me enough backup for the ~3A a heater needs.
oh and in OnShape you can just export every part as STL by right clicking -> export.
maybe you have to copy it into your local workspace
Not sure about his but I do know you can buy some solderable FFCs that are rated for 3A per conductor.
https://www.arieselec.com/products/data/11005-flat-pin-staked-flex-jumpers.htm
The nice part about printers is that they’re already wired for high current. Good lines running to the head and a suitable power supply, so lasers and whatnot are well within spec.
I would love to see a switching system like this to become standardized.
Yes!
Is it “open”?
How about this automatic dual changer?
https://www.thingiverse.com/thing:2815697 (see the video at https://www.youtube.com/watch?v=eV0b1-vkH4U)
All of hyrel3d heads are hot swappable and have a much stronger connection than a magnet.
Great work! Extruder carriage wiring is always the worst part of building a 3D printer. Using pogo pins and magnets is ingenious. I may have to install that into my printer.
I used similar ribbon cable pulled from a tape library robot. It’s been in my printer for over 4 years and still going strong.
thanks, feel free to fork and modify it :)
yeah those flexible flat cables are quite rigid as long you build a proper strain-relief.
they will survive millions of moves without any sign of weakening.
Electropermanent magnets might be a better idea… the printer could change the hotends automatically.
http://nicadrone.com/index.php?id_product=13&controller=product
Or a servo piloted camlock.
https://hackaday.com/2018/03/24/e3d-introduces-tool-changing-3d-printer/#comment-4442413
Do you have a design for a cr10
no, sorry. just geeetech prusa i3.
but feel free to create one – you just have to customize the X plate
https://cad.onshape.com/documents/64ece48f72560165db66652e/w/2d0c8146a6d59856a6149545/e/bcd075a15f02d81cb4bedbca
Can you export an STL of one or more modules from this?
Very nice design, could you possibly share the eagle design files? THX in advance
I like your design and probably I will make similar swappable magnetic hotends.
I have a few questions.
How did you make sure the magnets stay in place, did you just use glue? If you did, what type of glue?
Are the STL anywhere for the base components? Or just that CAD viewer?