DIY Spacer Increases FDM Flow Rate For Faster, Better Printing

The host of problems to deal with when you’re feeling the need for FDM speed are many and varied, but high on the list is figuring out how to melt filament fast enough to accommodate high flow rates. Plus, the filament must be melted completely; a melty outside and a crunchy inside might be good for snacks, but not for 3D printing. Luckily, budget-minded hobbyists can build a drop-in booster to increase volumetric flow using only basic tools and materials.

[aamott]’s booster, which started life as a copper screw, is designed to replace the standard spacer in an extruder, with a bore that narrows as the filament gets closer to the nozzle to ensure that the core of the filament melts completely. Rather than a lathe, [aamott]’s main tool is a drill press, which he used to drill a 0.7 mm bore through the screw using a PCB drill bit. The hole was reamed out with a 10° CNC engraving bit, generating the required taper. After cutting off the head of the screw and cleaning up the faces, he cut radial slots into the body of the booster by threading the blade of a jeweler’s saw into the bore. The result was a bore wide enough to accept the filament on one end, narrowing to a (roughly) cross-shaped profile at the other.

Stacked up with a couple of knock-off Bondtech CHT nozzles, the effect of the booster was impressive — a 50% increase in flow rate. It’s not bad for a prototype made with simple tools, and it looks a little easier to build than [Stefan]’s take on the same idea.

Continue reading “DIY Spacer Increases FDM Flow Rate For Faster, Better Printing”

A Vernier Take On A 3D Printer Extruder Indicator

A common way to visualize that a 3D printer’s extruder motor — which feeds the filament into the hot end — is moving is to attach a small indicator to the exposed end of the motor’s shaft. As the shaft turns, so does the attached indicator.

Small movements of the motor are therefore turned into larger movements of something else. So far, so simple. But what about visualizing very small extrusions, such as those tiny ones made during ironing?

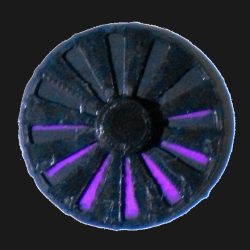
[Jack]’s solution is a Vernier indicator for the extruder. Even the smallest movements of the extruder motor’s shaft are made clearly visible by such a device, as shown in the header image above. Vernier scales are more commonly found on measurement tools, and the concept is somewhat loosely borrowed here.

The usual way these lightweight indicators are attached is with a small magnet, and you can read all about them and see examples here.

This new design is basically the same, it simply has a background in a contrasting color added into the mix. [Jack]’s design is intended for the Bambu A1 printer, but the idea can be easily adapted. Give it a look if you find yourself yearning for a bit more visibility in your extruder movements.

Let Your Finger Do The Soldering With Solder Sustainer V2

Soldering is easy, as long as you have one hand to hold the iron, one to hold the solder, and another to hold the workpiece. For those of us not so equipped, there’s the new and improved Solder Sustainer v2, which aims to free up one of however many hands you happen to have.

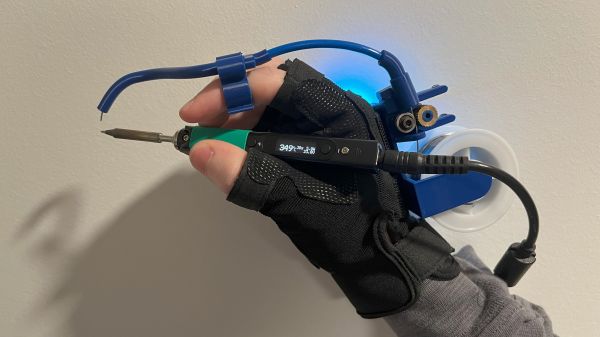
Eagle-eyed readers will probably recall an earlier version of Solder Sustainer, which made an appearance in last year’s Hackaday Prize in the “Gearing Up” round. At the time we wrote that it looked a bit like “the love child of a MIG welder and a tattoo machine.” This time around, [RoboticWorx] has rethought that concept and mounted the solder feeder on the back of a fingerless glove. The solder guide is a tube that clips to the user’s forefinger, which makes much finer control of where the solder meets the iron possible than with the previous version. The soldering iron itself is also no longer built into the tool, giving better control of the tip and letting you use your favorite iron, which itself is no small benefit.

Hats off to [RoboticWorx] for going back to the drawing board on this one. It isn’t easy to throw out most of your design and start over, but sometimes it just makes sense.

Continue reading “Let Your Finger Do The Soldering With Solder Sustainer V2”

Lessons In Printer Poop Recycling

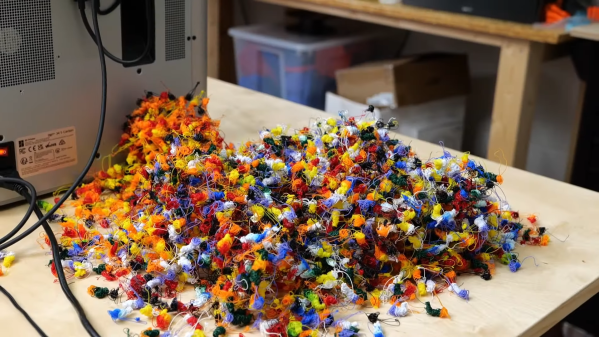
The fundamental problem with multi-color 3D printing using a single hotend is that they poop an awful lot. Every time they change filaments, they’ve got to purge the single nozzle, which results in a huge number of technicolor “purge poops” which on some machines are even ejected out a chute at the back of the printer. The jokes practically write themselves.

What’s not a joke, though, is the sheer mass of plastic waste this can produce. [Stefan] from CNC Kitchen managed to generate over a kilo of printer poop for a 500-gram multi-color print. So he set about looking for ways to turn printer poops back into filament, with interesting results. The tests are based around a commercial lab-scale filament extruder, a 3Devo Composer, but should apply to almost any filament extruder, even the homebrew ones. A few process tips quickly became evident. First, purge poops are too big and stringy (ick) to feed directly into a filament extruder, so shredding was necessary.

Second, everything needs to be very clean — no cross-contamination with plastics other than PLA, no metal bits in the chopped-up plastic bits, and most importantly, no water contamination. [Stefan]’s first batch of recycled filament came from purge poops that had been sitting around a while, and sucked a lot of water vapor from the air. A treatment in a heated vacuum chamber seems to help, but what worked best was using purge poops hot and fresh from a print run. Again, ick.

[Stefan] eventually got a process down that produced decent, usable filament that would jam the printer or result in poor print quality. It even had a pretty nice color, which of course is totally dependent on the mix of colors you start with. Granted, not everyone has access to a fancy filament extruder like his, so this may not be practical for everyone, but it at least shows that there’s a path to reducing the waste stream from any printer, especially multi-material ones.

Continue reading “Lessons In Printer Poop Recycling”

Looking Inside A 3D Printer Nozzle With Computed Tomography

Have you ever wondered what’s actually going on inside the hotend of your 3D printer? It doesn’t seem like much of a mystery — the filament gets melty, it gets squeezed out by the pressure of the incoming unmelty filament, and lather, rinse, repeat. Or is there perhaps more to the story?

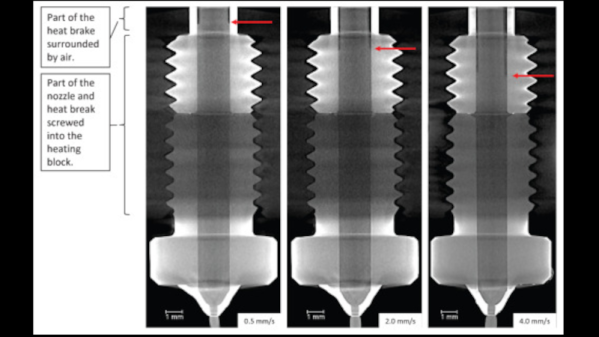
To find out, a team from the University of Stuttgart led by [Marc Kreutzbruck] took the unusual step of putting the business end of a 3D printer into a CT scanner, to get a detailed look at what’s actually going on in there. The test setup consisted of a Bondtech LGX extruder and an E3D V6 hot end mounted to a static frame. There was no need for X-Y-Z motion control during these experiments, but a load cell was added to measure extrusion force. The filament was a bit specialized — high-impact polystyrene (HIPS) mixed with a little bit of tungsten powder added (1% by volume) for better contrast to X-ray. The test system was small enough to be placed inside a micro CT scanner, which generated both 360-degree computed tomography images and 2D radiographs.

The observations made with this experimental setup were pretty eye-opening. The main take-home message is that higher filament speed translates to less contact area between the nozzle wall and the melt, thanks to an air gap between the solid filament and the metal of the nozzle. They also saw an increased tendency for the incoming filament to buckle at high extruder speeds, which matches up with practical experience. Also, filament speed is more determinative of print quality (as measured by extrusion force) than heater temperature is. Although both obviously play a role, they recommend that if higher print speed is needed, the best thing to optimize is hot end geometry, specifically an extended barrel to allow for sufficient melting time.

Earth-shattering stuff? Probably not, but it’s nice to see someone doing a systematic study on this, rather than relying on seat-of-the-pants observations. And the images are pretty cool too.

Infinite Z-Axis Printer Aims To Print Itself Someday

“The lathe is the only machine tool that can make copies of itself,” or so the saying goes. The reality is more like, “A skilled machinist can use a lathe to make many of the parts needed to assemble another lathe,” which is still saying quite a lot by is pretty far off the implication that lathes are self-replicating machines. But what about a 3D printer? Could a printer print a copy of itself?

Not really, but the Infini-Z 3D printer certainly has some interesting features that us further down the road to self-replication. As the name implies, [SunShine]’s new printer is an infinite Z-axis design that essentially extrudes its own legs, progressively jacking its X- and Y-axis gantry upward. Each leg is a quarter of an internally threaded tube that engages with pinion gears to raise and lower the gantry. When it comes time to grow the legs, the print head moves into each corner of the gantry and extrudes a new section onto the top of each existing leg. The threaded leg is ready to use in minutes to raise the gantry to the next print level.

The ultimate goal of this design is to create a printer that can increase its print volume enough to print a copy of itself. At this moment it obviously can’t print a practical printer — metal parts like bearings and shafts are still needed, not to mention things like stepper motors and electronics. But [SunShine] seems to think he’ll be able to solve those problems now that the basic print volume problem has been addressed. Indeed, we’ve seen complex print-in-place designs, assembly-free compliant mechanisms, and even 3D-printed metal parts from [SunShine] before, so he seems well-positioned to move this project forward. We’re eager to see where this goes. Continue reading “Infinite Z-Axis Printer Aims To Print Itself Someday”

3D Printing With Clay, Thanks To Custom Extruder

When it comes to 3D printing clay, there are a lot of challenges to be met. An extruder capable of pushing clay is critical, and [davidsfeir] has an updated version suitable for an Ender 3 printer. This extruder is based on earlier designs aimed at delta printers, but making one compatible with an Ender 3 helps keep things accessible.

Lightly pressurized clay comes in via the clear tube. Air escapes out the top (motor side) while an auger homogenizes the clay and pushes it out the nozzle.

What’s special about a paste extruder that can push clay? For one thing, clay can’t be stored on a spool, so it gets fed into the extruder via a hose with the help of air pressure. From there, the clay is actually extruded with the help of an auger that takes care of pushing the clay down through the nozzle. The extruder also needs a way to deal with inevitable air bubbles, which it does by allowing air to escape out the narrow space at the top of the assembly while clay gets fed downward.

[davidsfeir] was greatly inspired by the work of clay-printing pioneers [Piotr Waśniowski] and his de-airing clay extruder, and [Jonathan Keep], who has documented 3D printing with clay comprehensively in a freely-available PDF. You can check out more of [david]’s designs on his Instagram page.

There are so many different aspects to printing with clay or clay-like materials that almost every part is ripe for innovation. For example, we’ve seen wild patterns result from sticking a thumping subwoofer under a print bed.