Proving that astrophotography doesn’t have to break the bank, [Gerald Gattringer] has recently documented his DIY “barn door” style star tracker which is built almost entirely from scratch. Short of the Arduino and stepper motor, all the components were either made by hand or are standard hardware store finds.
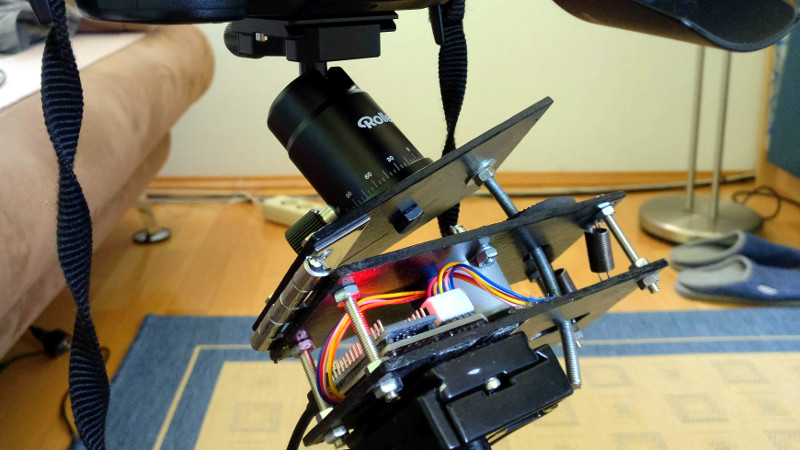
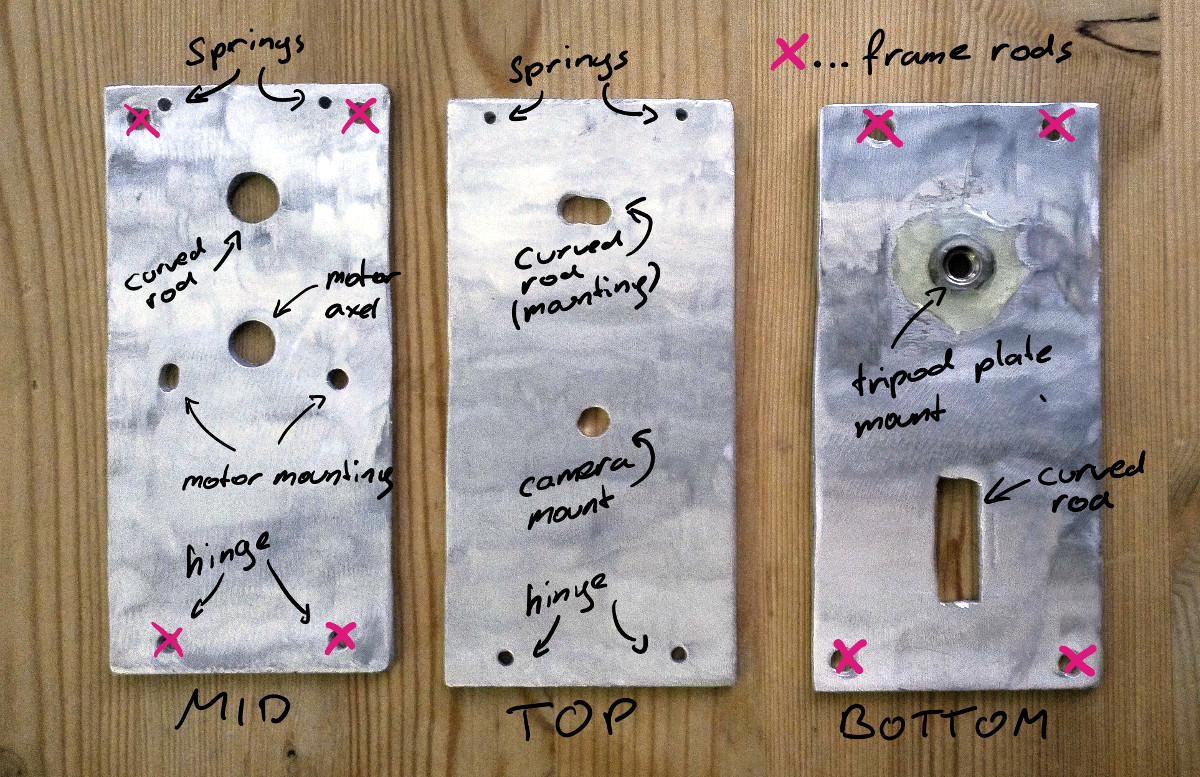 The build starts with three aluminum plates which [Gerald] cut by hand with an angle grinder. He then drilled all the necessary screw holes and a rectangular opening for the threaded rod to pass through. He even used epoxy to mount a nut to the bottom plate which would eventually attach it to the tripod.
The plates were then roughed up and spray painted black so they wouldn’t reflect light. The addition of a couple of screws, nuts, and a standard hinge.
Motion is provided by a 28BYJ-48 stepper which is connected to the drive nut by way of a belt. The spinning nut is used to raise and lower the threaded rod which opens and closes the “door”. To control the motor, [Gerald] is using an Arduino Nano coupled with a ULN2003 Darlington array which live on a routed PCB he made with his school’s Qbot MINImill. While some might say the Arduino is unnecessary for this project, it does make the final calibration of the device much easier.
We’ve covered a number of similar star trackers here on Hackaday, including one that you crank by hand. But the professional looking final result really makes this build stand out.


i tried the same few years ago, exact same setup but from wood,i never got the bend on the threaded rod just right. my junk bin continued this project later
i also startet doing the same with wood. as a lens i found some cheap ~10cm episcope lens. in the end the whole gear was way too heavy that a normal motor could lift it. the project is in standby atm until i find a solution. maybe i only take a cheap occular and mod it to a normal telescope.
How about replacing the pin in the hinge with a brass tube? If that’s too small to look through, then just glue an appropriate-sized tube to the platform near the hinge. Would that make a usable sighting tube for aligning the tracker with the North Star ?
You don’t even need a bend, it’s overengineering considering mount overall quality.
Just keep the hinge angle very low, use an half nut mecanism for fast reset if you want, and voila!
The tracking of a barn door drive is accurate only for small angles of the hinge. The Arduino would allow changing the stepper rate to compensate, making it accurate for longer periods of time.
It is accurate if the rod is curved such that it makes a part of a circle with the hinge at the center of the circle. I did this with wood and tried to do it with a strait rod and adjust with the Arduino. Never could get the speed correct even with a lot of fancy math.
Instead of math just do a plot (physical one of the device) with a time base and use the values as a table?
But it is true, a curved screwrod is the best option obviously.
If you have the Arduino compensate for the angle, then you can go one step farther and use a straight bolt and have the Arduino compensate for that too. Independent of that, it might be handy to have a fast-forward and fast-backward buttons to aid in “rewinding” the screw to setup for a new photo – you’ve plenty of spare Arduino pins for those.
I feel like there must be a better name for this kind of device… In my mind, this is a star tracker. That’s a very different beast both in concept and purpose. But so far I’ve failed to find if there’s a standard name for a device to keep a platform pointed at a specific point of the sky. “Sky tracker” seems reasonable, but that also seems to simultaneously be a model name of a device like this, a brand name of a communications network, and maybe a dozen other things.
In the astronomy world these are called Barn door trackers (https://en.wikipedia.org/wiki/Barn_door_tracker). They have been around for a while, but its always nice to see one on HAD.
You might want to look into heliostats. The goal is different but the principle of operation is very similar.
Simple neat effective design. I just picked up a Nikon MB-D100 Multi Function Battery Pack (Vertical Grip) for a good deal to get my old D100 back in use and will have to try this out. I originally was going to try to hack the camera vertical grip out for 18650 cells… though found a good deal on some Kastar equivalent batteries and am feeling the urge to focus attention on the tracker I was working on. I’ve not seen this style before and was planning on modifying a Meade DS-114AT Reflecting Telescope I scored at ShopGoodwill.com Autotracker kit for use with radio directional finding also. I might need to rebuild the system since the loading might be too much strain on the stock kit. This is inspirational since I have most the materials and will have to play around and see how works for both photographs and tracking signals. Looks great taking photos.
Hey, how are you aligning the axis to the axis of the Earth?
Google maps will show you latitude, which gives the tilt needed for an axle parallel to the earth’s axis, and longitude, which together, used on a web based solar position calculator like NOAA’s (assuming the new administration hasn’t put in a “red team” at NOAA to counter that heliocentric theory that all those sciency researchers keep getting grants for, and defunded the web page) which will allow you to determine true north based on the shadow cast by the sun at any particular time of the day. The same can be done at night with the position calculator for the moon.
Mount a laser to the side and align to polaris.