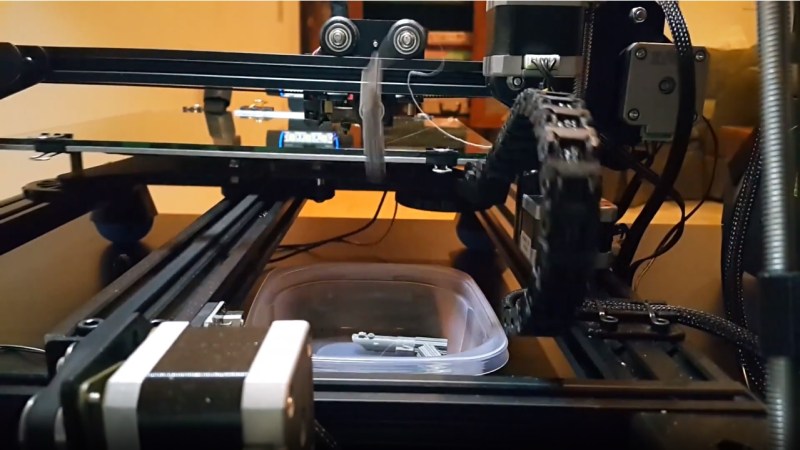
One of the promises of 3D printing is that you can mass produce objects at home, printing out multiple copies of whatever you want. Unfortunately, the reality is a bit different: once you have printed something out, you usually need to remove it manually from the print bed. Unless you are [Replayreb], that is: he’s come up with a neat hack to remove a print from the print bed by using a custom bit of G-code to move the print head to knock the print off, into a waiting box.
[Replayreb] came up with the idea because he sells Lightsabre pen caps on Etsy, and wanted to automate the printing as much as possible. So, he wrote a short piece of G-code that keeps the print bed warm, moves the print head close to the print bed and moves it up. knocking the print off the bed. He also came up with a short Windows script that loads the print G-code, adds the extra code to knock it off and creates multiple copies of both. Set this printing, and the printer will produce multiple copies of the object automatically.
This method has its limitations, though: it will only work with tall, thin prints like the Lightsabre of [Replayreb] that have a small surface area that will come off the print bed cleanly when pushed. The print also has to be set to print near the edge of the print bed. So, it will require some tweaking and practice to work for each different print.
Back in the good old days, Makerbot did produce a belt print surface to do something similar, and we have seen a number of similar ideas in the past, but both of these require extra hardware. This approach uses the printer itself, and doesn’t need anything but a bit of G-code cleverness.


You could print like 100 of thees on one bed !?
Only if sharing layers. printing another 96 after the first 4 will be difficult with the head size. Hopping between the 100 objects for every layer could create a lot of strings, this method produces a nicer finish.
I’ve actually found that small items often print nicer in batches if you have your retraction set up right. Having a hot print head wiggle around on top of one small spot for a long period of time is tough to cool properly, and having the head lift and wait also has some problems.
I’ve always found printing small items one at a time in PLA was a bit of a mess. You need some extra cooling time, and leaving the hot print head sitting over it never really seemed to let it cool very well.
Sometimes I would resort to printing a “cooling tower” (a small, solid vertical cylinder) next to a part with small features, to give it extra time to cool without the print head hovering over it.
That sounds like you need to set the minimum time per layer to a higher value?
Glad it works for his application. Definitely a lot of limitations…the ones mentioned above plus the fact that you’re not cleaning the bed or noz after each copy. Also not seeing any major benefit over the obvious print-a-bunch-at-one-time-on-the-bed…
Printing many on the bed at one time will result in quality loss and a greater chance for multiple failures. Stringing would be the first quality issue. If you try this you will notice.
And deal with a literal CF of stringing? Even if no stringing, surely printing one at a time yields higher quality?
sorry, meant as a reply to @aaron
This one_at_a_time approach avoids the problem of something going wrong well into the print and losing ALL the pieces
If you going to the trouble of modifying the g-code to knock off the piece why not have the printer add a few inches of extra heights the highest point and push against that with the head.
Given how strongly the prints can stick to the bed, this is really asking for messing the printer up. Don’t be surprised if your machine isn’t square anymore after a few of such “knocks”.
Bed adhesion on a tall skinny parts without brim is minimal, cr-10 is pretty beefy I’m sure it could handle hundreds if not thousands of this type of print as shown in the video without experiencing alignment issues
People were doing serial printing for a long time already:
https://youtu.be/dKje1EDCjbE
The beauty is that they can all be unique prints, though. Today, you can use Cura Connect workflow software to control a cluster of printers and do large amounts of prints.
You didn’t forget about the 1000’s of Ultimaker Robots we printed at the office this way. Good old days :-)
So on this topic, we experimented with it at Ultimaker, and we found:
* It’s hard to get right 100% of the time (out of 6 printers, 2 failed every weekend)
* It requires precise tuning of the GCode and start height
* It only works with specific objects.
* If it goes wrong, the results can be messy after a weekend of printing junk.
Just print a bunch of them at once:
http://mark.rehorst.com/misc/nerdy/IMG_20160802_125110648.jpg
How can you be sure that the head wont collide with already printed pieces ?
Some slicers can do sequential prints by specifying head dimensions, though it won’t work with spacing as tight as op’s pic. That one looks to be printed in parallel.
Not sure why you worry about the head colliding with other pieces? If you put all these into Slic3r and slice as one big platter, they will all get printed one layer at a time. The head is always a little higher than any layer it just has printed out. Unless your extruder extrudes more than it should be, there shouldn’t be a chance of the head getting hit with anything beneath it.
Print a mold, cast from there.
Fix your retraction settings.. and all the unnecessary travel…
I have since I recorded that clip. The long pause was the printer waiting for the bed to heat back up even though it was already hot. I removed the gcode at the end of my prints that was turning it off. Also I couldn’t get the head to move back down the Z-axis to knock off the print without homing it first. I also experimented with the retraction settings but leaving the filament in the nozzle helped the next print stick better. I just snip it off with cuticle clippers.
I don’t understand what sort of mental gymnastics are required to respect the “lightsaber” trademark to such a degree that you capitalize it and then spell it “lightsabre” anyway. It’s not “light saber”, with one spelling in British and a different spelling in American English. It’s “lightsaber”, one word, and “lightsabre” is never appropriate.
If this idea was any older it would be a retrotechtacular!
https://www.youtube.com/watch?v=lra0YW3hG6Q
I think I remember first seeing this here but I could only find the YouTube video