Ever since [Ilan Moyer] published the design, CoreXYs have been exploding in the homebrew 3D Printer community. Nevertheless, not all designs are created equal, and a solid design means adhering to some unspoken constraints. Fear not, though. [Mark Rehorst’s] blog post pulls the lid off these constraints and puts them up-front-and-center. For anyone looking to succeed with their own CoreXY build, this thoughtful critique will keep us away from stray design paths.
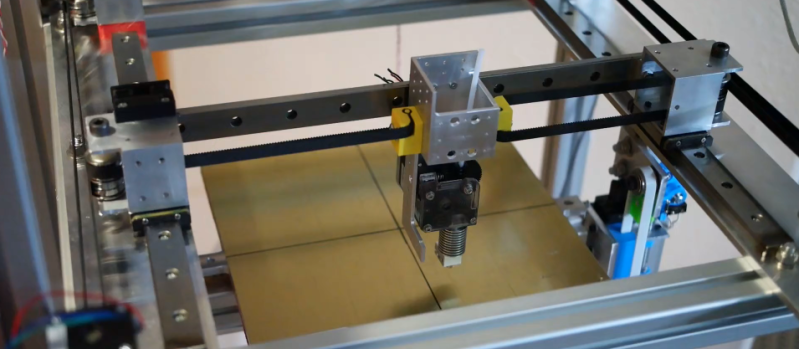
[Mark’s] blogpost centers around the xy-stage of his UMMD printer. Here, he walks through the constraints of where belts should be located to guarantee dimensional accuracy of parts. Engineering doesn’t always result in designing the parts ourselves, but rather picking them from a list of options. This geometry-constraint breakdown gives us a more acute set of eyes the next time we pick a CoreXY frame to download and clone off of a place like Thingiverse.
What’s more, for all the antagonizing forces acting on our xy-stage like thermal expansion and frame flexing, [Mark] comes in with a countermeasure. Belts are thickened. Moving stages are constrained correctly, and pulley blocks are reinforced for a stage that is both precise and accurate. Given that it’s so easy to get another printer to start producing parts, lessons learned here will guide us on what underlying measures they need to counteract for a successful print stage.
It’s hard not to love [Mark Rehorst’s] foray into at-home printer builds. Not only do we see new ideas that constantly reinvent how we design printers, each build comes bundled with a wealth of tips and drawbacks. [Mark] gives us a tested design and a critical set of eyes on it that better helps us explore the space if we so choose. For more thoughtful additions to your next 3D printer, check out [Mark’s] CPAP-style remote cooling fan and belt-driven z axis.


Great job Mark! Put milwaukee on the nap!
Great timing! I was just working on a post that goes into some detail about laying out a corexy mechanism and tensioning the belts. I finished it this morning. You can find it here: https://drmrehorst.blogspot.com/2018/08/corexy-mechanism-layout-and-belt.html
Some fantastic design choices and write-ups with data and reasoning behind them!
That is a lot of the hard work to make better quality 3D printers, especially larger ones.
Thank You.
What excellenr timing indeed! I just started designing my own corexy based on some openbuilds designs and d-bot and hyperbot. I want to use 2020 to 2080 series extrusions and plates machined using my cnc router. I already thought of securing the stscked idler pulleys at both ends and use all non 3d printed mounts but machined aluminium. I’m going to try 6mm belts but use gt3 for xy axes like the ones on the cnc, they are very rigid and reinforced. But it has a pitch of 3mm so resolution may suffer.
I’m also going to use nema23 high torque stepper motors i got with the cnc kit, where i replaced them with even beefier ones and use 24V on the drivers. Hopefully that should give a good balance between speed, torque and power dissipation. I’ll also use v slot wheels for all axes just like the openbuilds ox cnc.
The z axis will use a tr8x8 leadscrew on each side and use a closed loop timing belt with a single stepper motor (nema17 for now). I’ll use the delrin nut block used by the ox design, but with the anti backlash version and proper fixed mounts for the leadscrew.
The belt tensioning system I came up with is sliding the motor assembly along the 2040 extrusion. If I can’t do it by hand I will add an angle bracket and use a screw.
Anothet design twist I came up with is placing the pulleys under the extrusion instead of on top. It looks cleaner and no dust or debris can fall into it and keeps most parts within tge cube space.
But I hadn’t thought of using 25mm idlers, or putting the belts parallel to the guide rails, though I did it purely for aesthetic reasons but it makes sense. Great tips!!
I’m still on the fence about placing the motors outside the build chamber. They will run cooler but it isn’t self contained that way. I’ll use nema23s and drive them slightly under the maximum power so they’ll run cooler anyway. Also, tge newer drivers have automatic power down features so they run even cooler. Cnc machines don’t often need very high holding torque.
Belts parallel to guide rails in corexy is not just more visually satisfying, it is an absolute necessity if you want to make accurate prints everywhere on the print bed. There are a lot of bad designs out there…
My printer’s XY motors only rise about 10C above ambient, so even if you run the enclosure at 45-50C when printing ABS, putting the motors inside the enclosure should be OK, especially if they are on aluminum mounts. NEMA-23 motors really aren’t needed for XY, and will probably be noisy compared to NEMA-17 motors.
I think GT3 will be OK for resolution, but if it takes a lot of force to bend the belts around the pulleys it may not be so good for corexy. I was going to try steel core GT2 and decided against it about 1/2 way through putting one of the belts on the XY stage. It took too much force to bend the belt so tensioning would be a problem, and I’d be afraid the steel cores would break after a relatively short period.
I thought about putting the belts under the XY stage, but decided that if I make mods to the extruder carriage (which happens every couple weeks) it would be a PITA to get at the pulleys and belts. My printer is a little too big to just turn over when I need to work on it. I haven’t had any problems with debris getting into the pulleys/belts.
I don’t know how heavy your bed assembly is going to be, but you might want to use a NEMA-23 for the Z axis. I think a NEMA-17 may be a little weak unless you gear it down sufficiently. You can get about 4:1 maximum using off the shelf pulleys. Antibacklash nuts aren’t necessary in the Z axis as gravity will keep standard nuts in contact with the screw threads at all times.
Use a 32 bit controller – either a SmoothieBoard or Duet so you don’t have to recompile firmware for every configuration change- you’re going to be making a lot of changes. The SmoothieBoard is a little easier to get up and running, and all configuration is in a single text file. The Duet takes a little more effort, but the machine will run quieter and it has a really nice touch screen interface available, and a great web control interface via network connection, either wired or wireless.