It’s hardly news that mechanical keyboard users love their keyboards. When it comes to custom keyboards, though, [Cameron Sun] has taken things to the next level, by designing his own keyboard and then having the case custom milled from aluminum. If a Macbook and an ErgoDox had a baby, it would look like this!
[Cameron] had been using a 60 percent keyboard (a keyboard with around 60% of the keys of a standard keyboard) but missed the dedicated arrow keys, as well as home/end and pgup/pgdown keys. Thus began the quest for the ultimate keyboard! Or, at least, the ultimate keyboard for [Cameron.]
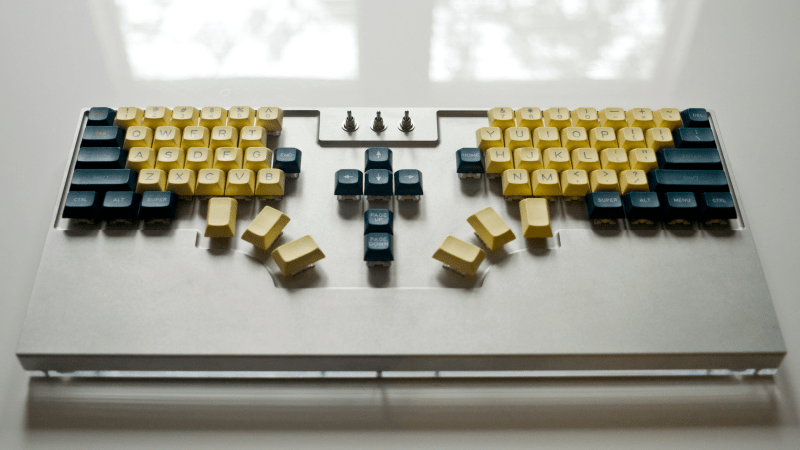
Keyboards begin and end with a layout, so [Cameron] started with keyboard-layout-editor.com, a site where you can create your own keyboard layout with the number of keys you’d like. The layout was a bit challenging for [Cameron] using the online tool, so the editing was moved into Adobe Illustrator. Once the layout was designed, it was time to move on to the case. Wood was considered, but ultimately, aluminum was decided upon and the basic shape was milled and then the key holes were cut using a water jet.
An interesting addition to the keyboard were three toggle switches. These allow [Cameron] to choose a modified layout for use when gaming, and also to move some of the keys’ locations so that one side of the keyboard can be used for gaming.
Custom keyboard layouts are getting more and more popular and there are lots of DIY cases to hold those layouts. [Cameron] has upped the ante when it comes to cases, though. If you’re interested in building your own keyboard, we have you covered with articles like The A to Z of Building Your Own Keyboard. If you’re looking for more custom cases, perhaps a concrete one is what you want?
Via Reddit.


and it has happened again. Please look at the 3 switched in the top-center of the keyboard.
Why… why… do lot’s and lot’s of people always seem to fail to mount/adjust their switches to the correct heigth.
Now the ugly thread of the switch is sticking out like a sore thumb. Do these people never wonder why there are always 2 nuts included with the tumbler. Please use both! The second one isn’t a spare. Even the cheap chinese clonse have 2 nuts included in the package! And if they don’t send them back!
The second nut is there to allow you to mount the switch on a large range of frontpanel material thicknesses, so that the switch looks nice on every frontpanel… it does not need to stick out!
Now just because of the switches the whole build looks like it’s been modified by an amateur (who doesn’t care). While it is very clear that lot’s of effort went into this build, that’s a pity. Fortunately it can be fixed… if the “spare” nuts haven’t been thrown in the bin… yet…
Here an example why you would nee to do this, imagine how it would look if you only used one nut…
https://cdn-shop.adafruit.com/970×728/3306-02.jpg
unfortunately there is no toothed or spring-like ring used, so eventually, this will loosen itself… but at least the nuts were used like they should be and it looks a whole lot better.
PS: next time we will be discussing the large washer with the silly spike on it. And why you should use at at the inside of the frontpanel and not on the outside. That this is intended to prevent the switch from rotating (and working itself loose or creating an ugly or confusing frontpanel).
Things like this keep me wondering… if it is so hard to properly mount a simple switch… then there must be other things that are wrong (but just aren’t as visible). Interesting…
Have you considered proofreading your comments so you don’t sound like jerk? I realize we are all passionate about seemingly small things (relative to others) but jeez try to have some humility. I’d literally never show you something I made ever again after a response like that.
Not all of us are sensitive snowflakes, Jan gives good suggestions as you would get in any engineering environment.
Constant, unjustified tapping on shoulder softens the tissue.
Yes, people who love mechanical keyboards can be… passionate. And perfectionists.
Jan’s feedback is actually quite mild, and mentions points the first-time builder may be unaware of.
Going straight to milled aluminum, rather than asking for feedback on a prototype, means there’s no opportunity to fix minor design flaws. I would welcome Jan’s input on any product I made – but I’d get the feedback at the prototype stage.
Write an article or two on things like this! I never knew there were two nuts to adjust the height. What other “everyone knows that” things are there that everyone does NOT know? How about how to figure out what Phillips screwdriver actually fits that random screw? Do some basic articles, just label the. As such so the experts don ot get annoyed.
The “large washer with a silly spike” is also used with [rotary] potentiometers.
By preventing slippage, you can rotate a knob to a given position, and get the same results every time.
Being able to give critique and accept it is the best thing I got out of Purdue and it was in art class not in tech. However high the mini switches may protrude, they are up level in the plane of action not buried below the key tops.
Right is not always right.
I had a note about the voltage and number of a light bulb used in a grandfather clock. Someone else went out to the customers house to try and find out what type of bulb it used. He noted that the power supply wall wort said 6volts. Later I found my note with 12volts crossed out and 6volts written next to the number for the bulb. This would have even confused the great Google. The 12v bulb is run low at 6v for long life and a warm glow with all the brass.
you do have a good point there. Right isn’t always perfect.